Showers
Design
Requirements for the design, manufacture and installation of embellishments
Good design
See the following corporate documents to identify relevant project design requirements:
Sunshine Coast Planning Scheme regulates the way land, buildings and structures are used and developed on the Sunshine Coast.

Sunshine Coast Design contains 10 design principles that guide good project planning and design outcomes, that are appropriate for the Sunshine Coast.
The LIM provides further overarching design advice, refer:
- Introduction and Design Principles - e.g. sustainability, CPTED, accessibility
- Preliminaries - environmental management, tree sensitive design and site set up.
Embellishment requirements
- Universal access.
- Comfortable and suitable for the average person.
- See 'Positioning' and 'Equal access' sections for the corresponding LIM category.
- Made from materials that will be durable and can be suitably protected from exterior elements, such as salt spray and UV exposure.
- Robust and sturdy to withstand constant public use and be resistant to vandalism.
- Fixings are to be 316 marine grade stainless steel (unless otherwise stated).
- Tamper proof fixings should be used
- Graffiti protection coatings applied (where applicable)
- Fire retardant (where applicable).
- Warranties should be as listed below.
- Easily repairable or replaceable.
- Sourced locally and use standard fittings.
- Reputable suppliers should be used who keep a supply of stock parts on hand for the life of the product.
- Use sustainable materials, although sustainability needs to be considered over the lifetime of the embellishment.
- Install on paved, concrete or other hard surfaces (where applicable).
- Manufactured to engineering specifications (where applicable).
- See the 'Standards' section for the corresponding LIM category.
Warranty and asset life
Product/embellishment | Warranty (minimum) | Asset life (typical useful life) |
Showers and foot shower | 1 year | 15 years 2 |
Aluminium - shower floor/base | 10 years | 15 years 2 |
Fibre reinforced plastic (FRP) - shower floor/base | 10 years | 40 years 2 |
Concrete - shower floor/base | 10 years | 40 years 2 |
Timber - shower floor/base | 15-25 years | 15 years 2 |
Source 2: Sunshine Coast Council Asset Management Plan 2017/18-2022/23 – Parks and Gardens (figure based on current data, subject to change).
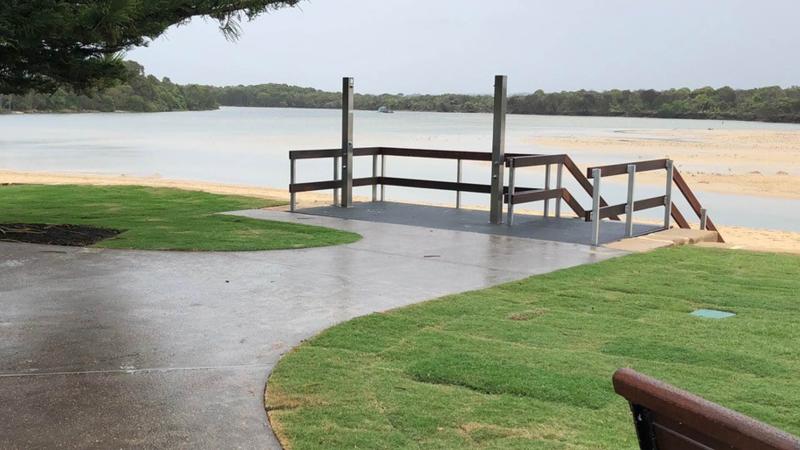
Showers
Once the location of the outdoor shower has been decided, based on the Environment and Liveability Strategy (ELS) and Recreation Parks Plan (RPP) guidance, consider the appropriate embellishment level to suit the selected site.

Overarching design considerations:
- All open spaces should include universal access (e.g. ensure the shower has universal access by selecting a product with activation controls (tapware) at the correct height and force to activate, and by designing sufficient wheelchair manoeuvre space to and around the shower).
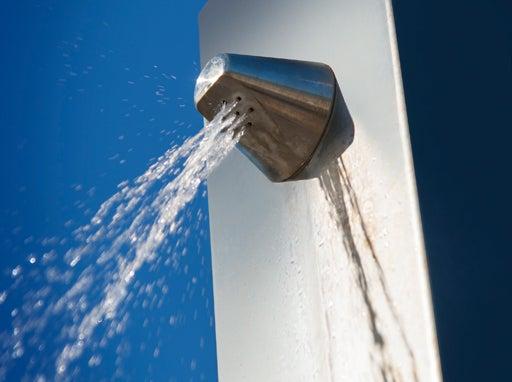
- Required design features include a 316 marine grade stainless steel bolt down body and water saving measures.
- Shower base material must be designed to promote removal of sand build up, and to provide self draining, non-slip surfaces.
Design of shower units
All fittings and pipes must have WaterMark certification – a mandatory certification scheme for plumbing and drainage products to ensure products are fit for purpose.
The shower outlet device (showerhead/rose/hand shower) that discharges water, require (Water Efficiency Labelling and Standards (WELS) scheme) registration or WELS labelling, provided they meet specific conditions. Associated components such as mixers, pipeworks, mounting structures and supports are not defined as WELS products under the determination.
Public space outdoor showers enable everyone to rinse off after activities and swimming at foreshores and water courses.
- Showers must have vandal resistant fixings.
- Each shower head should have a flow restrictor installed (Water Efficiency Labelling and Standards (WELS) scheme).
- Double showers should include towel rails and foot showers.
- Access panels must be incorporated into the shower unit. This enables quick and simple access to replace and maintain internal parts.
- A maintenance tap must be provided as part of the shower unit (at the rear), or install within close proximity to the shower for easy access for cleaners.
- Provision is to be made for the installation of smart technologies e.g.water use sensor (100 mm x 100 mm x 100 mm) and internal plumbing to the inside of the shower unit. Recommended 135 mm x 135 mm or greater post size. This counter is designed to collect data and will aid in the asset management, maintenance and servicing of the shower.
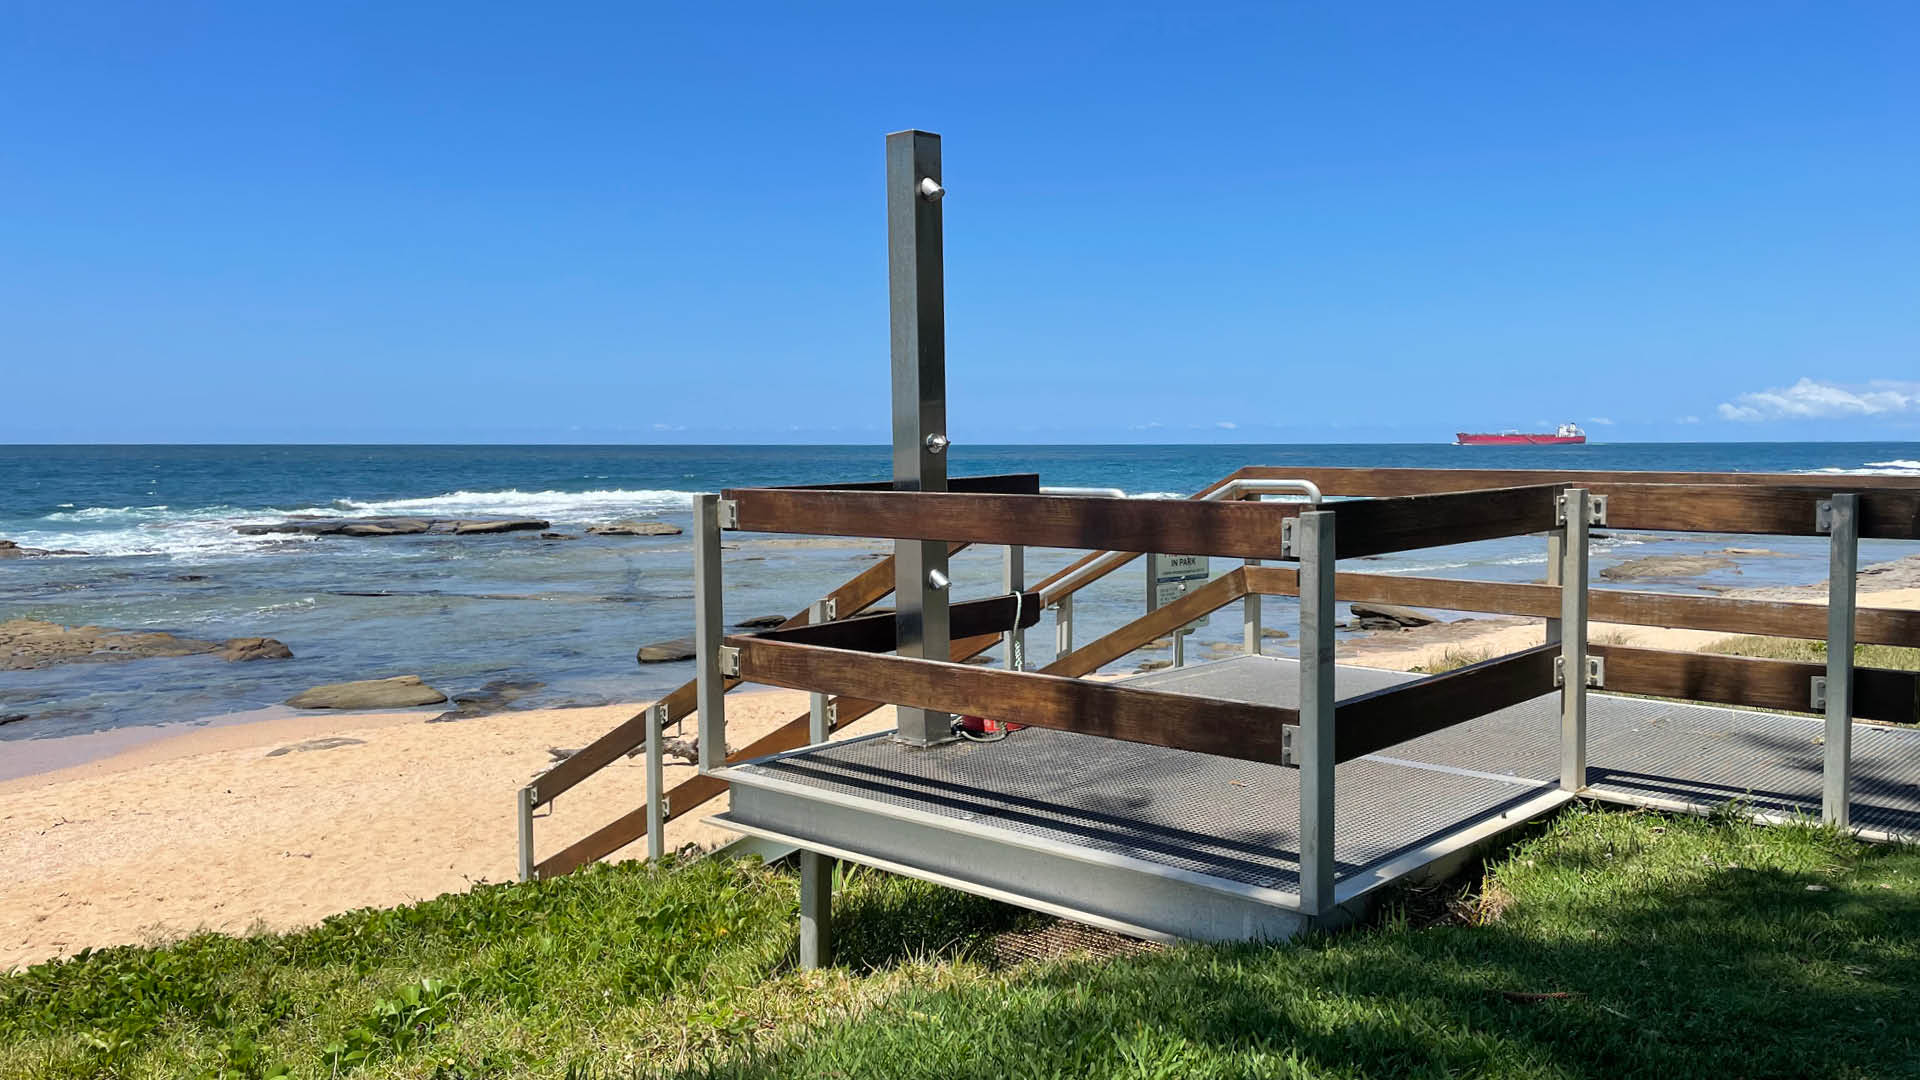
See Figure 1: Typical outdoor shower.
Figure 1: Typical outdoor shower
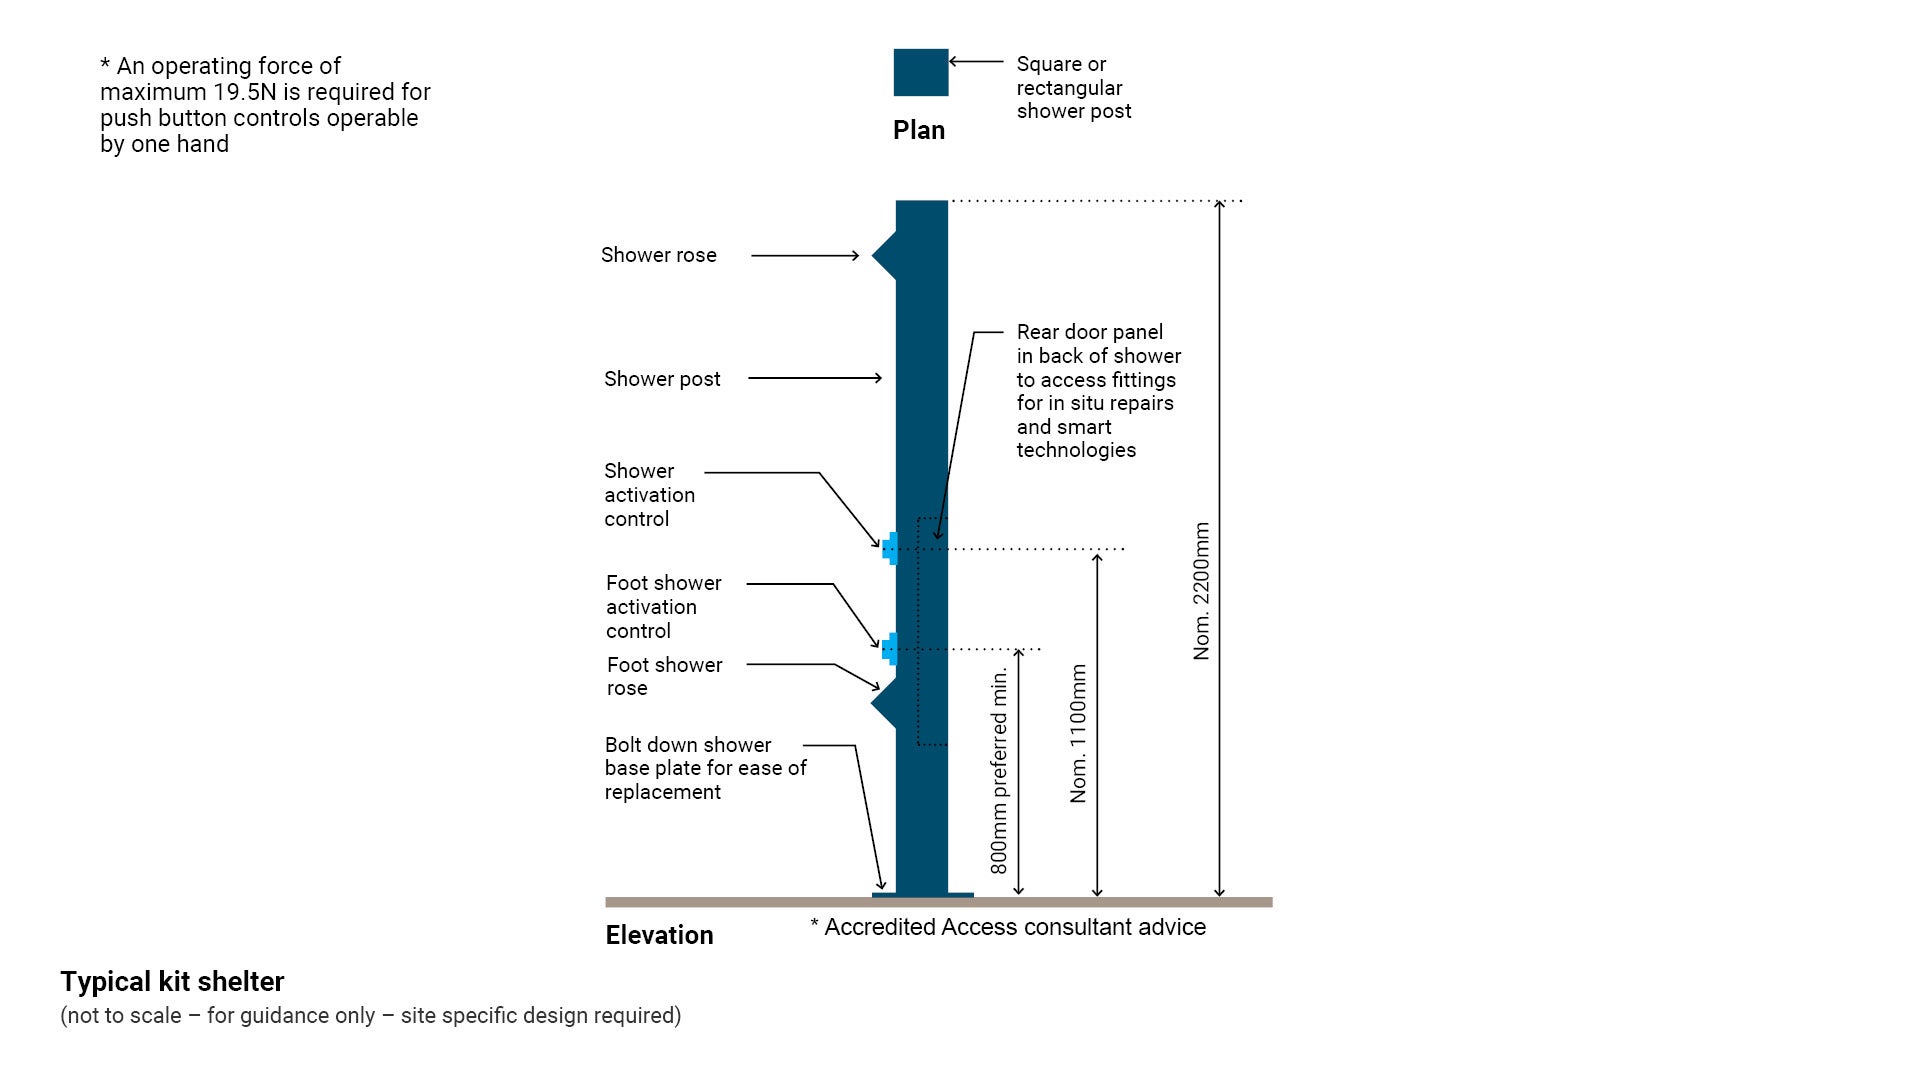
Activation control (tapware)
- Shower activation controls (tapware) must have a watermark approval certificate that it meets Australian Standards and will not contaminate water supply.
- There are two activation control (tapware) options:
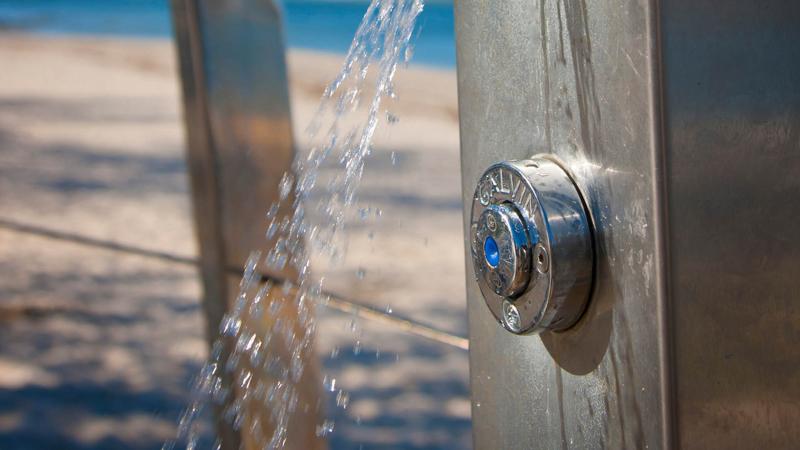
- Timed flow – push button that provides timed length of flow options.
- Selecting the shortest time is preferred to minimise any confusion by the user that the tap will turn off.
- To be installed at low use locations.
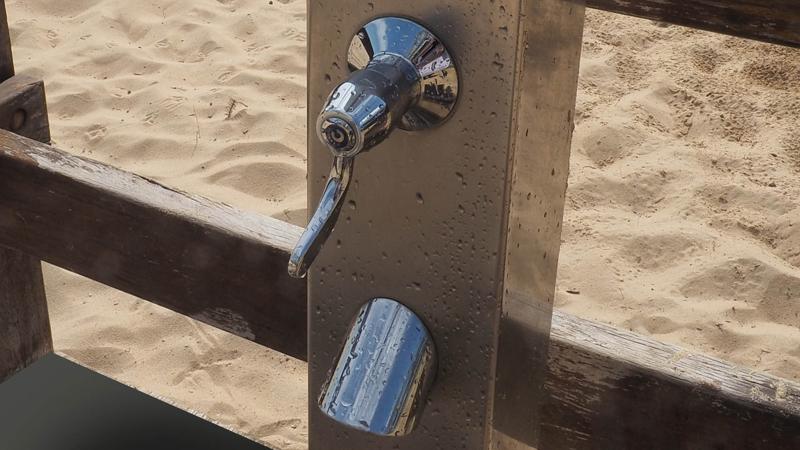
- Ceramic disc – the quarter turn lever does NOT have timed length of flow options.
- To be installed at high use locations.
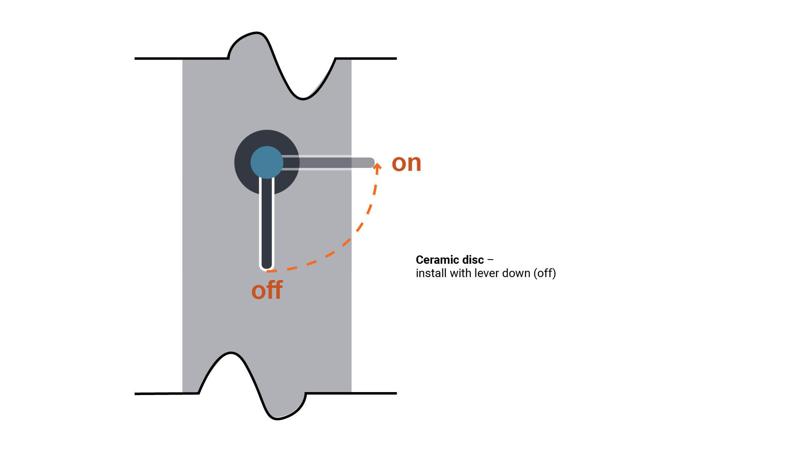
- Ensure correct installation – lever is to be installed facing down. When lever faces down (towards the ground) it is in the off position. To turn on, the user turns the lever to the right.
Materials, fixings and finishes
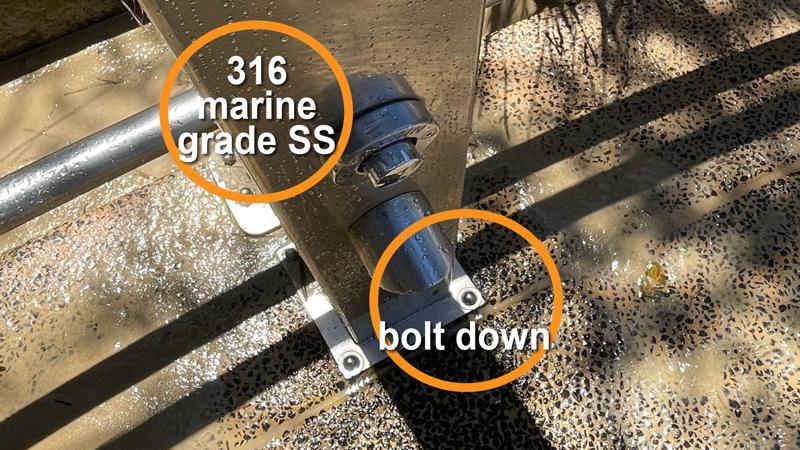
- Bolt down showers onto a fibre reinforced plastic material (preferred), concrete slab, aluminium deck, or timber deck (not preferred), for ease of replacement.
- Showers must be constructed of 316 marine grade stainless steel (e.g. satin No. 4).
- Powder-coating, 2 pack epoxy or painted surfaces are NOT accepted due to the paint chipping, requiring ongoing maintenance.
- Fixings are to be 316 marine grade stainless steel.
- Minimal welded joins to reduce corrosion and discourage vandalism.
- Shower base material should be graded to prevent water ponding, should be compliant for slip resistance for wet surfaces and should discourage the build-up of algae.
Maintenance
- A suitable waste water solution should be incorporated into the base design to prevent sand build up and the work health and safety risk associated with manual sand clean out.
Council plumbing and underground services
This section outlines the key regulatory and technical requirements for the installation of showers in open spaces.
Discharging into civil stormwater (e.g. roadways) is NOT acceptable (see Environmental Protection Act and Local Government Act).
General requirements
- Showers must be installed as per the Plumbing and Drainage Act 2018 by a licensed plumber.
- Plumbing works may require a Council plumbing compliance application and permit or notifiable works as per Plumbing and Drainage Regulation 2019. Contact Council (Building and Plumbing) team.
- If there is no water supply available, an application must be made to Unitywater for a new water meter to supply the park/reserve (this may not apply in all situations).
- Products must hold current WaterMark certification to indicate the product has been tested and has passed requirements regarding its suitability for supplying water for human consumption
- Products must be marked with the WaterMark logo and License Number.
- Plumbing connections and components are to be fully enclosed in the shower body. Provide maintenance access panel for in-situ repairs.
- Showers must be installed by a licensed plumber (drainers licence is not sufficient).
Water supply
All showers are required to link to mains water supply with:
- an appropriate dual check valve (back flow prevention device).
- an isolation valve (for emergency shut off) on the supply line of each embellishment. Installed in an easily accessible location within 1.0 m of the shower, not inside the shower.
- a pressure limiting valve.
Discharging water
Discharging into civil stormwater (eg. roadways) is NOT acceptable (see Environmental Protection Act and Local Government Act).
Prior to construction: consultation with Council (Environmental Operations) must occur (during the design phase) to:
- Suitability of site – accessing impact the infrastructure (and services) will have on the vegetation and surrounding area.
- Minimise scouring to the surrounding dunal area.
If successful discharge is in doubt, do not install, or alternatively relocate the site for the planned shower – if discharging of shower water is foreseen not to be functional, then the decision to not install or to relocate the site for the shower must be considered. If the above is not reviewed, the shower will result in ongoing high cost maintenance and possible damage to the surrounding environment.
The waste water discharge methods illustrated are examples only and must be determined by calculated usage and site/soil conditions.
Pits
- Council (Parks and Gardens) prefer pits to be:
- a concrete pit or
- a PVC pit where the pit will not to be driven over by maintenance vehicle.
- Polycrete (polymer) pits are not preferred, but if they are installed, they must be installed with galvanised lids and a concrete collar (to protect the pit).
- Where the use of metallic lids is required, lids are to be coated in a heat resistant, pedestrian grade anti-slip coating.
Drainage grates
- If drainage grates are used, heel guard grates are to comply with AS 3996 – Access covers and grates.
- Grate should be sectional, so that they can be easily lifted and maintained. Avoid sectional cross brace as it restricts use of a shovel. Lifter must be provided for maintenance.
- Drainage grate hinges are not recommended, as they can trap sand and seize.
- The grate should finish flush with the finished surface level.
See LIM Landscape drainage for further guidance.
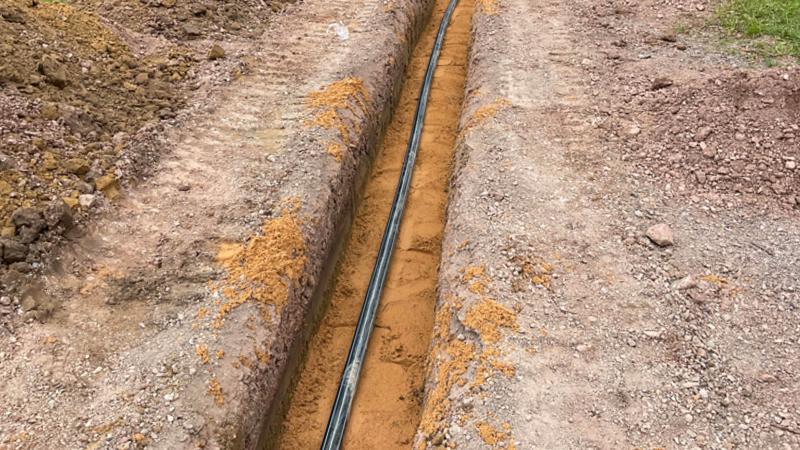
Outlet pipes
- To determine minimum grade requirements for pipe laying, see QUDM and AS/NZS 3500.1:2003 – Plumbing and drainage – Water services.
- The outlet pipe must be raised a minimum of 200 mm from the base of any drainage pit so that sand build up does not block the discharge point.
- The outlet pipe is recommended to be a minimum 150 mm diameter (ease of maintenance and less sand built up occurs) and have a minimum pipe bend of between 90 degrees and 135 degrees (horizontal) with a self-cleansing fall to prevent sand settling (however, a straight pipe is preferred). If the bend is less than the advised angle, the pipe will most likely be blocked with sand resulting in a non-functioning drainage system.
- A level site installation of a shower may require a larger diameter pipe to prevent sand/silt blockage.
- A sloping site installation of a shower may require a smaller diameter pipe due to the grade of application and increased natural water velocity.
Methods of discharging water
The following methods of discharging waste water should be used in the listed order below:
- Natural dunal discharge – (preferred solution) sand and water naturally fall through a raised deck onto the sand dunes below. (Site and soil evaluations may be required)
- Soakage trench – if the above is not feasible, then discharging waste water into a suitably designed soakage trench is the next preferred option. Site evaluations and soil tests will be required.
- Open space discharge – shower drainage may be discharged into the site’s open space (park) stormwater network as long as it is not connected to civil stormwater
- Shower waste water should NOT be discharged into garden beds, as the addition of high volumes of salt and sand can change the soil composition and affect plants.
- Piped to dunal areas – alternatively drainage may be piped to the adjoining dunal system.
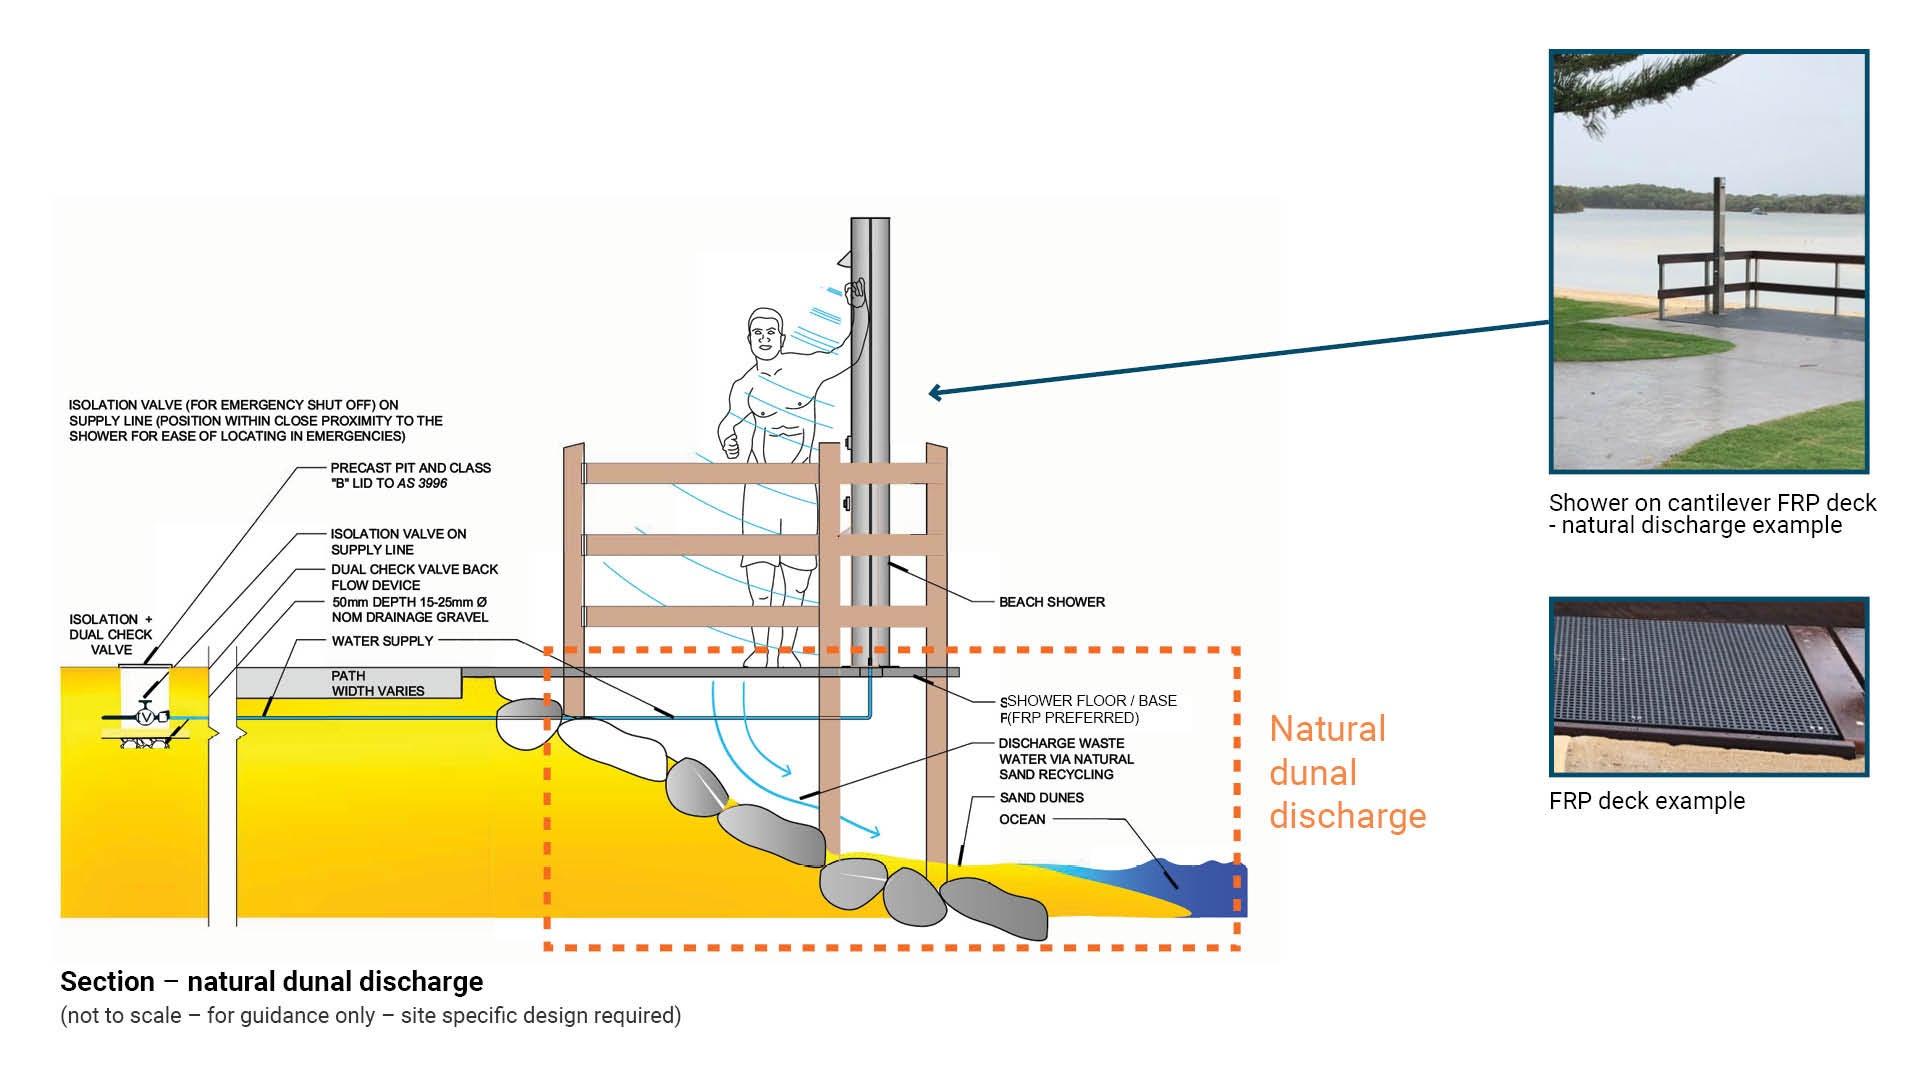
The process of discharging waster water via natural sand recycling is the preferred solution for showers. The waste water flows back onto the beach/dunal system removing the need for pipes and minimising maintenance. The discharged water may be minimal in some cases, however provision for scour protection to the below and surrounding dunal area must be included. The sand below the shower deck will act as a natural filter.
The following key considerations should be addressed:
- Shower material and deck material should be appropriate for the site.
- Suitable gaps must be provided to allow water and sand to fall through to sand dunal area below.
- Site positioning is important for the success of the process. See positioning guidance.
See the following for further guidance:
- Figure 3: Section – natural dunal discharge
- Table 1: Shower decks/slab material types
- Table 2: Raised deck or concrete slab shower base.
Figure 3: Section – natural dunal discharge
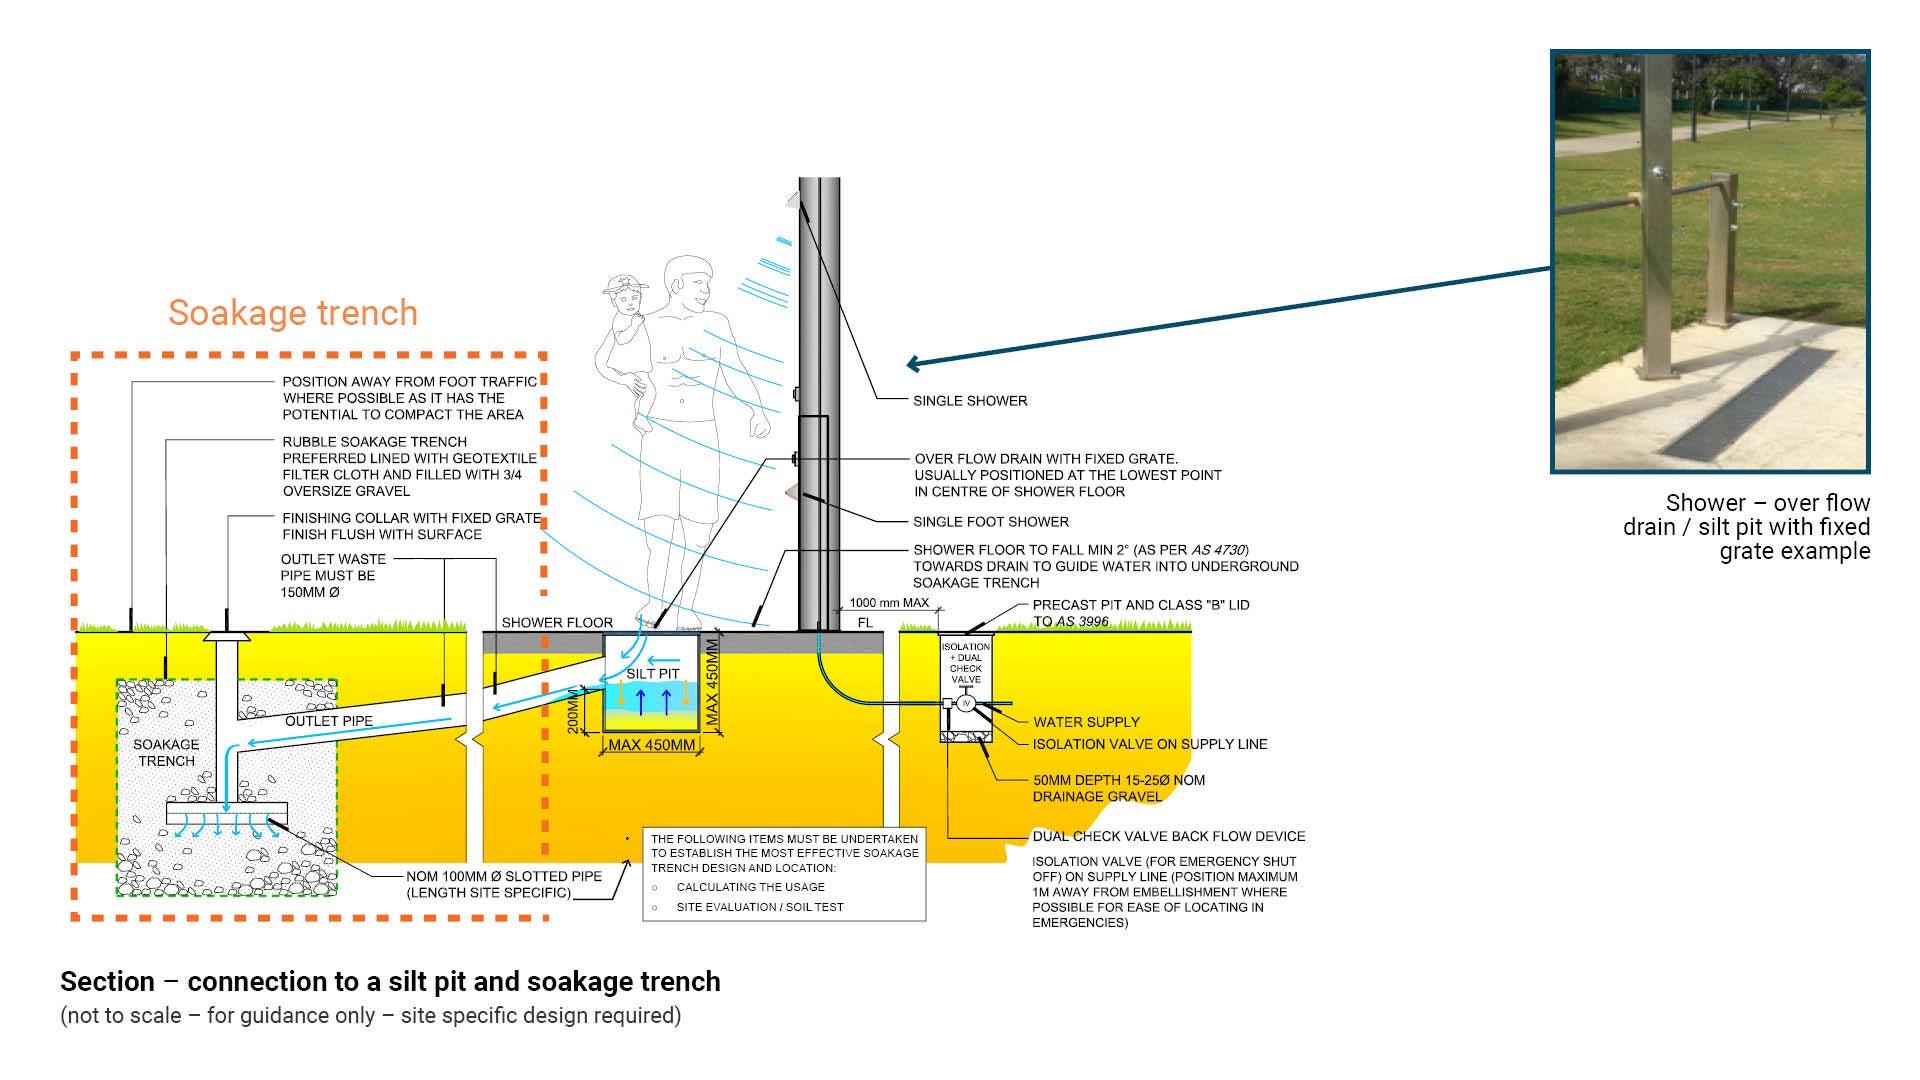
If a natural form of water discharge is not possible (back onto beach or sand dunal area), the next preferred solution is to install a soakage trench. This trench must be accompanied with a silt pit positioned under the shower floor, as per Figure 2.
The silt pit is designed to trap the majority of sand in the base, while the water flows into the minimum 150 mm diameter pipe and into the rubble soakage trench. The following key considerations should be addressed:
Silt pit
- The silt pit grate should finish flush with the surface level.
- Maximum 450 mm deep x 450 mm wide, so cleaning with a shovel, can occur efficiently and safely. Length to be determined by shower floor area, but must be rectangular (as per inset photo example) for access for a shovel for maintenance.
Outlet pipe
- The outlet pipe from the silt pit must be a minimum 150 mm from the bottom of pit, so sand can settle at the base and not be drawn into the pipe.
- The smaller the length of outlet waste pipe between the silt pit and soakage trench, the more efficient the performance of the pipe.
Soakage trench
- The following items must be undertaken to establish the most effective soakage trench design and location:
- calculating the usage
- site evaluation/soil test
- see Positioning guidance for best practice soakage trench locations.
- Optimal size – site specific particularly where ground levels are flat or site has minimal slope.
There are many factors that ensure a soakage trench proves successful, see Positioning section for further guidance.
See the following for further guidance:
- Figure 4: Section – connection to a silt pit and soakage trench
- Table 1: Shower decks/slab material types
- Table 2: Raised deck or concrete slab shower base.
Figure 4: Section – connection to a silt pit and soakage trench
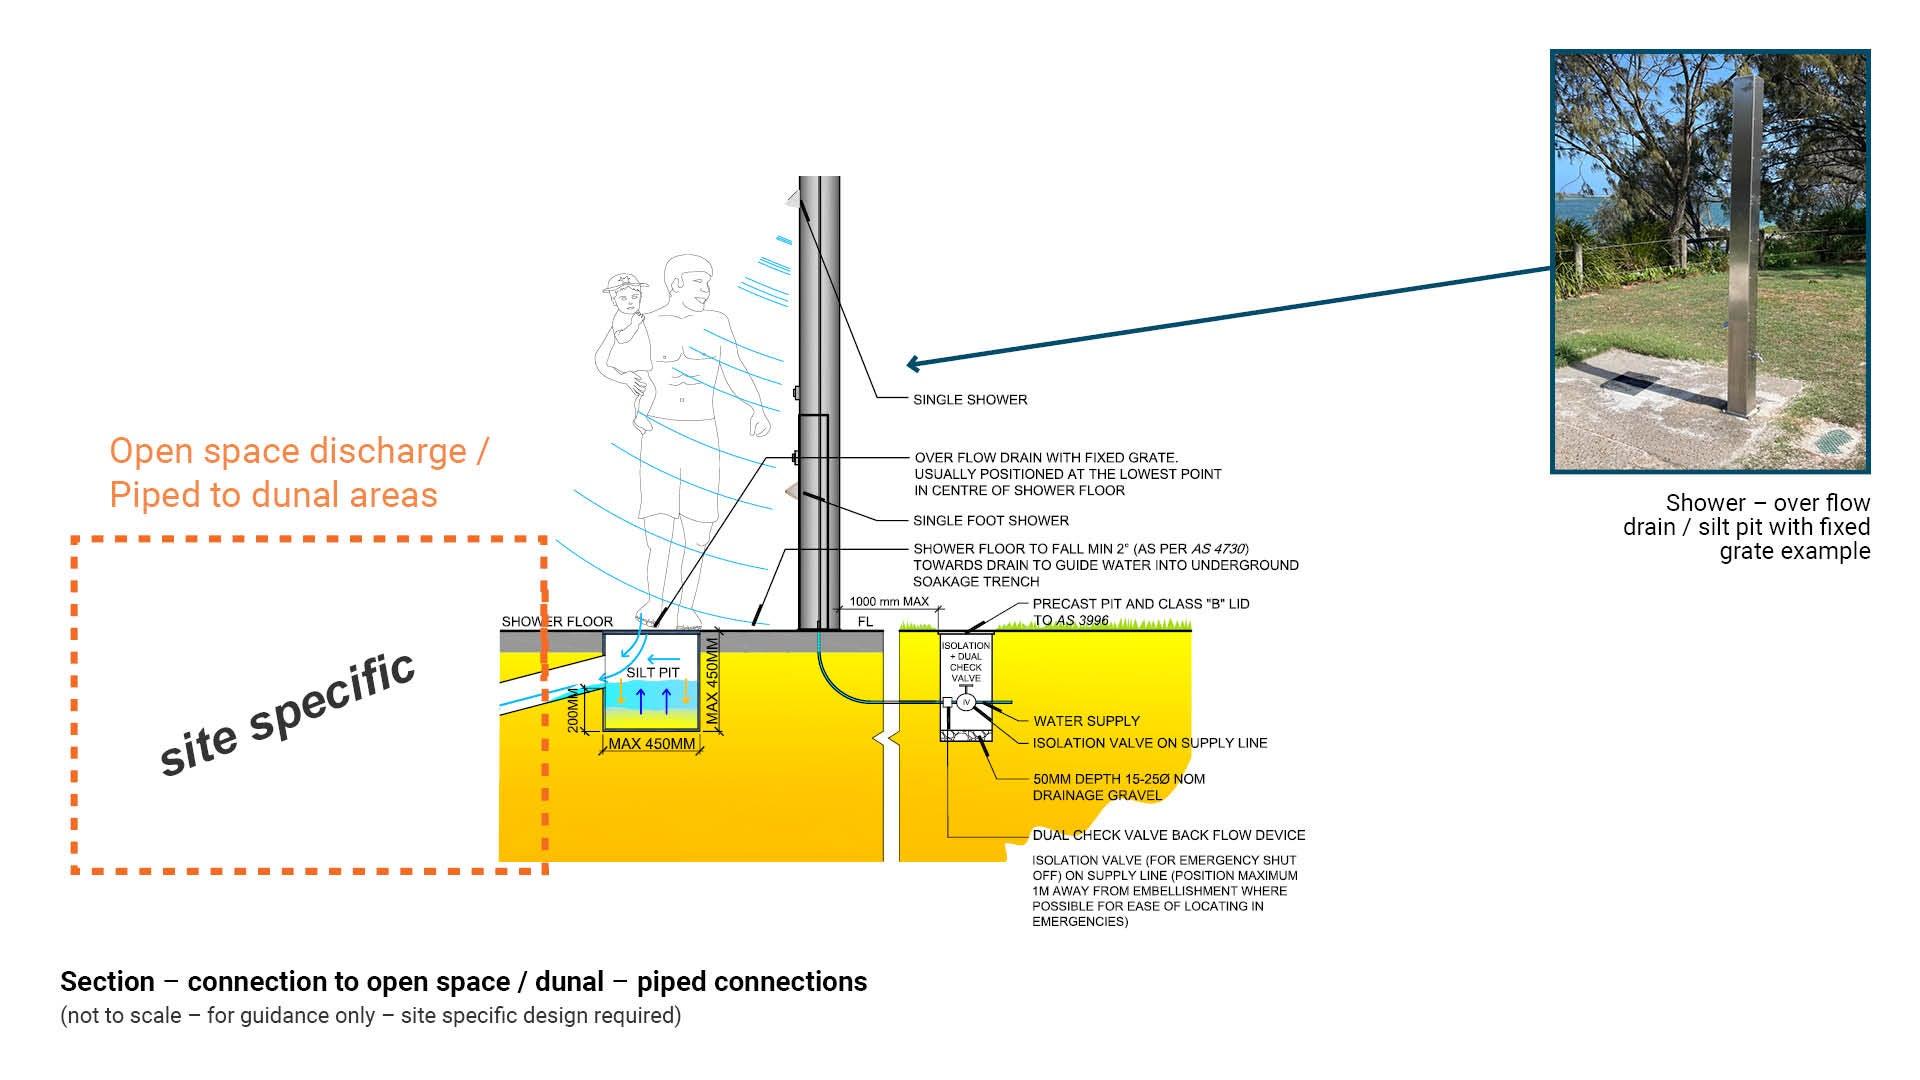
3. Open space discharge / 4. Piped to dunal areas
If methods 1 and 2 are not suitable; as per Figure 3.
The silt pit is designed to trap the majority of sand in the base, while the water flows into the 150 mm diameter pipe and into the rubble soakage trench. The following key considerations should be addressed:
Silt pit
- The silt pit grate should finish flush with the surface level.
- Maximum 450 mm deep x 450 mm wide, so cleaning with a shovel, can occur efficiently and safely. Length to be determined by shower floor area, but must be rectangular (as per inset photo example) for access for a shovel for maintenance.
Outlet pipe
- The outlet pipe from the silt pit must be a minimum 150 mm from the bottom of pit, so sand can settle at the base and not be drawn into the pipe.
- The smaller the length of outlet waste pipe between the silt pit and soakage trench, the more efficient the performance of the pipe.
Open space/dunal piped connection
See the following for further guidance:
- Figure 5: Section – connecting to open space/dunal – piped connection.
- Table 1: Shower decks/slab material types
- Table 2: Raised deck or concrete slab shower base.
Figure 5: Section – connection to open space/dunal – piped connection
Shower decks/slab material types
Table 1 outlines a sample of deck/slab types and key considerations that should help inform the decision making process with respect to materials.
Table 1: Shower decks/slab material types
Shower base (deck/slab) | Key considerations/recommendations |
Aluminium deck (NOT preferred)  | NOT preferred
|
Fibre reinforced plastic 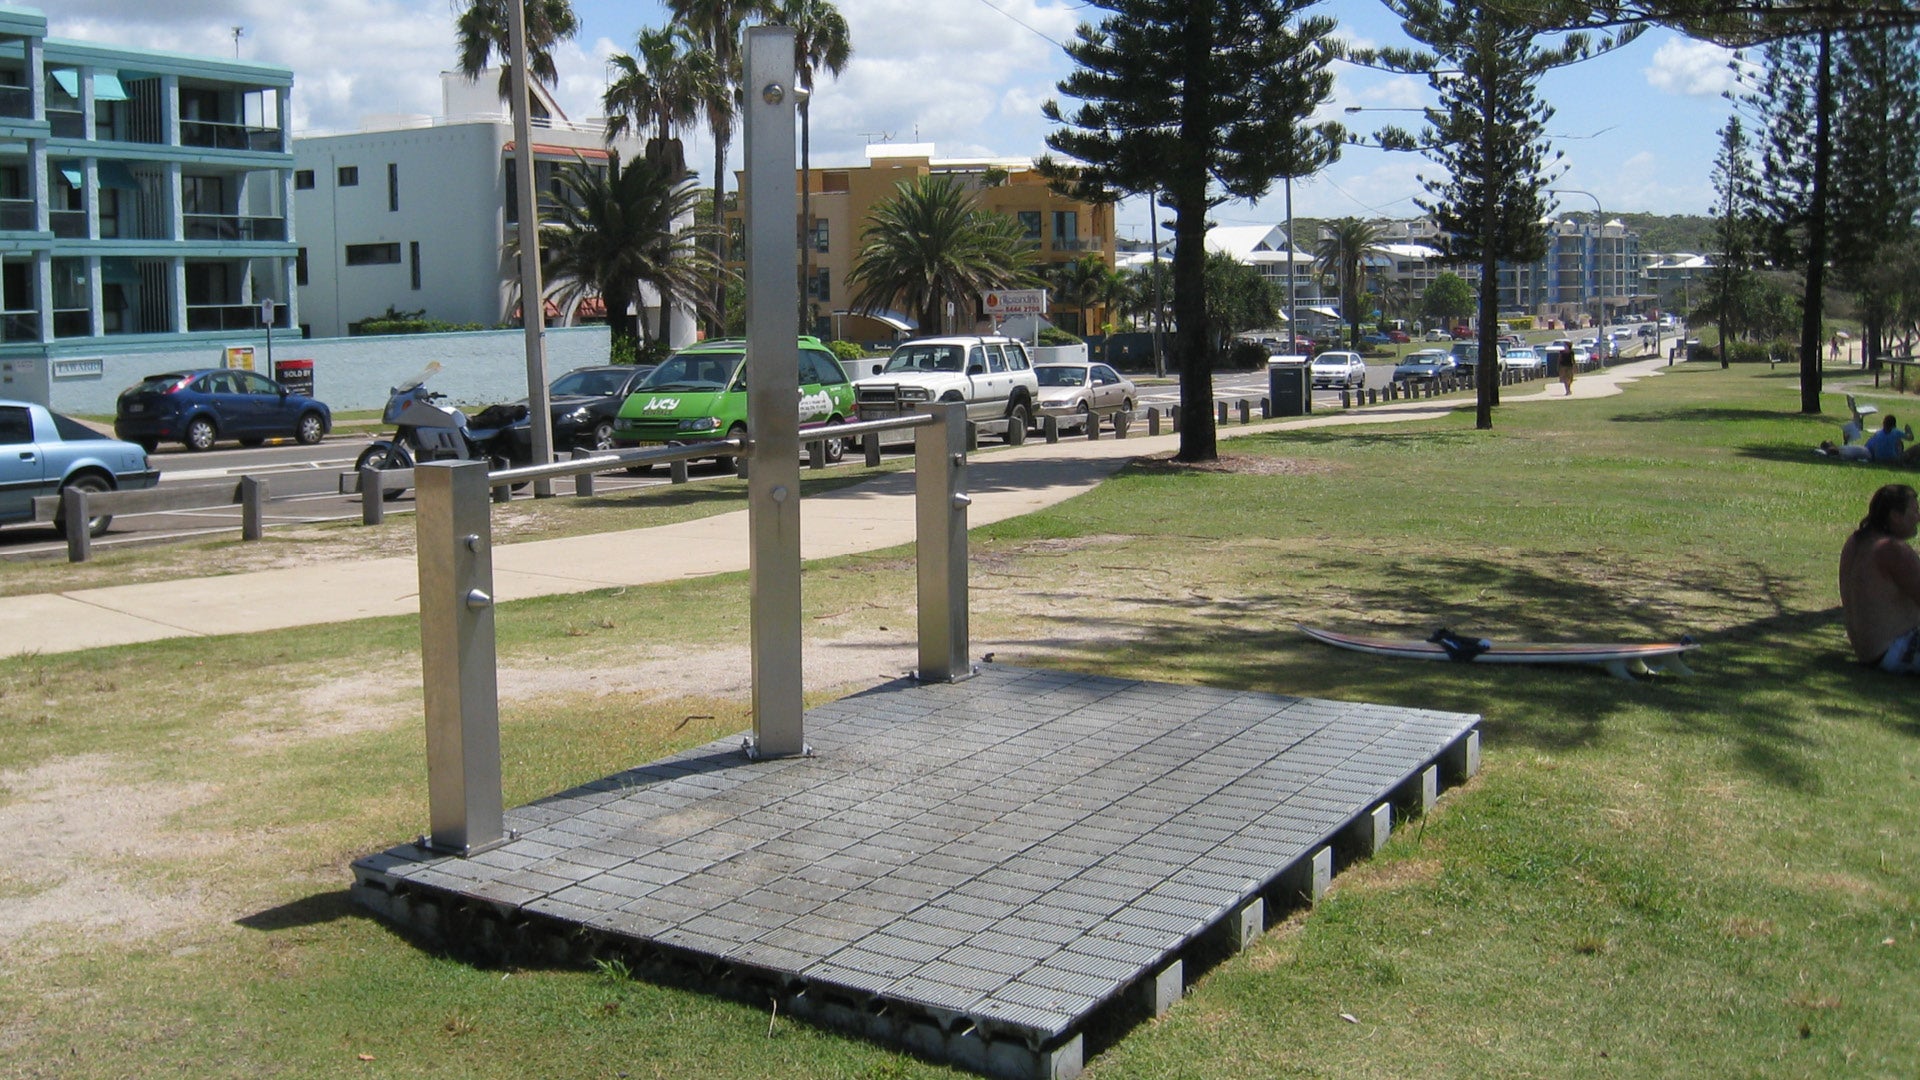 |
|
Concrete slab 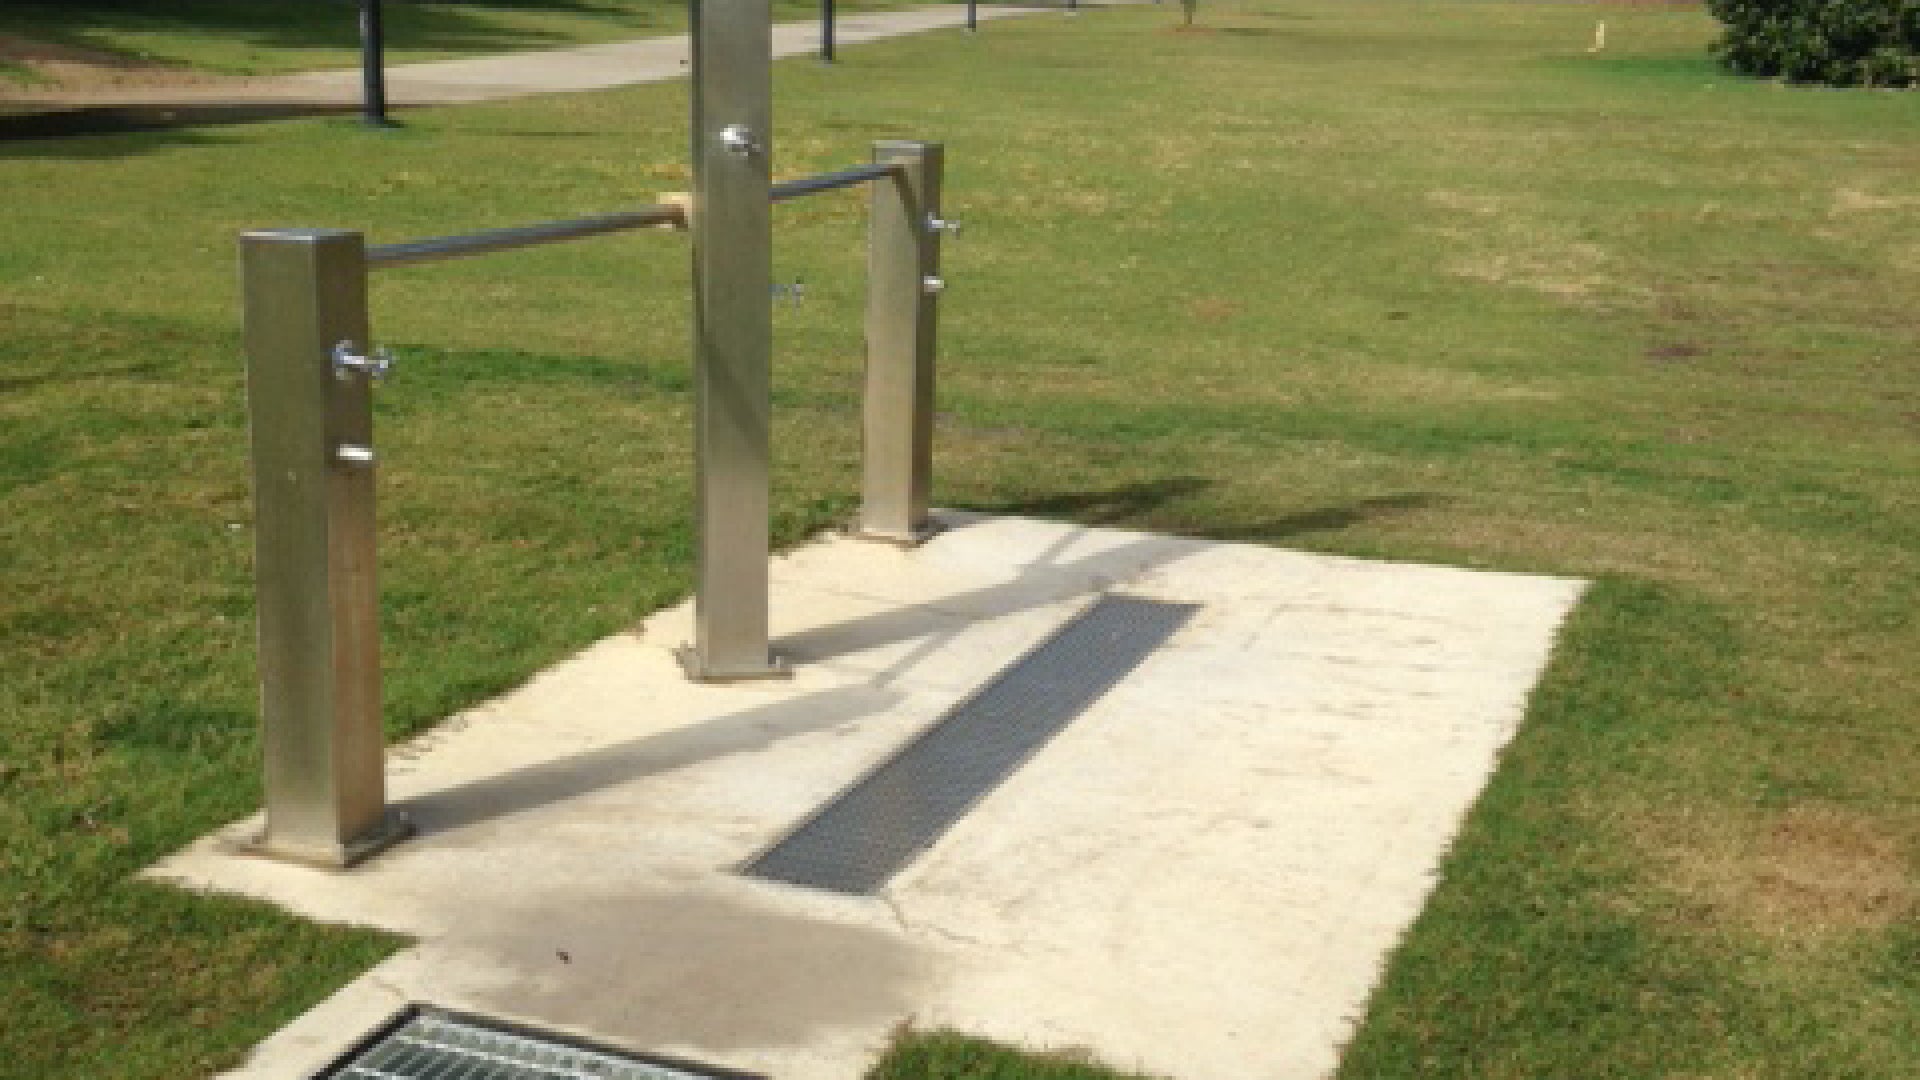 |
|
Timber deck (NOT suitable) 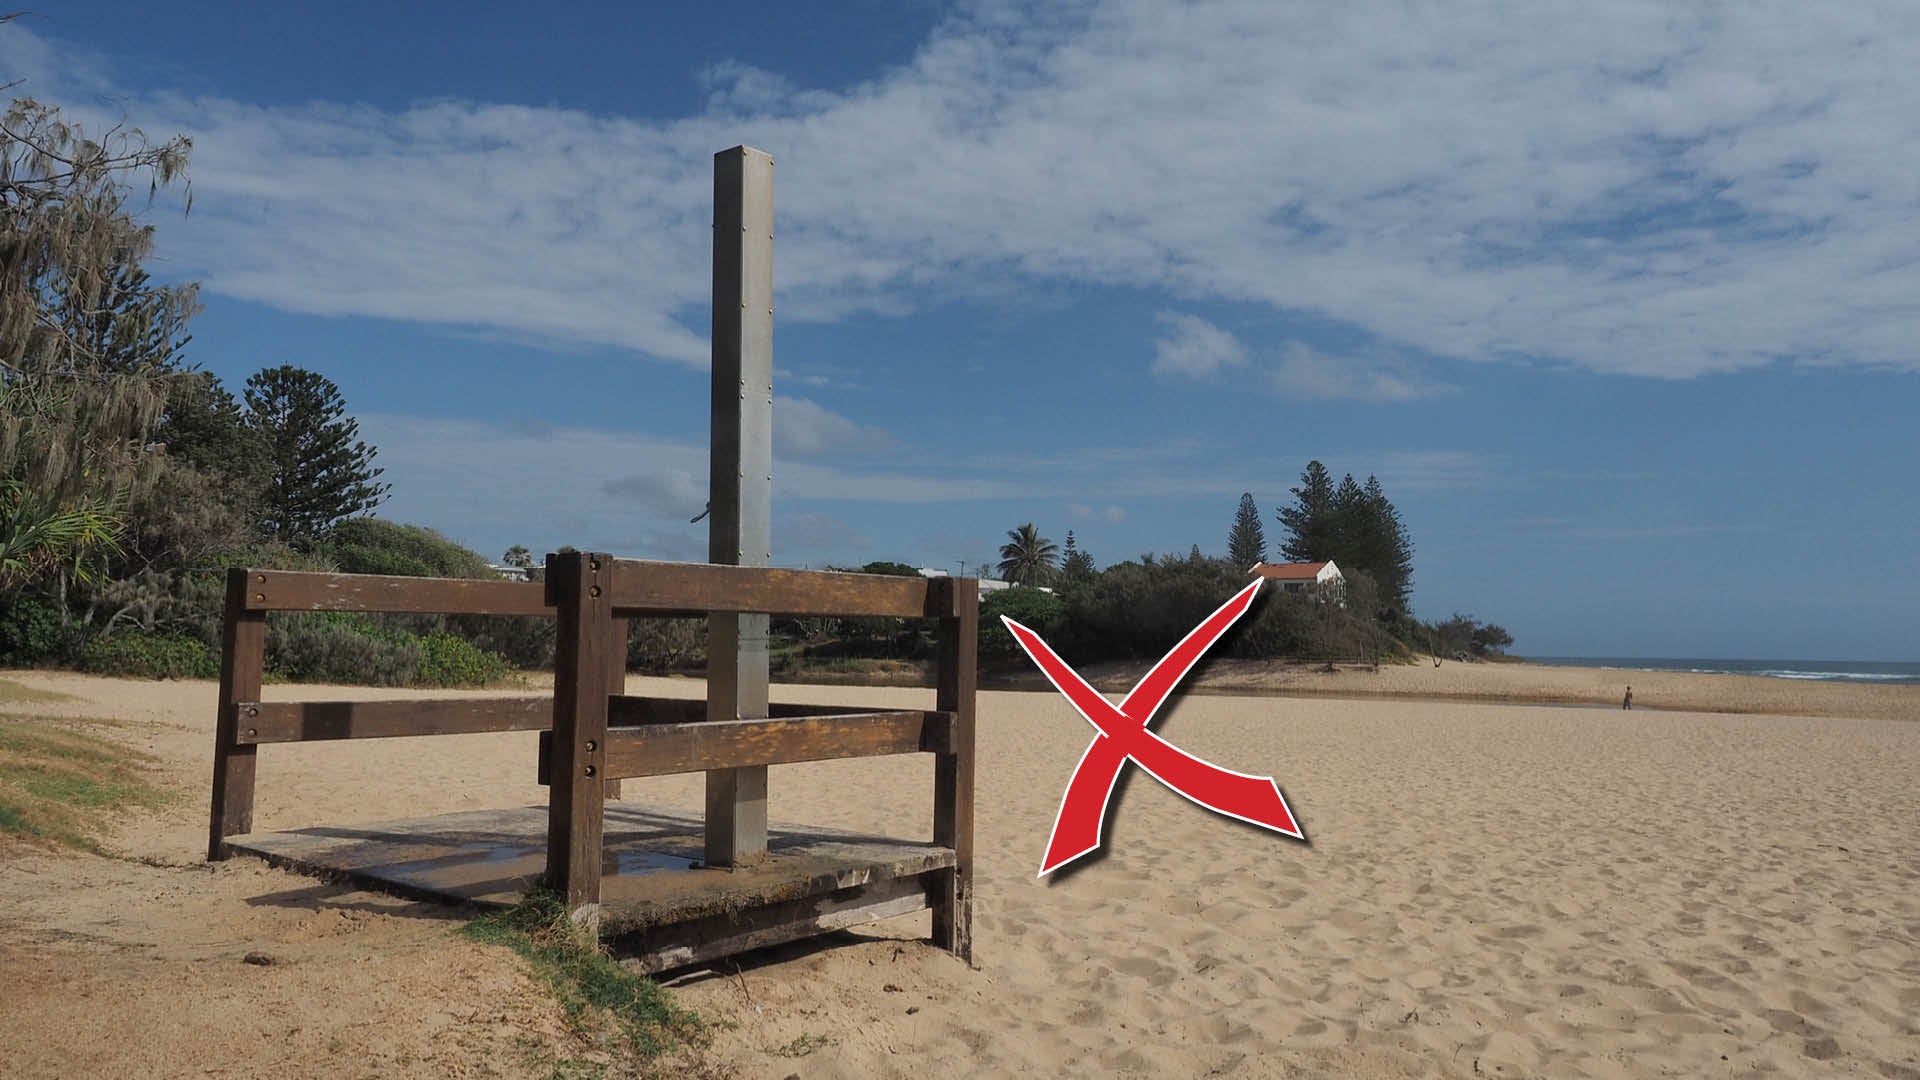 | NOT suitable for use
|
Raised deck or concrete slab shower base

The most sustainable way to install a beach shower is on a raised deck or a concrete slab foundation.
Table 2 outlines a sample of deck/slab types and key considerations that should help inform the decision making process with respect to the elevation.
See the following for further guidance:
- Table 1: Shower decks/slab material types
- Table 2: Raised deck or concrete slab shower base.
Table 2: Raised deck or concrete slab shower base
Deck/slab shower base | Key considerations |
Raised deck (sloped land)
OPTION A – Deck system cantilevered over sand dunes 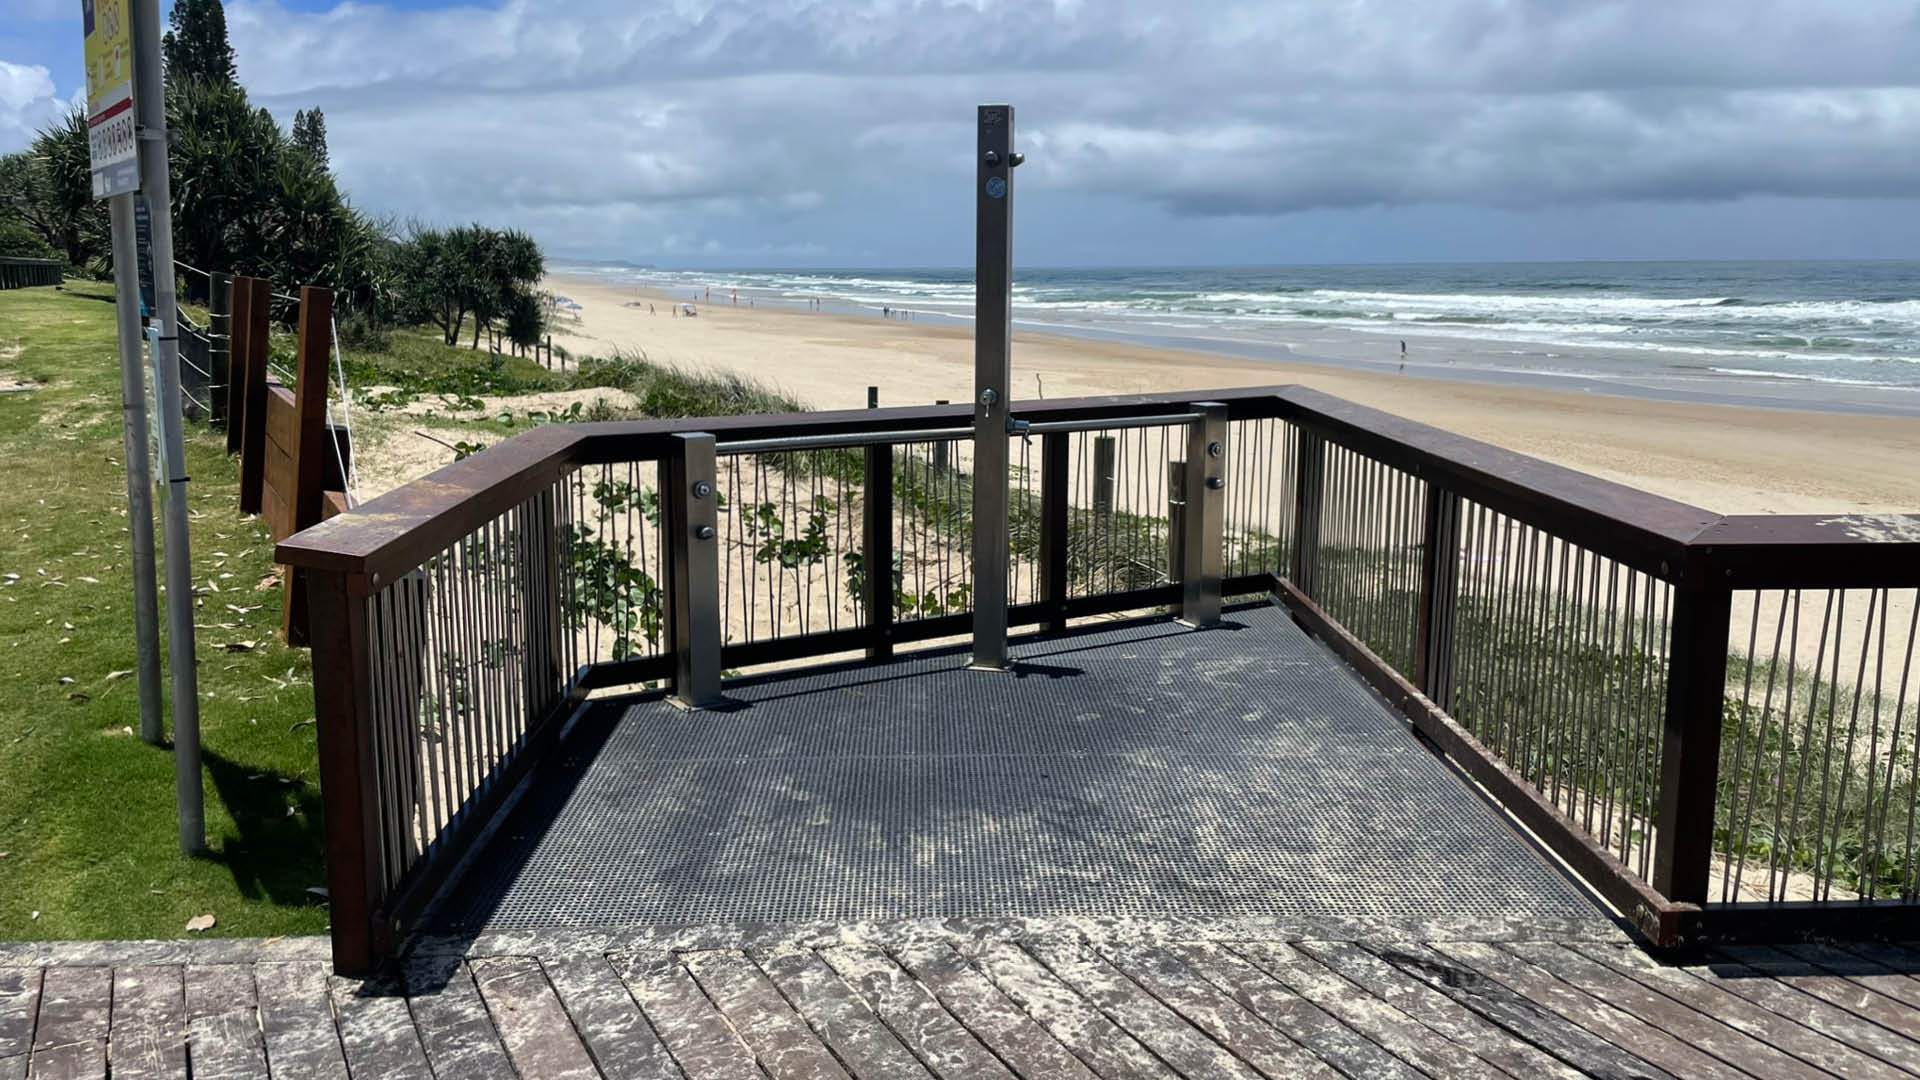 |
|
Raised deck (sloped land)
OPTION B – Deck system in park/sand dunes
 |
|
Concrete slab (flat land)  |
|
This component is currently in development