Beach infrastructure

Positioning
Best practice guidance for the placement and arrangement of embellishments
Site setout
Orientation
- Follow dune profile and contours where possible, extend and reduce heights where necessary.
- The alignment relative to prevailing winds must be considered.
- Locate dune fence at the perimeter of the protected vegetation area, consult with Council (Environment Operations) for extents.
- Position fences to enable beach users to enjoy views and activity where environmental impact is minimal.
- Consider the alignment of the fencing and access to minimise sand encroaching adjacent open space and / roads during high winds.
Safety
Crime Prevention through Environmental Design (CPTED) principles apply.
‘Sand catching fence’ installation
Fence Type 4 is most commonly used as a hind fence – a sand catching device. The fence uses a galvanised coated wire fencing mesh (Waratah Stocksafe-T Longlife or equivalent) with knitted shade cloth (black or green, colour to be determined by site location, black preferred).
Method for applying the coated wire mesh and shade cloth:
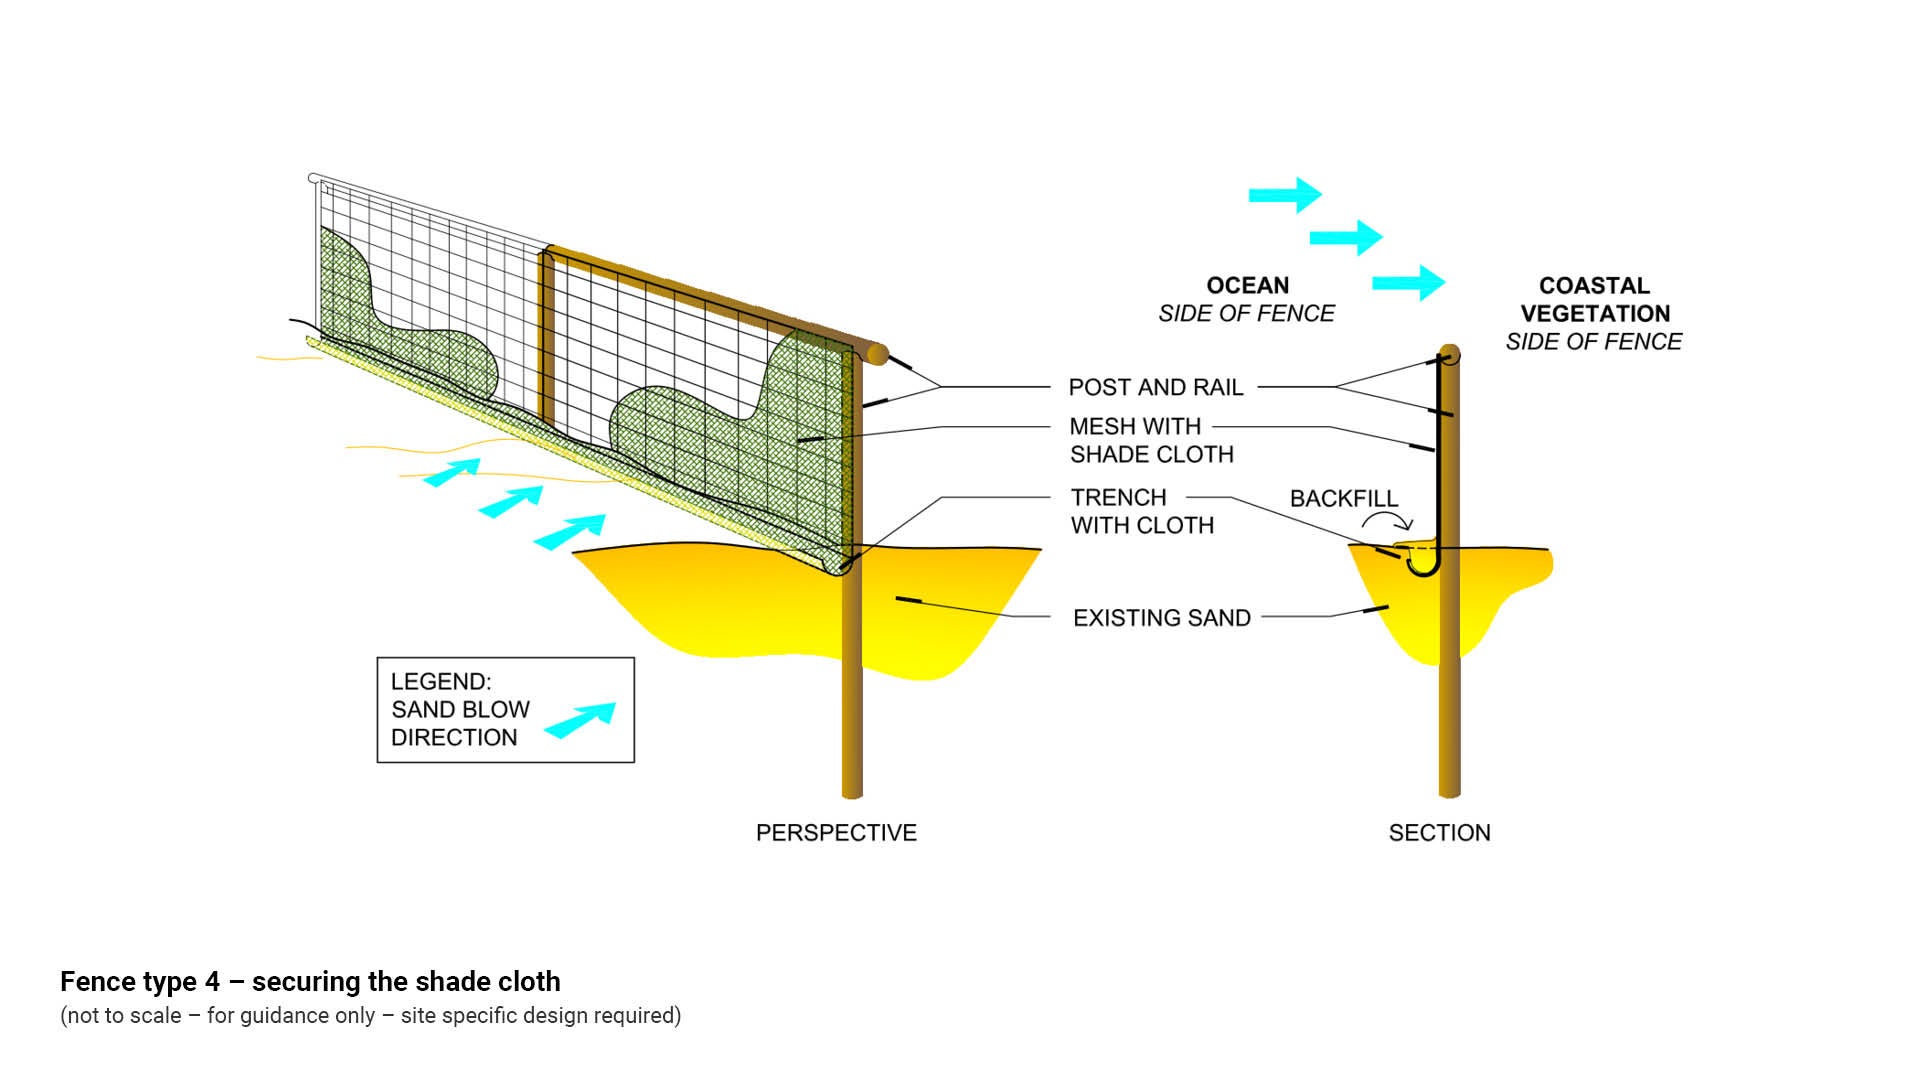
- The knitted shade cloth is clipped with staples to the coated wire by the fence contractor.
- The coated wire mesh is then attached to the treated timber post with galvanised staples on each span.
- The knitted shade cloth is positioned on the ocean side of the fence. This maximises sand catching. The sand builds up on the fence ocean side and the fabric limits sand from penetrating through the fence.
- A trench is dug along the base of the fence on the ocean side. Extra shade cloth fabric is placed in the trench and backfilled with sand to firmly hold and contain the cloth.
See the following figures for further guidance:
- Figure 6: Fence type 4 – sand movement
- Figure 7: Fence type 4 – securing the shade cloth.
Figure 6: Fence type 4 – sand movement
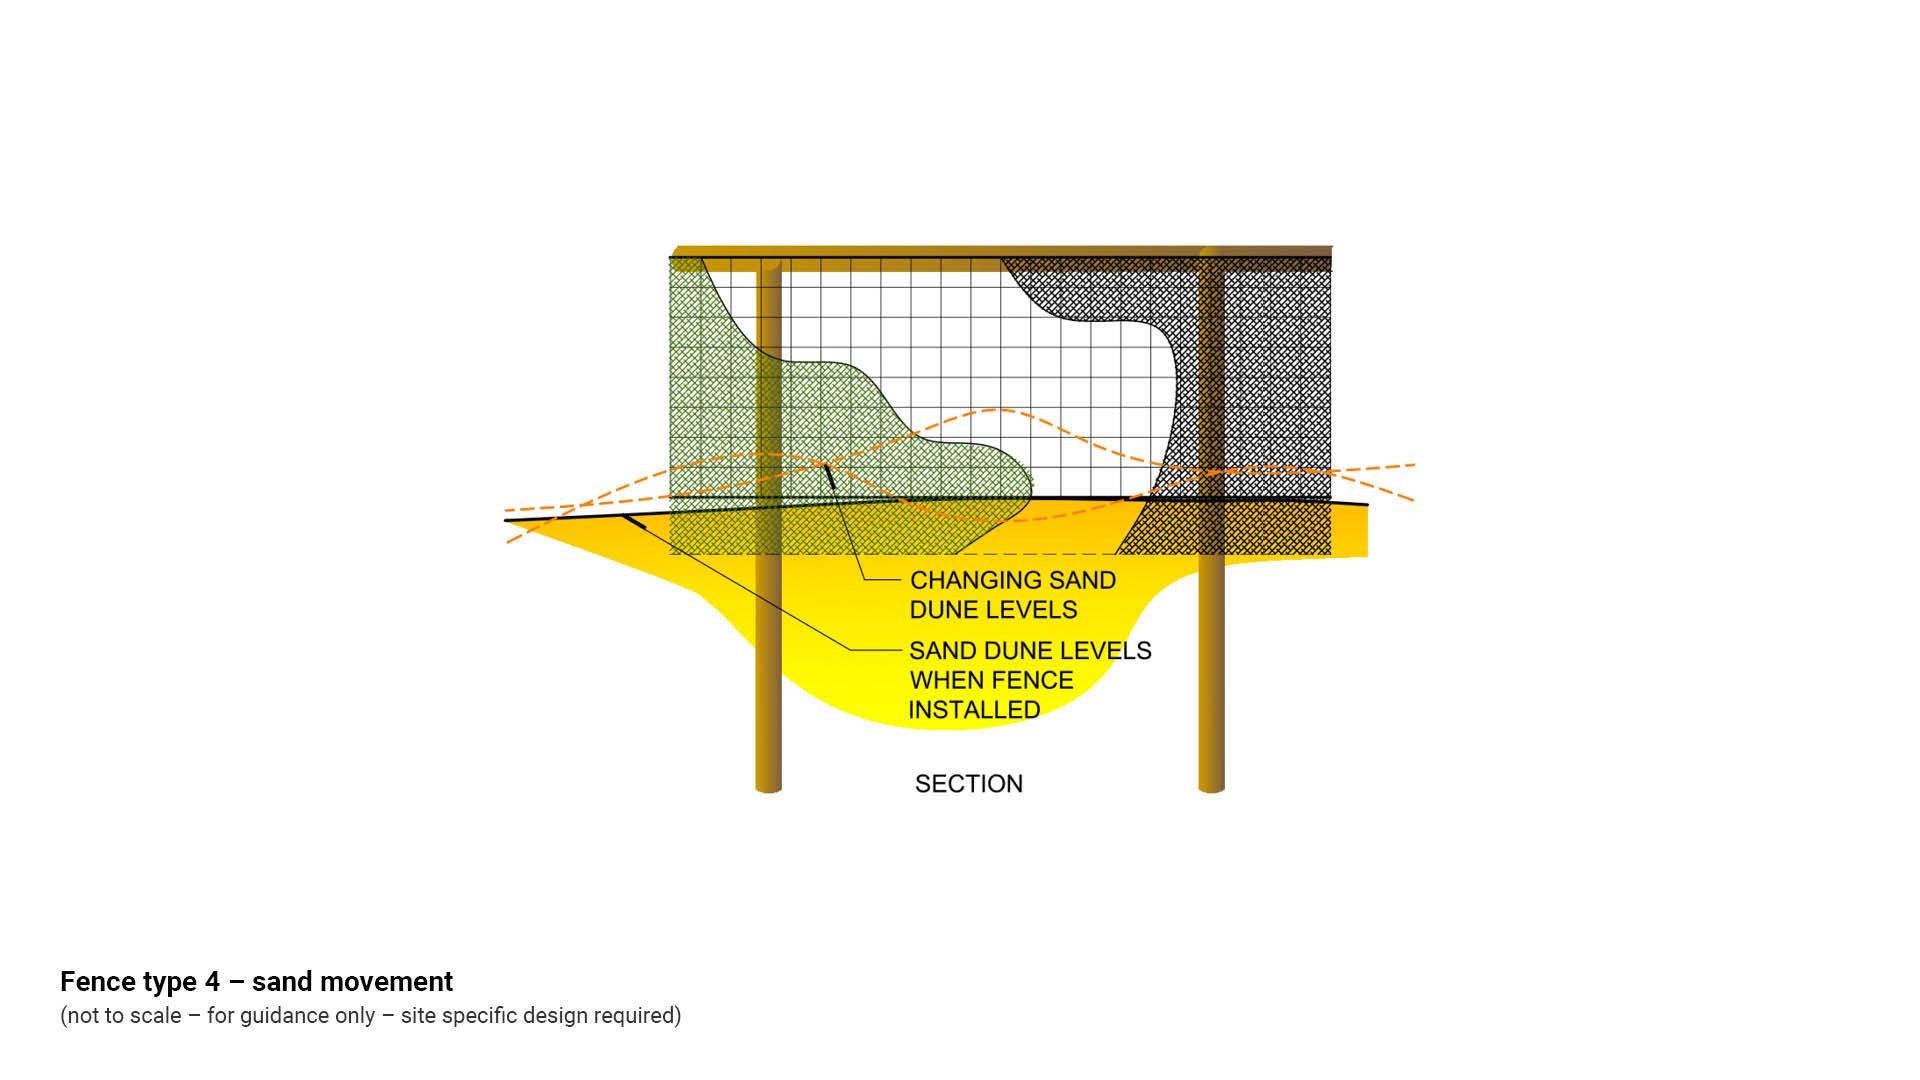
Figure 7: Fence type 4 – securing the shade cloth
Strand maintenance (sand levels)
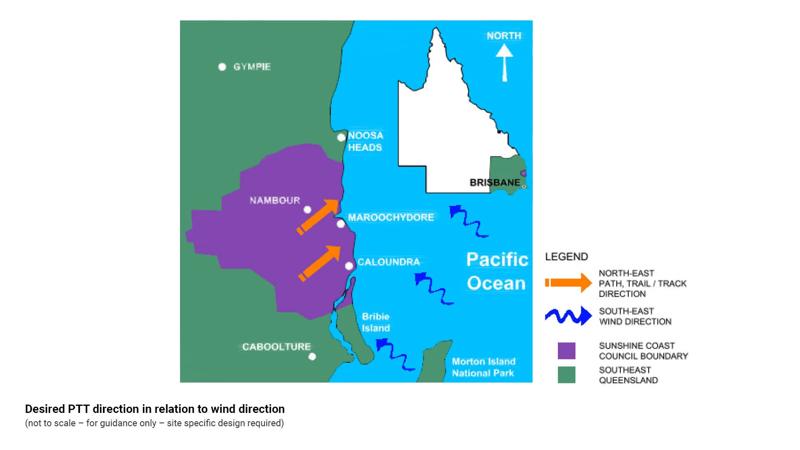
Fence type 1 and type 3 are positioned along the beach access alignments. Where possible a north-east path/trail/track direction is the most desirable alignment. This alignment will help maintain sand levels, as the wind direction for southeast Queensland is predominantly from the South-East. However, due to established trees and existing alignments of beach accesses, this is not always possible.

Sand levels should be maintained to provide a clear and safe path for beach-goers and turtles. Keeping sand levels even (the desired height of 450 mm minimum between the bottom strand and sand level) also helps lengthen the life span of a fence.
- Both fence type 1 and 3 require the plastic filament to be drilled through each post and then tied off at the end post.
Beach front fence positioning
The following should be considered before erecting a beach front fence:
- Determining whether the beach has a low or high use will have an impact on the location and alignment of the fence.
- The 1974 erosion scarp must be considered the ‘point of reference’ (for historically affected beaches only) and the most recent storm erosion (recorded by Council) must be also considered before installing any permanent fencing in the front dune area.
- Determine the ‘highest astronomical tide’ (HAT) from Maritime Safety – Queensland Tide Tables 2015. The fence should be positioned to avoid tidal inundation where possible. This will help preserve the fence and lesson the chances of the fence washing away.
- HAT is the highest water level which can be predicted to occur under average meteorological conditions and any combination of astronomical conditions.
- HAT is not the most extreme level which can be reached. Storm surges may however cause considerably higher levels to occur.
Beach front fences (fence type 1) require a 10 m post spacing to allow better flexibility of the bottom strand for turtles to access dune areas.
Strand heights may need to be adjusted from time to time for the following reasons:
- Continual sand movement from erosion and storm events.
- Turtles may become caught in strands (450 mm is the minimum height between the bottom strand and the sand level).
There are two options of installing beach front posts:
- Option 1. The post is driven into the coffee rock below the sand bedding level, with a hydraulic driver which is fitted to the back of a tractor. This method is preferred, as it provides greater security, is longer lasting against erosion and storm events and has less environmental impact than option two.
- Option 2. The post is excavated and concreted into the coffee rock. This option is not preferred due to the permanent impact on the beach area, however it may be used where option 1 is not durable.
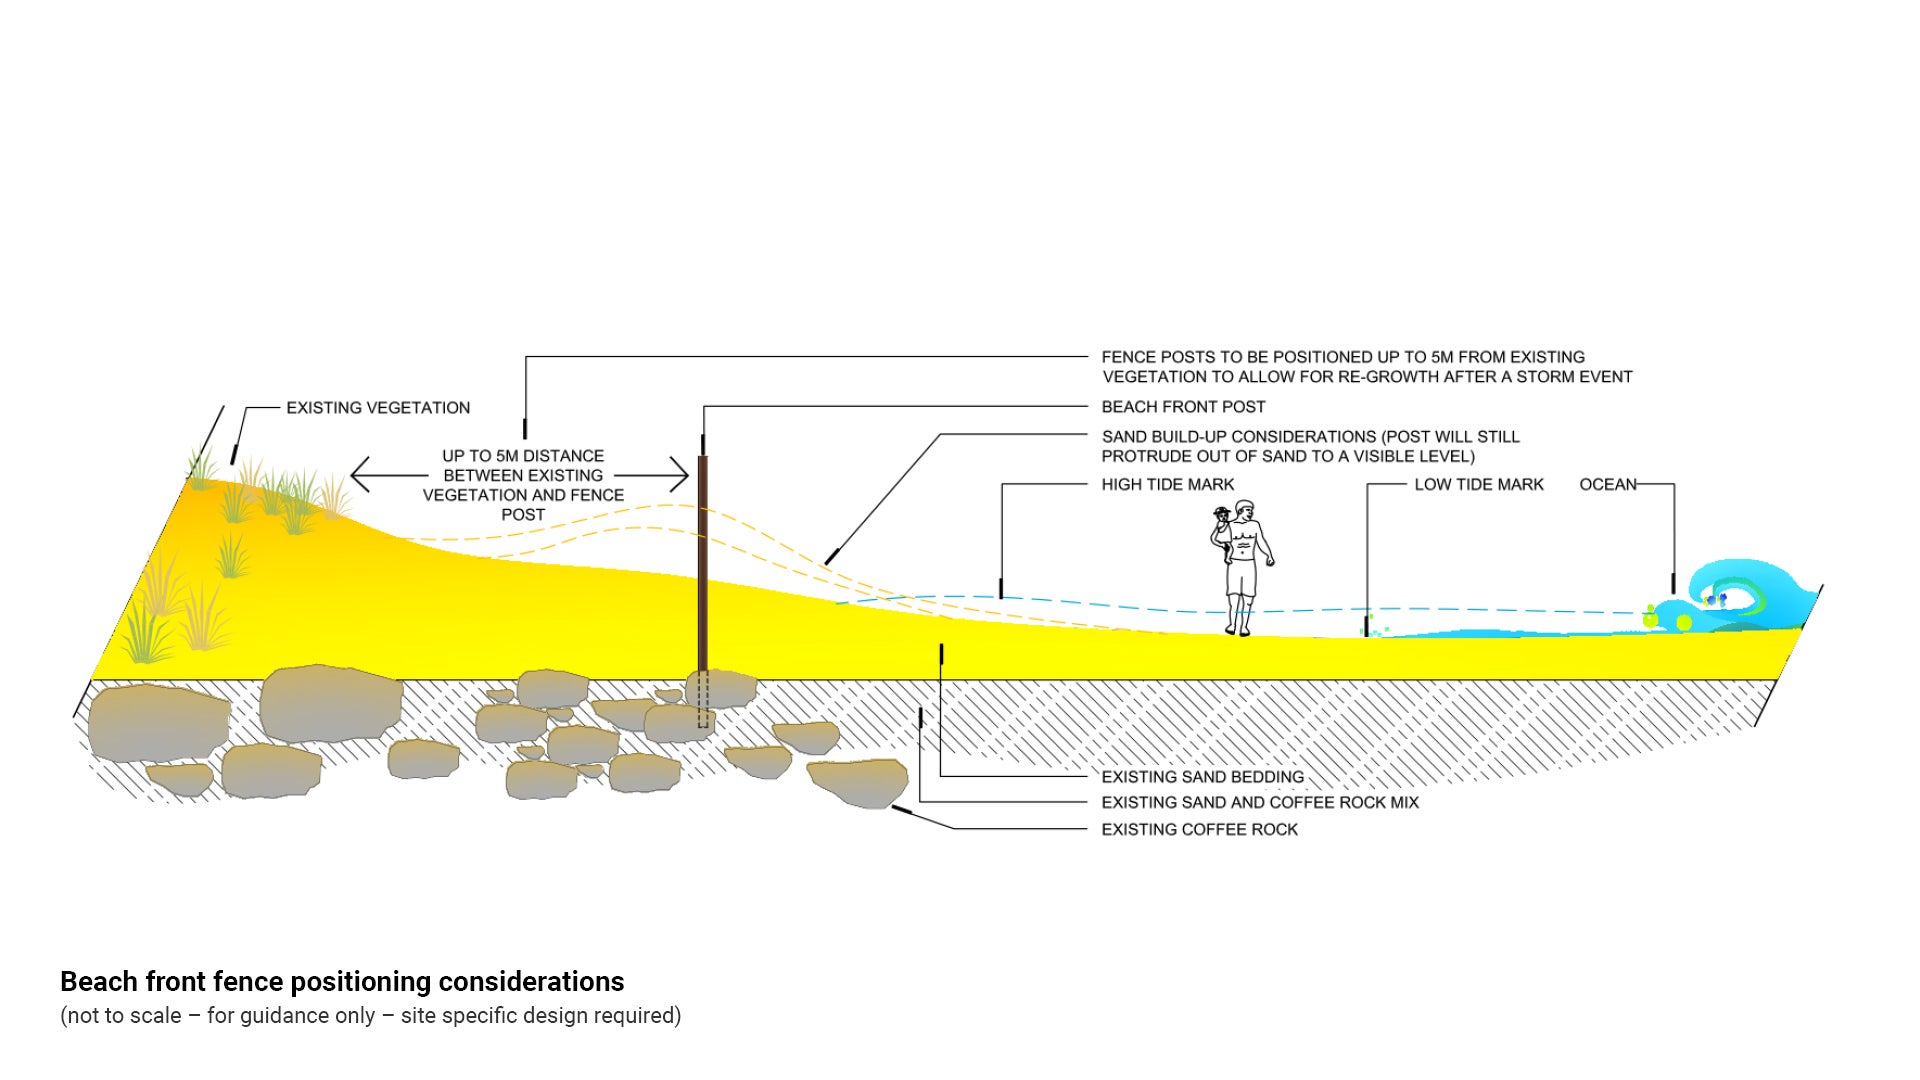
See Figure 8: Beach front fence positioning considerations.
Figure 8: Beach front fence positioning considerations
Clearances
- The location of beach front fencing must consider high and low tides and storm surge levels. Fences positioned with these considerations will increase the useful life of the fence and reduce maintenance.
- Beach front fence post should be embedded up to 2.1 m (where possible) to reduce chances of loss in a severe storm event.
- Beach front fence post height above the ground should be optimum 1.5 m (where possible).
See Table 5: Positioning guidance offsets.
Table 5: Positioning guidance offsets
Embellishment | Distance from | Minimum distance | Reason |
Fence |
|
|
|
Pathway (hard surface and natural surfaces) with no fence | Trees | New trees: 1.2 m min offset. Existing trees: determined by species. | AS 4970 – Protection of tees on development sites. Tree protection. |
Bottom strand of plastic filament (turtle friendly fence) | Sand bedding level | 450 mm | To allow turtle movement under fence. |
Beach front fence | Post to post | 20 m trial | Appropriate span before strand begins to sag. |
Coastal vegetation | 5.0 m max | Allow re-vegetation and room for growth. | |
Fence | Clear area to any other embellishment | 2.5 m | For deck mower clearance (where possible) Avoid creating small difficult to mow areas. |
This component is currently in development