Fences and gates
Design - environmental reserves
Requirements for the design, manufacture and installation of embellishments in environmental reserves
Fences and gates installed in environmental reserves provide:
- protection of recognised wildlife habitat
- protection of sensitive ecosystems.
- the direction of stock to water.
- restriction of unauthorised access by motorbikes or motor vehicles.
- containment, protection or redirection of pedestrians or native fauna.
- exclusion of threats to native wildlife posed by motorised traffic, feral animals.
- hazard protection barrier.
See the following for fence and gate types for environmental reserves:
- Table 1: Standard - fence and gate for environmental reserves
- Table 2: Special purpose - fence and gate for environmental reserves.
Table 1: STANDARD - fence and gate for environmental reserves
Standard fence and gate - typical example | Fence type/name and purpose |
 |
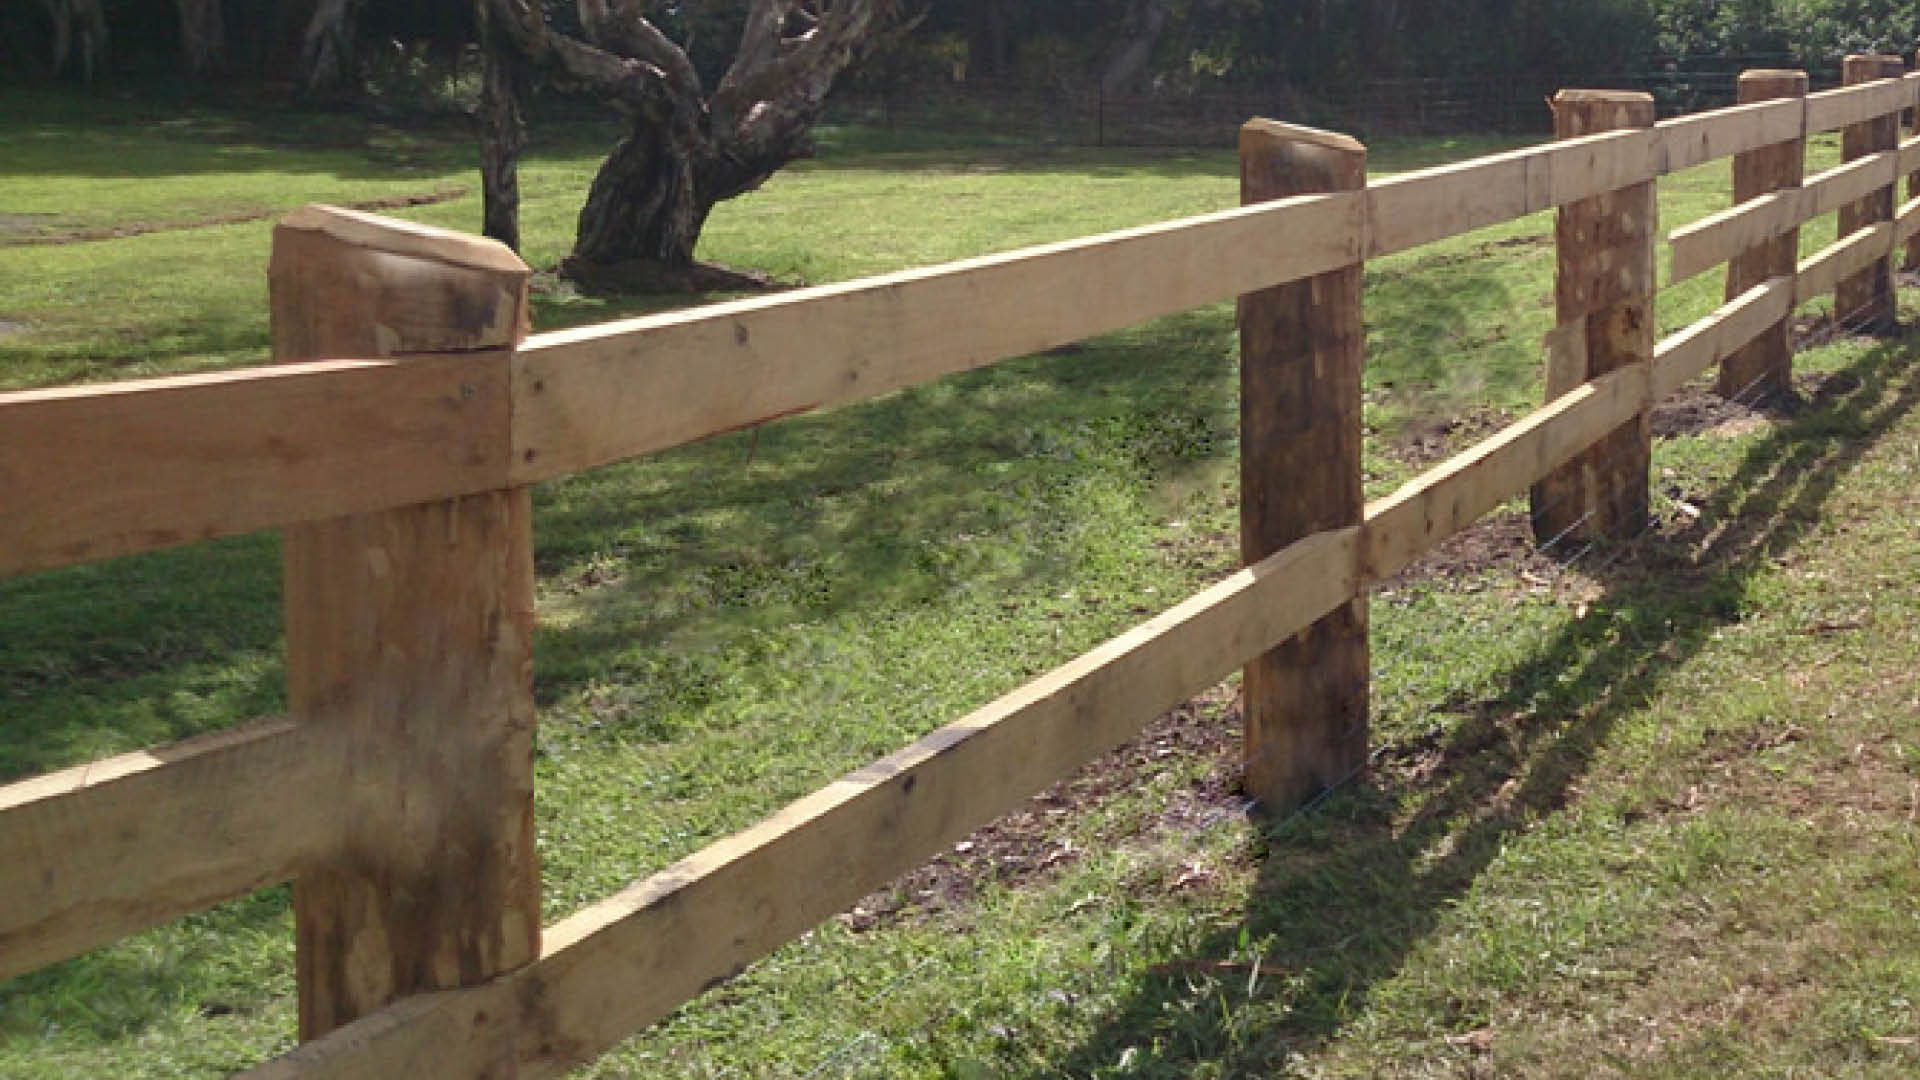
Post and rail fences
Provide a visual barrier to deter pedestrian access. Provide vehicle exclusion. Provide demarcation. |
 |
Chicane gates
Provide gate design to suit a variety of post and rail fence types. Provide pedestrian access |
 |
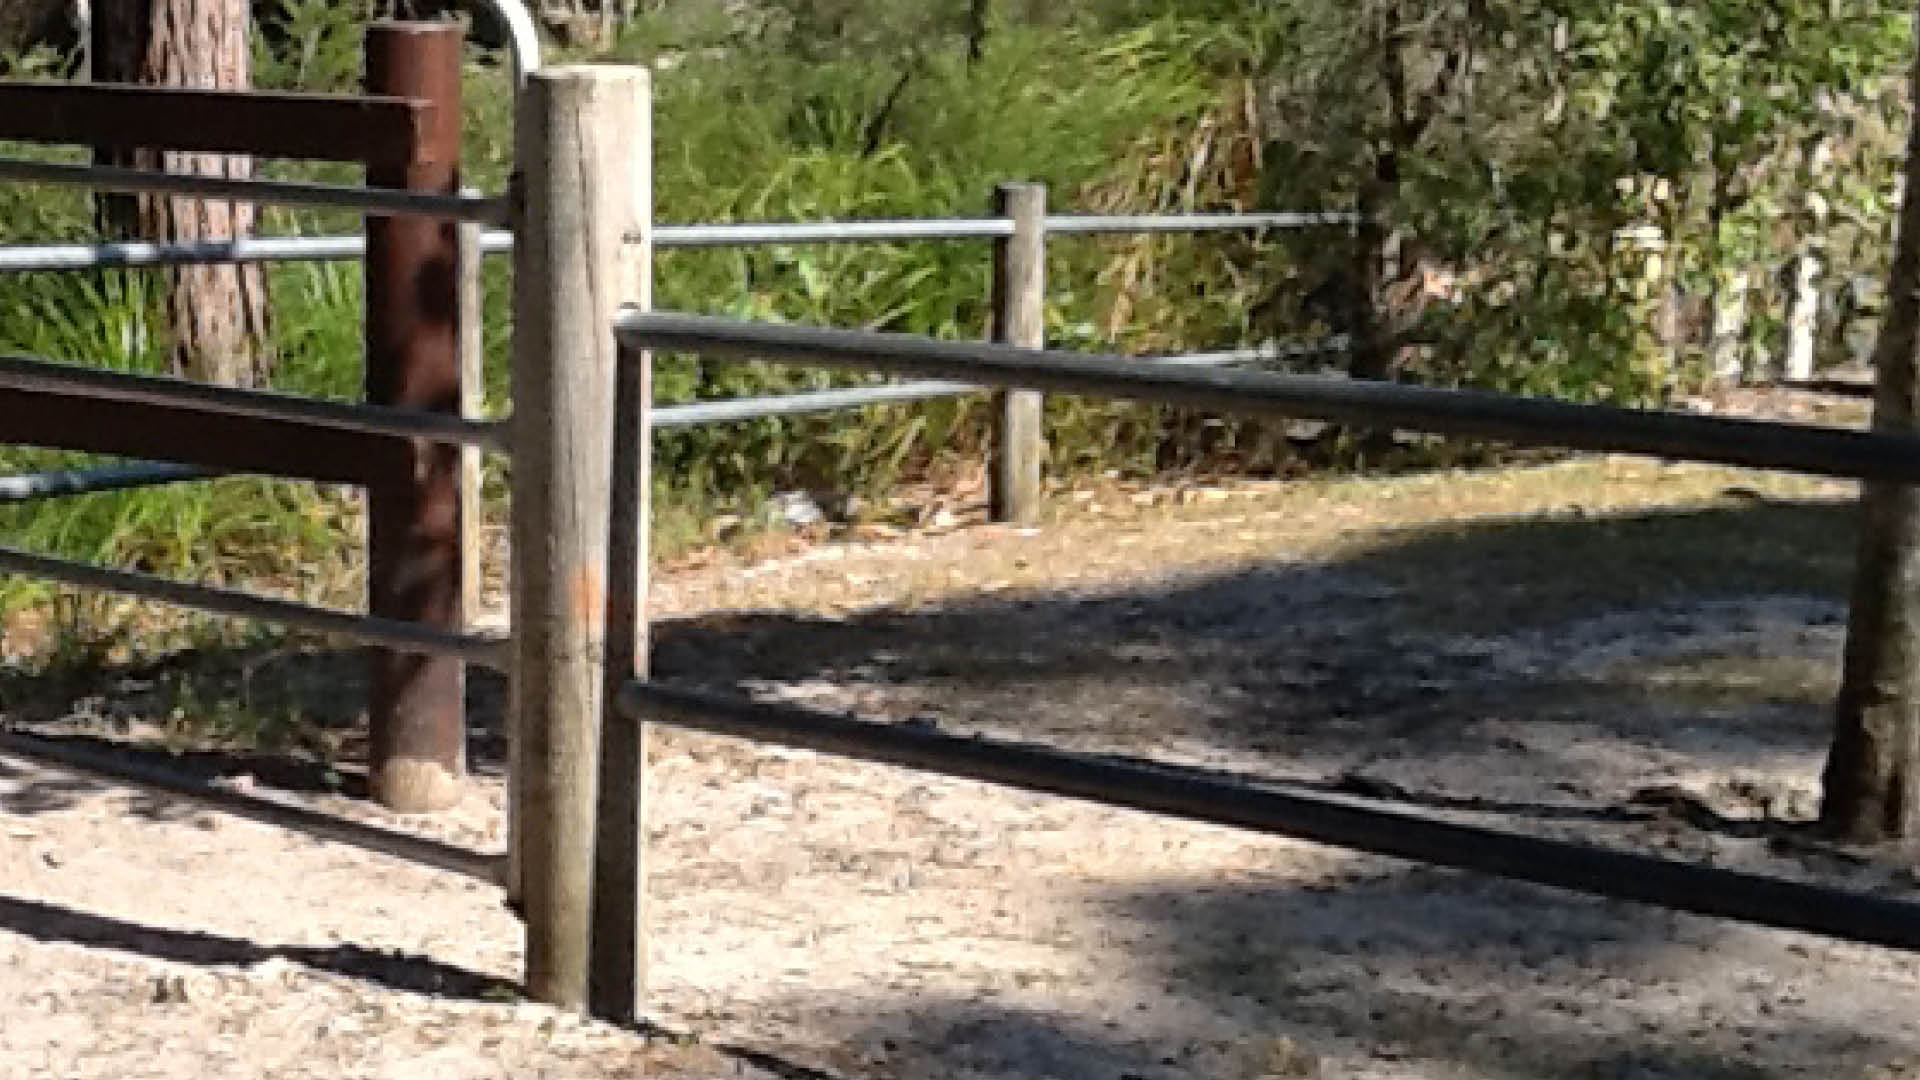
Vehicle gate (super heavy duty)
Provide access for approved vehicles to enter an otherwise restricted area (maintenance and emergency vehicles) |
Table 2: SPECIAL PURPOSE - fence and gate for environmental reserves
Special purpose - typical example | Fence type/name and purpose |
 |
Beach access and habitat protection fences
Provide protection from pedestrians for dunal areas and fauna habitat. Prevent entry by feral predators and unauthorised vehicle access. |
 |
Horse step overs
Provide access for horse and rider, pedestrians and cyclists. Prevent unauthorised vehicle access. |
 |
Fauna fences
|
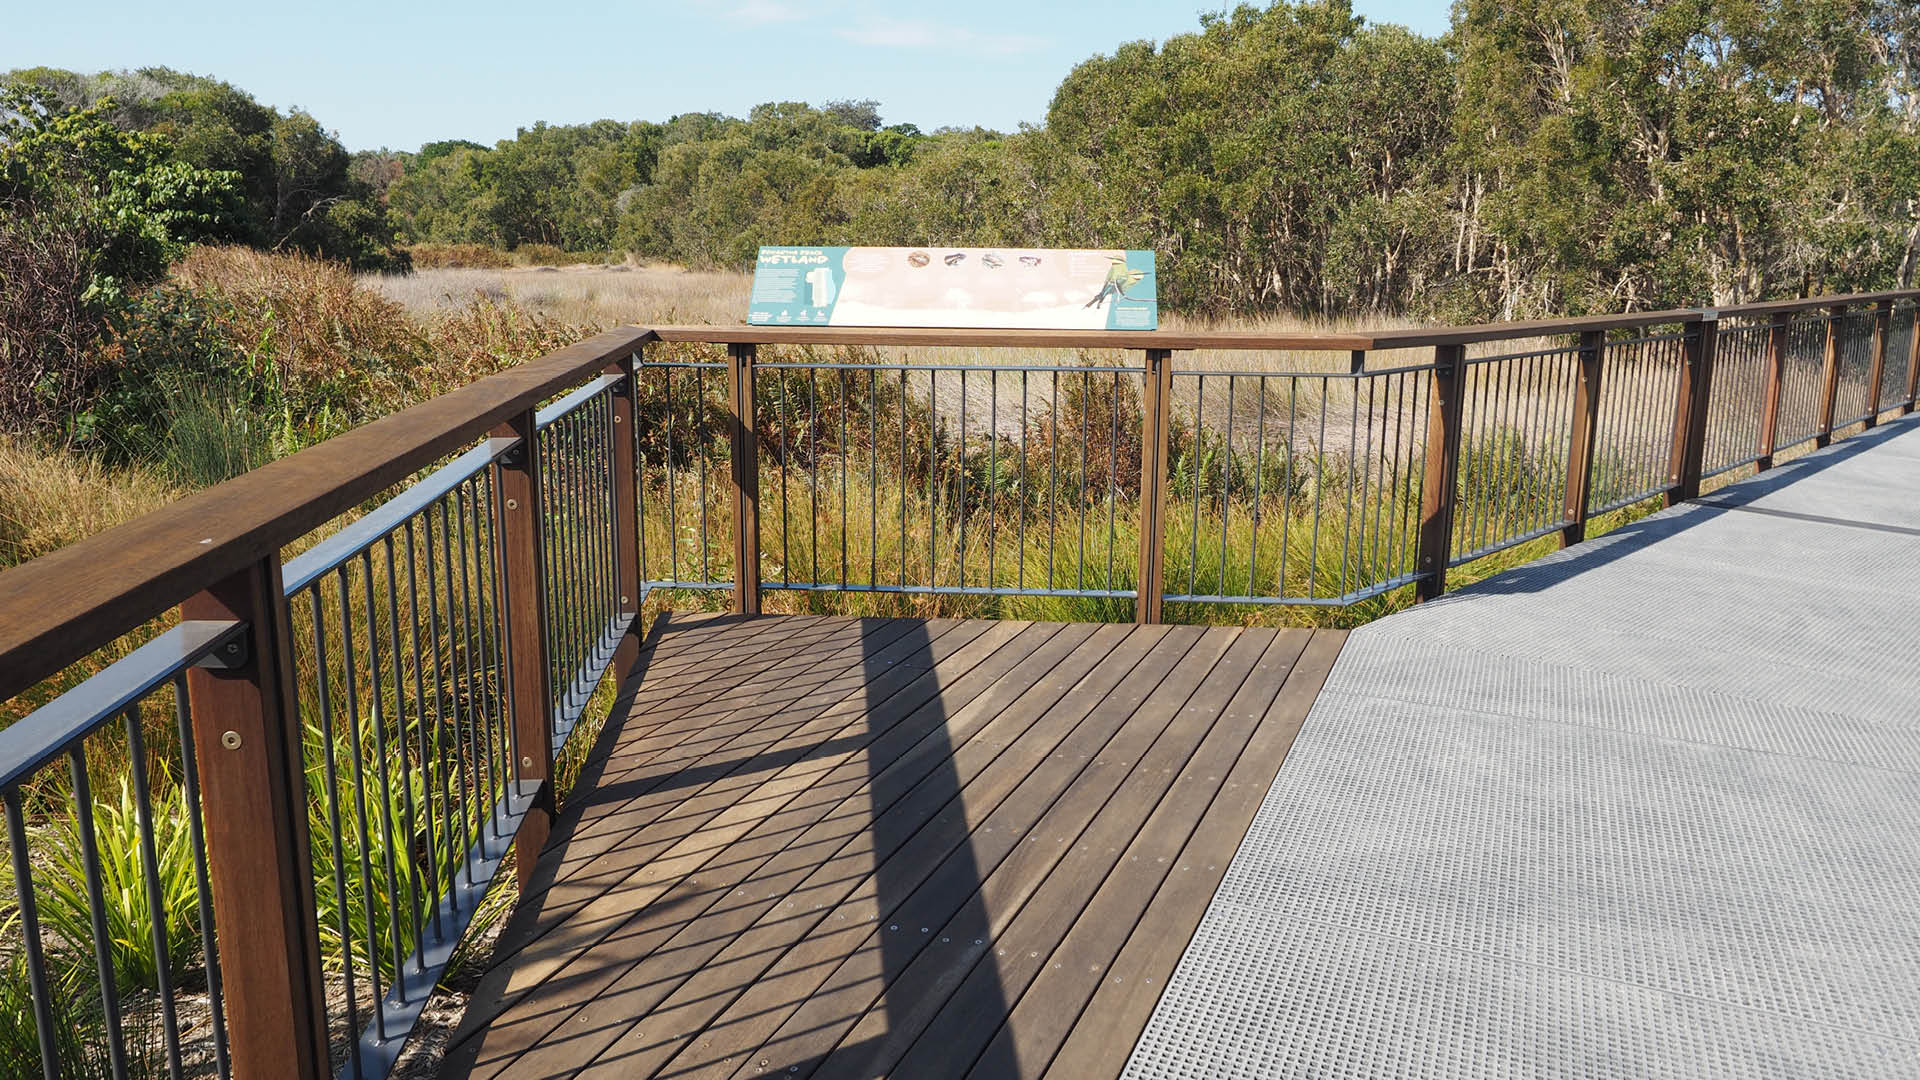 |
Wetlands fencing (matching vehicle gates where required)
Fencing located around wetlands and other waterbodies to create a visual and physical barrier are installed to:
|
- Parks and open space fences may be used at parks and open space locations.
- Environmental reserve fences and gates may be used at environmental reserves.
- Fences and gates must be designed to suit the application. Engineering certification may be required.
- Approval must be obtained from the asset owner/custodian.
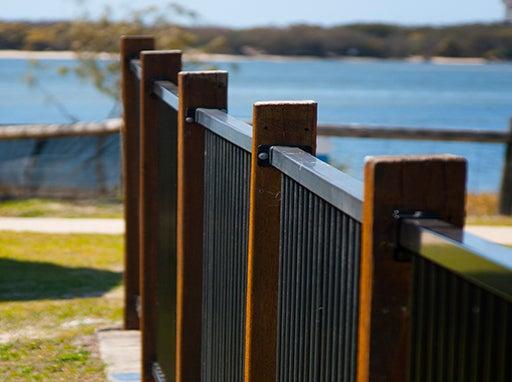
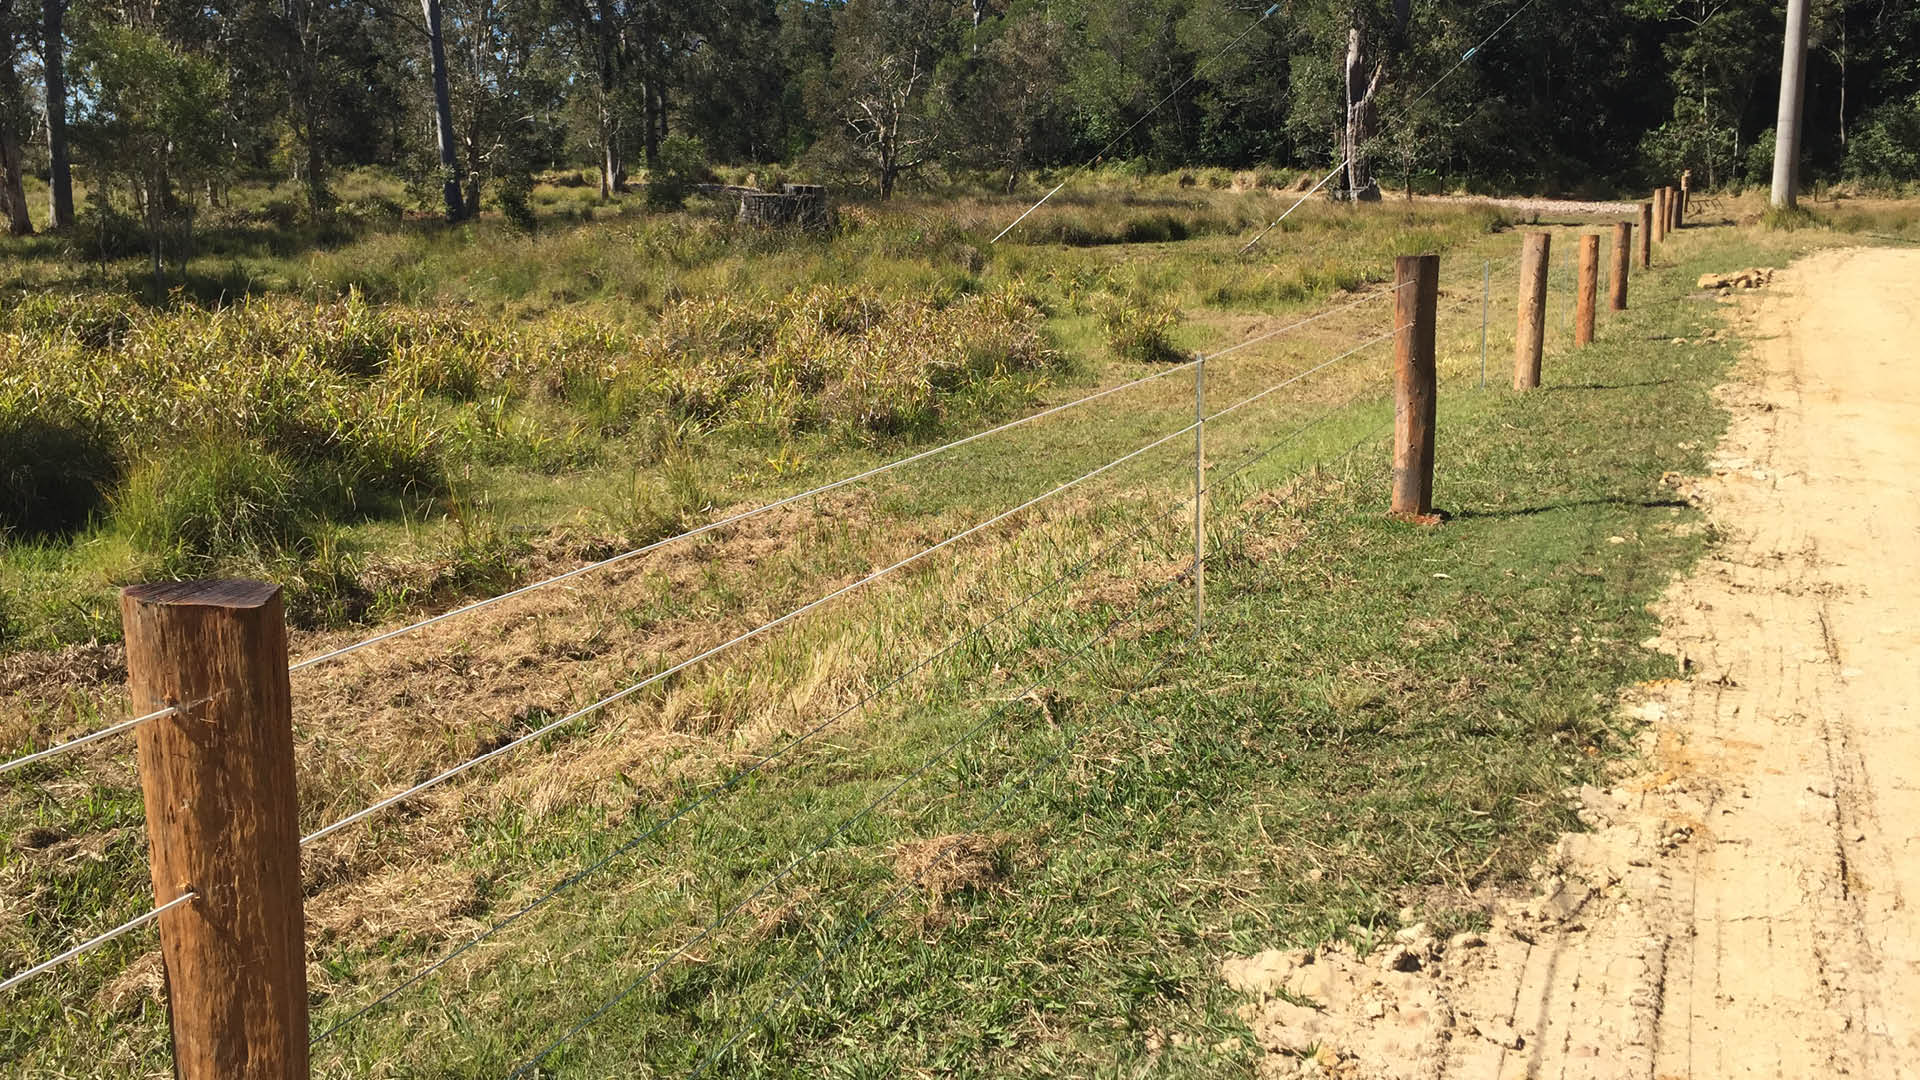
Post and rail fences
Purpose

Post and rail fences are typically installed to create a barrier to deter pedestrian access. They may also be installed to prevent unauthorised vehicle access as well as providing demarcation for a protected area.
Planning
Consider the following when selecting fence locations:
- Fences and gates adjacent to roadways, must comply with road related standards and guidelines (clear zones, spearing hazards).
Design
Design the post and rail fence to include the following:
- Post and rail fence panels can be used as ‘barrier’ and or ‘perimeter’ fences – case by case basis. Engineering certification may be required.
- Ensure the fence is installed with an access gate or opening (pedestrian and or vehicle) where required).
- Post tops – all timber post tops to be angled at 15 degrees to prevent water damage. Galvanised post tops to be capped.
- Rails – all timber rails to have arrissed edges for safety and superior finish, all galvanised top rails to be welded to galvanised posts.
- All footings must be designed and installed to engineer’s specifications.
Materials selection should consider:
- the level of use.
- any potential unlawful entry.
- adjacent fence material.
Post and rail fences can typically be constructed of various materials to complement the surrounding environment. If a gate(s) is installed, ensure materials and components complement or match the fence materials.
Natural elements may also be used to create/contribute to a barrier fence, such as strategically positioned vegetation, trees, stones or boulders.
See the following for further guidance:
- Table 3: Typical standard post and rail range
- Table 13: Alternatives to installing fences (see LIM Fences and gates - Design - other options).
Note: The ‘beach access and habitat protection fences’ are specific purpose post and rail fences that provide protection from pedestrians for dunal areas and fauna habitat. They also prevent entry by feral predators and unauthorised vehicle access.
See the following for further guidance:
- A summary of other post and rail based fence designs can be found below. See Beach access and habitat protection fences.
- See LIM Beach infrastructure.
Table 3: Typical standard post and rail range
Typical example | Fence type/name and purpose |
|
Galvanised post and rail |
 |
Timber post and galvanised rail |
 |
Timber post and rail |
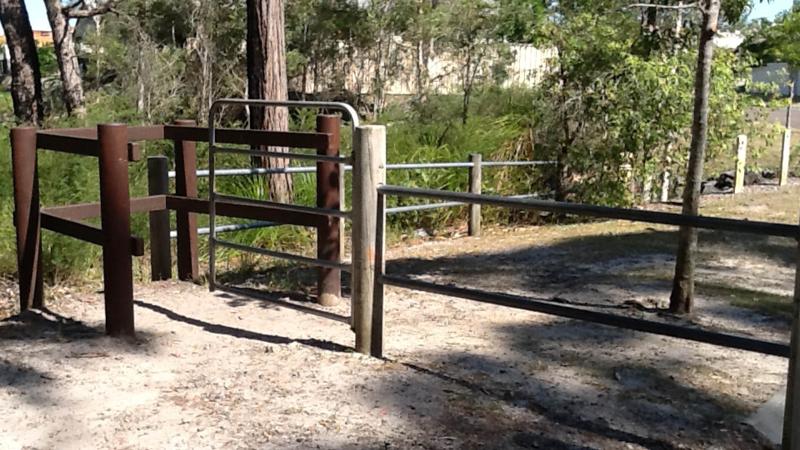
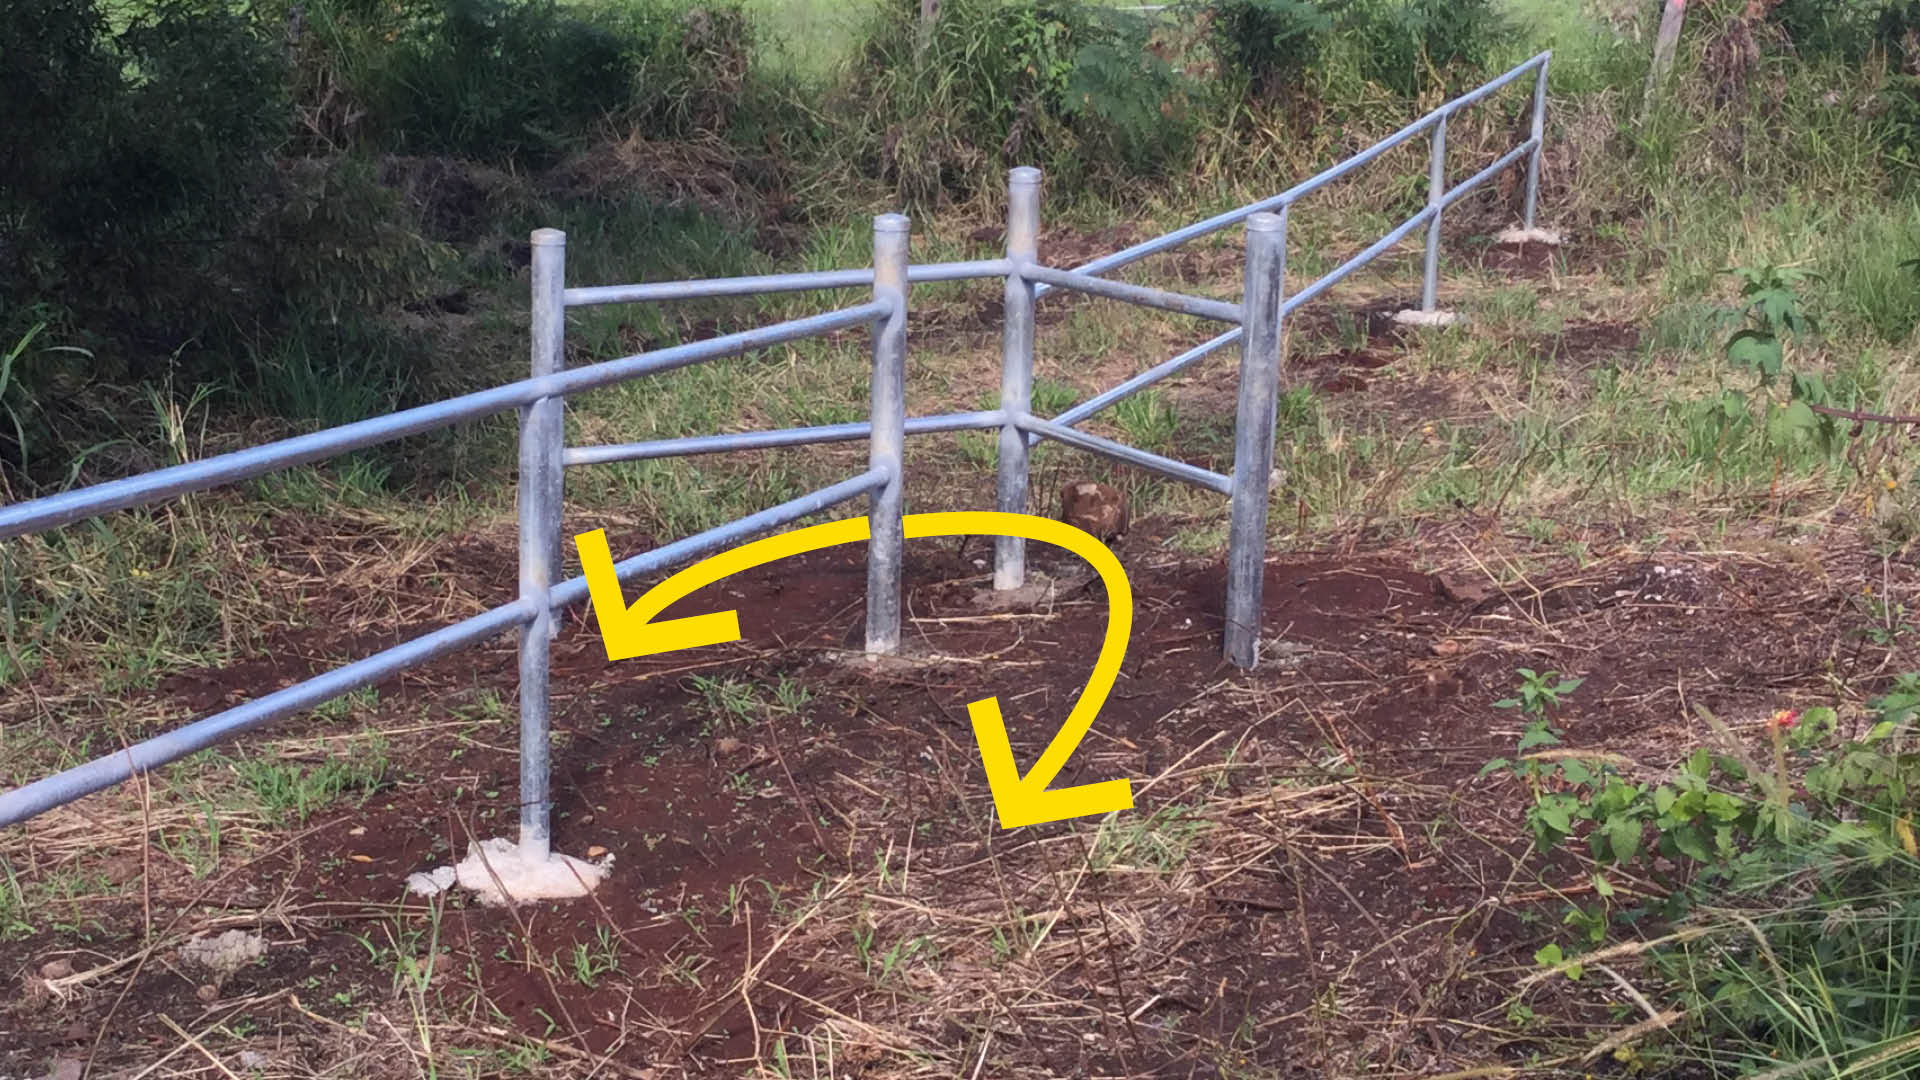
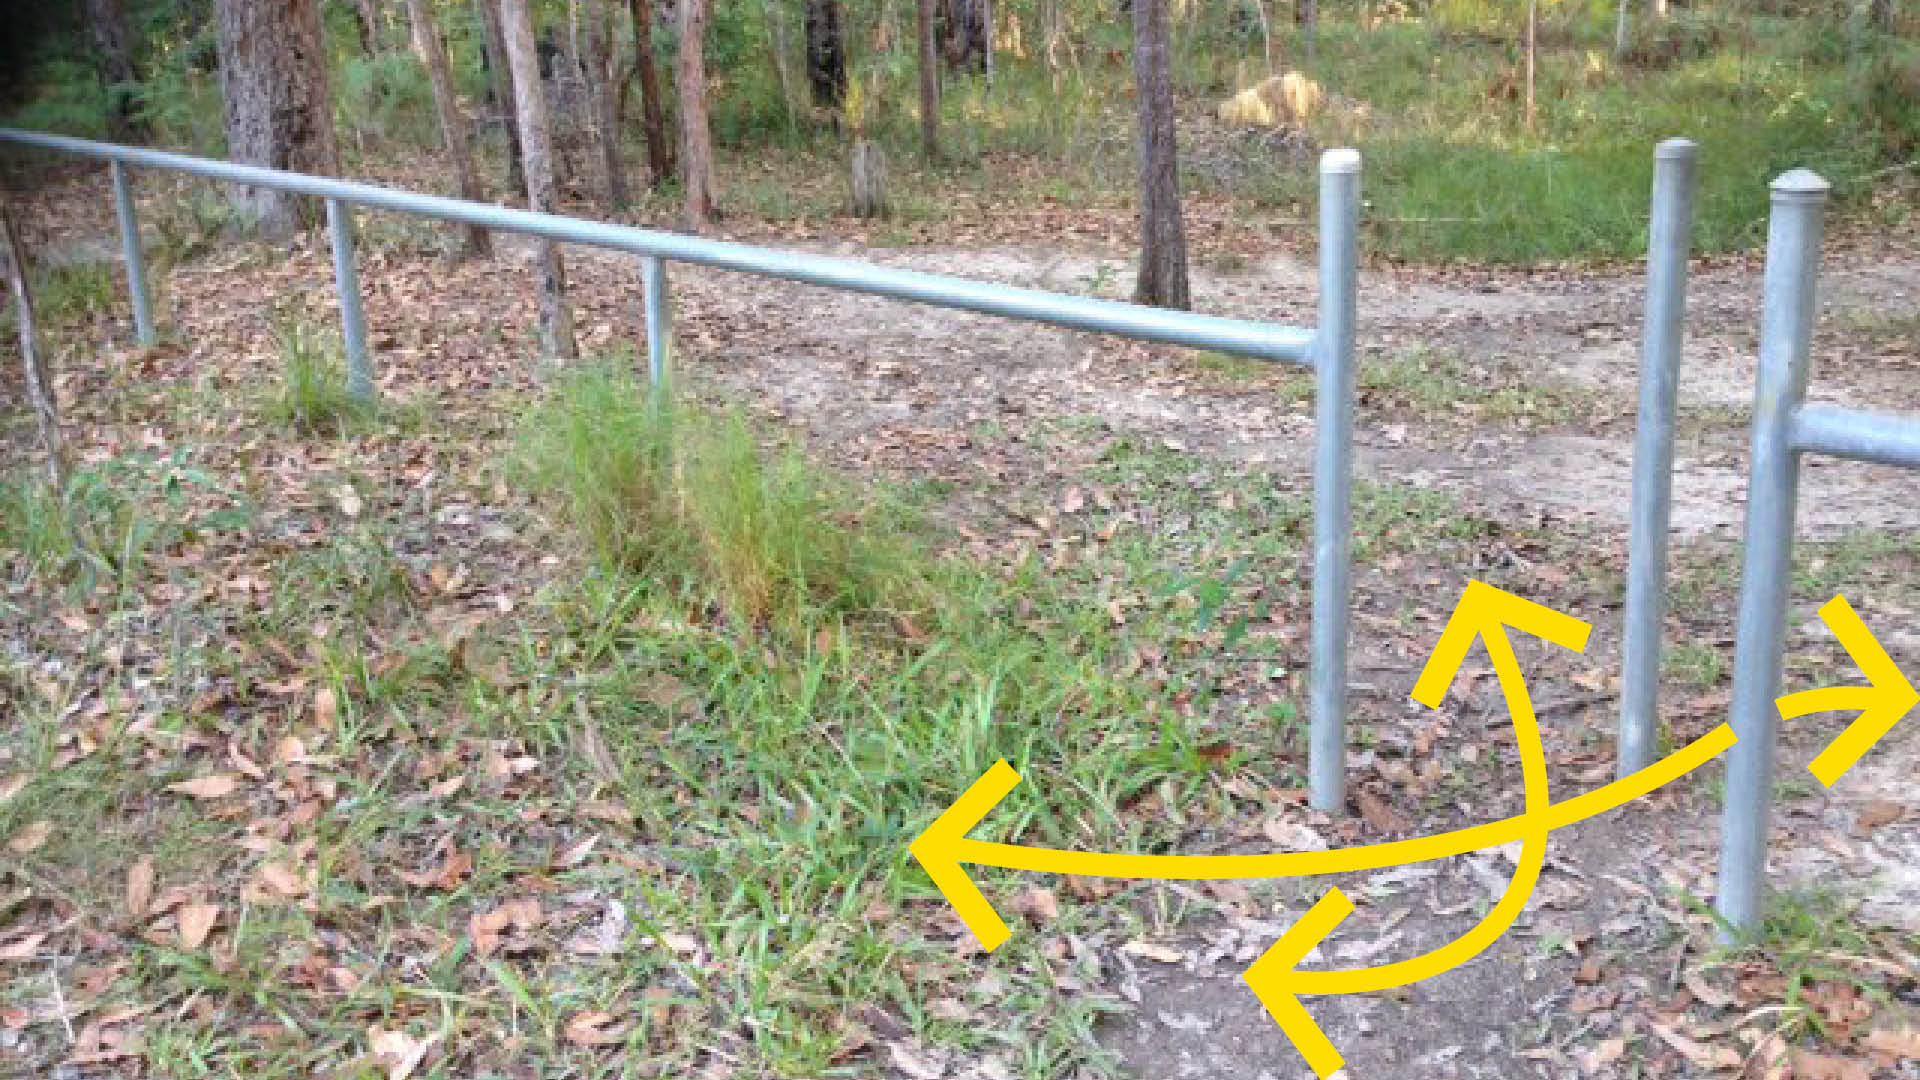
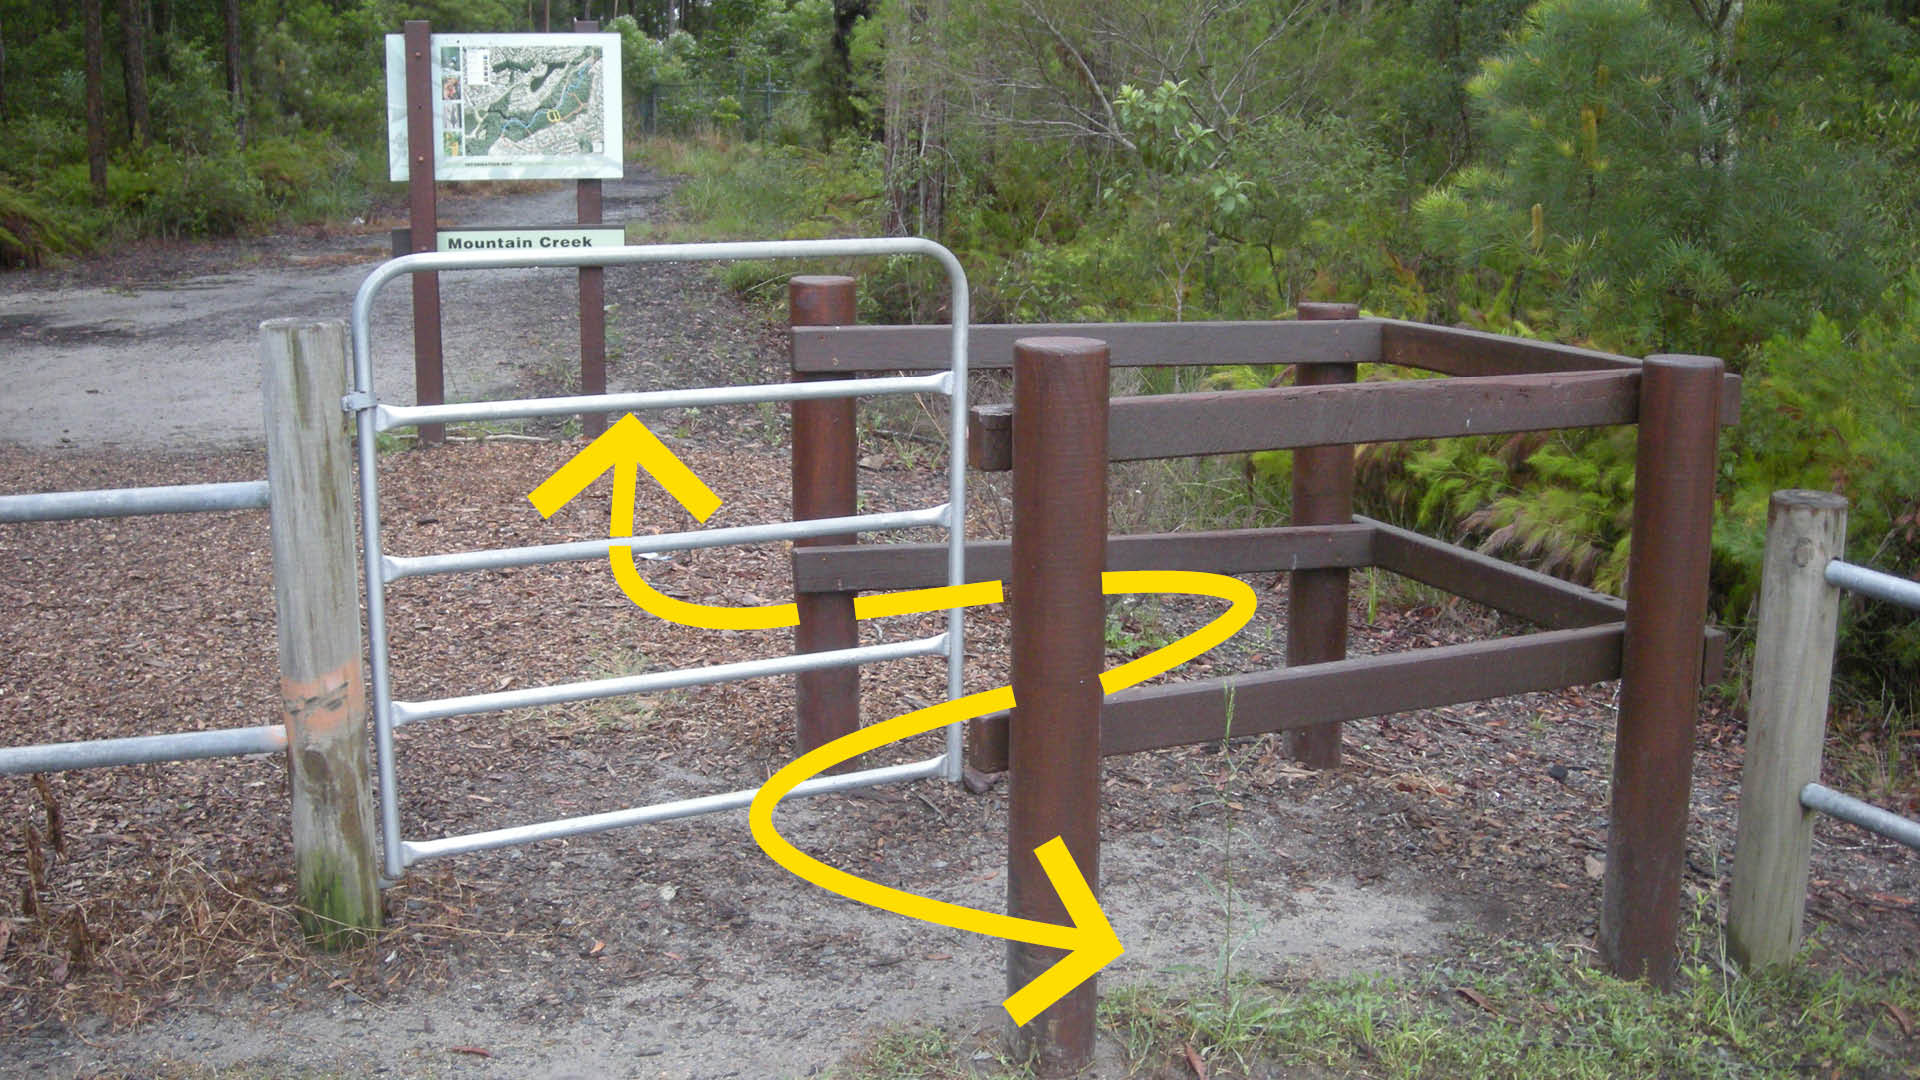
Chicane gates
Purpose
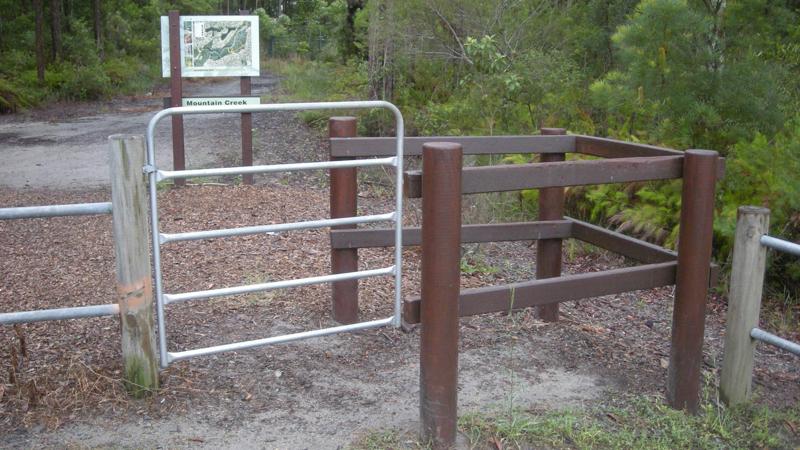
Chicane gates are installed to provide pedestrian and bicycle access for areas that are protected by either a barrier or perimeter fence. The gate also restricts unauthorised motorbike and vehicle access. The gate is designed to suit a variety of post and rail fence types.
Environmental reserves which contain recreational trails, use a chicane gate system to restrict access.
Key attributes:
- The chicane gate is typically designed to create an ‘s’ or a ‘u’ shape turn designed to restrict unauthorised vehicle entry.
- The chicane gate may be positioned alongside a vehicle access gate or at a permitted trail access.
- Some chicane gates may also include a separate horse step-over. See horse-steps overs below.
Planning
Consider the following when selecting gate locations:
- Position near level areas at entry and exit.
- Fences and gates adjacent to roadways, must comply with road related standards and guidelines (clear zones, spearing hazards).
Design
Design chicane gates to include the following:
- Ensure there are no entrapment or crushing points (i.e. provide appropriate gaps at gate openings).
- Gates with hinges should be designed to swing both inwards and outwards.
- Where trails are multi-use, gates must provide sufficient width (1.6m absolute minimum) for pedestrians, cyclists, horse and rider.
- Consider installing reflectors or wrapping reflective tape around the top of a gate where there may be insufficient luminance contrast between the background and the gate.
- Ensure the gate is installed with a fence (one or more fence panels) either side or position natural elements such as vegetation or boulders on both sides of the gate to ensure vehicle exclusion.
- Signs may be fixed to the gate where required.
- Post tops – all timber post tops to be angled at 15 degrees to prevent water damage. Galvanised post tops to be capped
- Rails – all timber rails to have arrissed edges for safety and superior finish, all galvanised top rails to be welded to galvanised posts
- All footings must be designed and installed to engineers specifications.
See Table 4: Typical chicane gates.
Materials selection for a chicane gate should consider:
- level of use
- any potential unlawful entry
- adjacent fence material.
Chicane gates are typically constructed of galvanised steel for durability and they may act as a neutral material that can complement the adjoining fence.
Traditional system - timber post and rail in a ‘s’ shape
Table 4: Typical standard chicane gates
Standard - typical example | Fence type/name and purpose |
 |
‘Walk-thru’ open area entry/exit point |
 |
Galvanised post and rails in a ‘u’ shape |
 |
Vertical galvanised posts |
 |
Traditional system - timber post and rail in a ‘s’ shape |
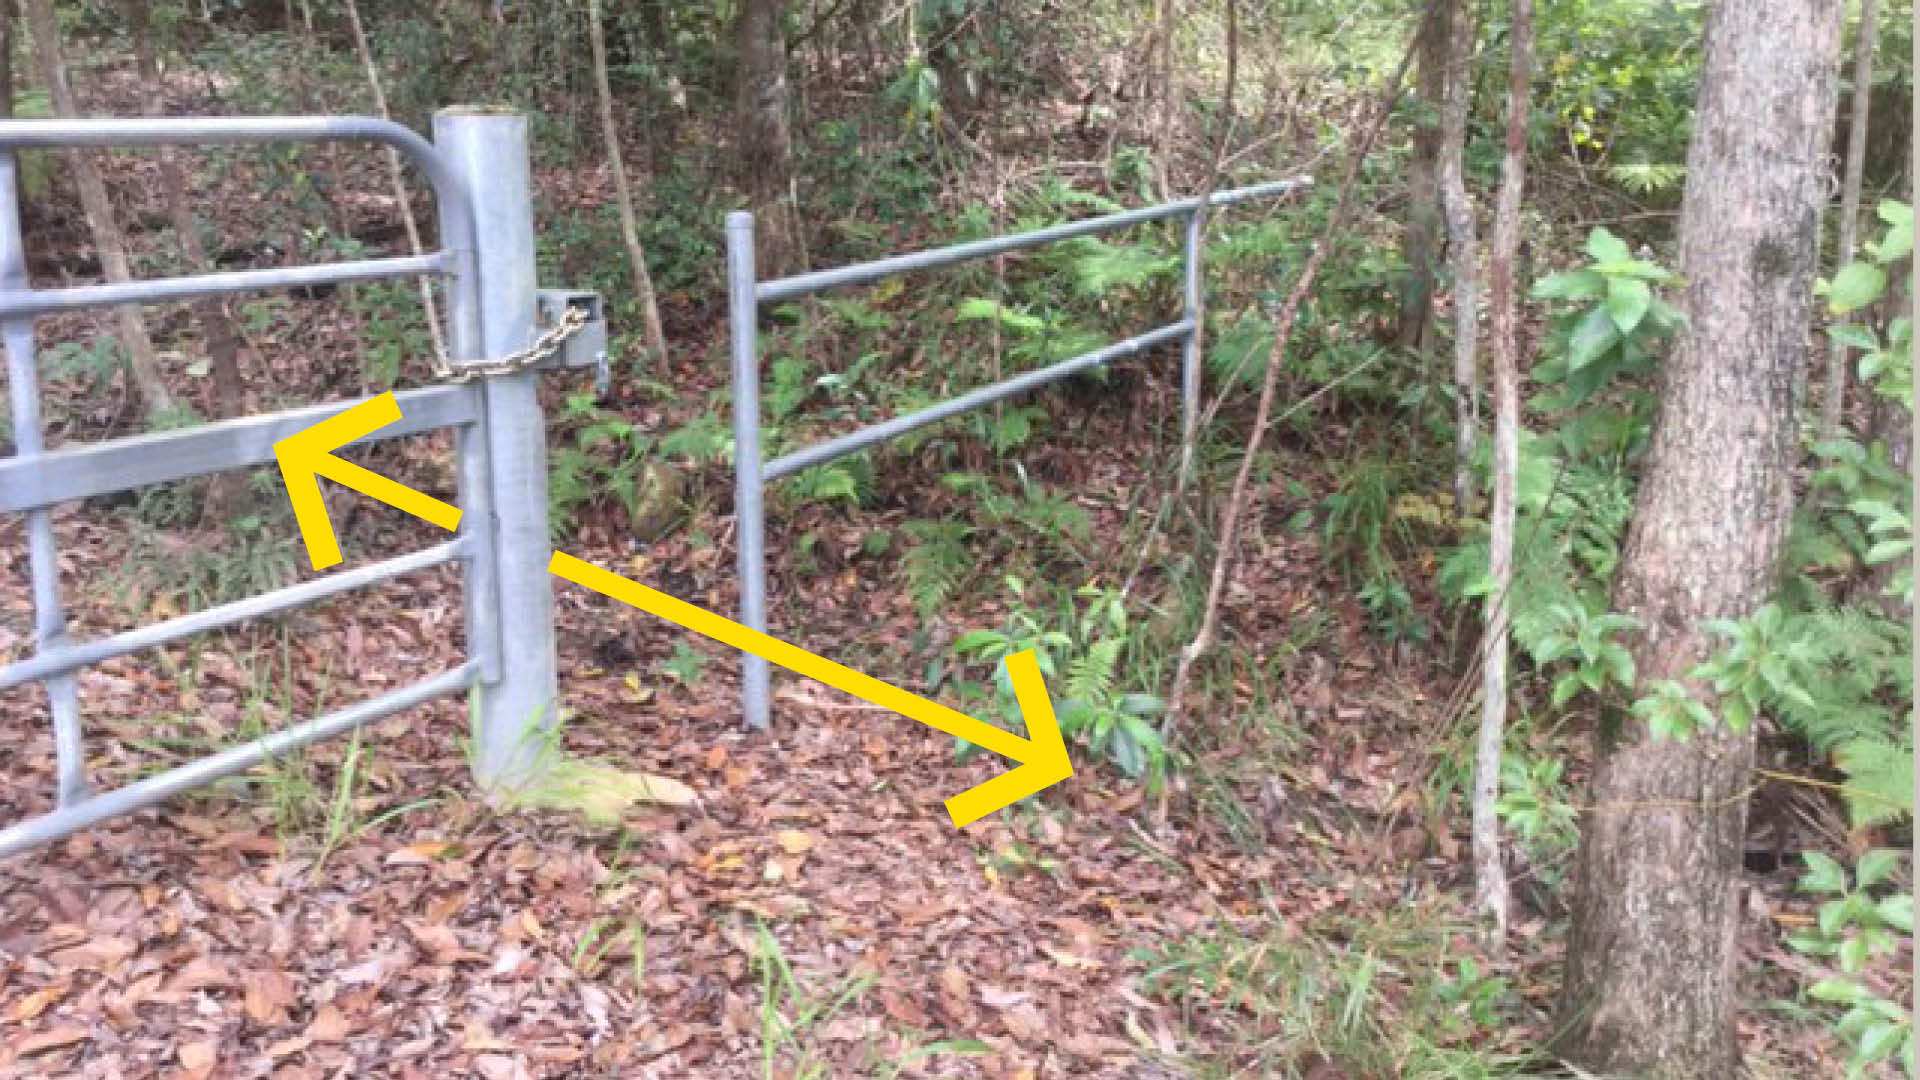
Vehicle gate (‘super heavy duty’)
Purpose
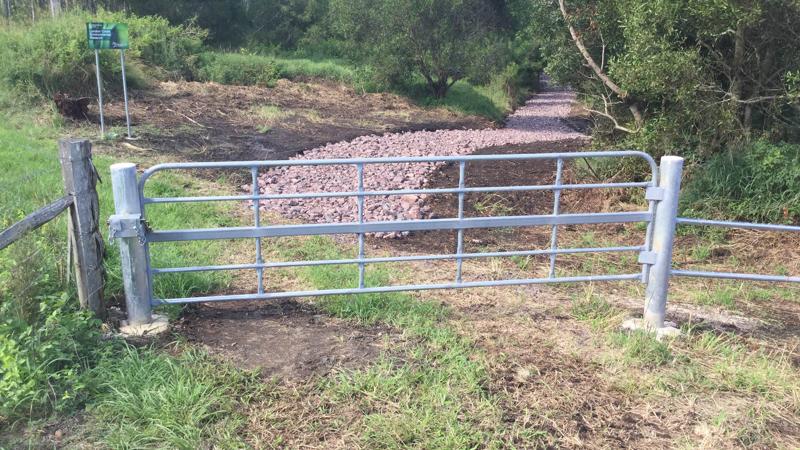
A vehicle gate is designed to provide approved vehicle access. Where unauthorised vehicles enter a protected area (such as an environmental reserve), they can cause irreversible damage to the trail network and to flora and fauna habitat.
A super heavy duty vehicle gate is installed as barrier to deter unauthorised vehicles (such as motorbikes or motor vehicles) where passive surveillance is infrequent, and at sites which display evidence of unapproved vehicle access.
Alternative vehicle gate
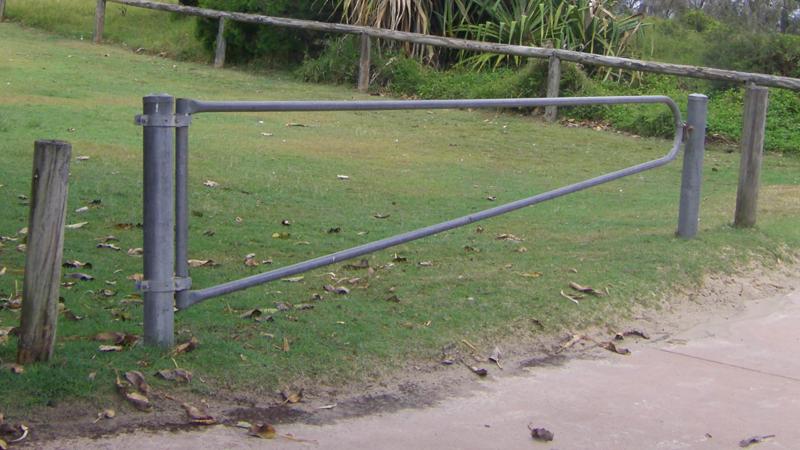
Alternative vehicle gate
Not all sites have low surveillance or are targeted for entry by unauthorised vehicles. Where this is the case, and a high standard finish is not required, consider a standard vehicle access gate. See parks and gardens vehicle gate (‘standard CHS’).
Planning
Consider the following when selecting gate locations:
- Direct access from the nearest road.
- Locate along a fence line with easy access. Consult Council (Parks and Gardens – Operations) to determine their preferred location.
- Ensure the gate does not open cross a footpath or provide no conflict with other activities.
- Sufficient overhead clearance for crane truck delivery such as components for shelters, barbecues, park furniture.
- Where a vehicle gate is accessed via a sealed road, paint a yellow ‘no stopping’ line across the entry to prevent vehicles parking and blocking the gate.
- Locate vehicle gate at a site easily accessible from a road. Ensure there is sufficient parking area for approved vehicles to temporarily park (outside of the gate), prior to entry. Ensure the parked vehicle does not interrupt the normal flow of on-road traffic.
- Ensure the gate swing area is not restricted by trees and allows adequate circulation space for entering vehicles. The gate location must be free of tree roots.
- Locate gate with a connecting barrier fence or natural elements (i.e. vegetation)
- Gates adjacent to roadways, must comply with road related standards and guidelines (clear zones, spearing hazards).
Design
Design the vehicle gate to include the following:
- Minimum 4.0 m clear space for approved maintenance and emergency vehicles. Provide sufficient overhead space for large vehicles (fire trucks).
- Hinged swing system which opens inwards to the fenced area, or both ways where possible. Manufactured with two hinges for safe operation.
Ease of operation to comply with health and safety requirements.
- Ensure there are no entrapment or crushing points (i.e. appropriate gaps at gate openings).
- All ends to be capped.
- All footings must be designed and installed to engineers specifications.
Consider the following when selecting gate materials:
- level of use, any potential unlawful entry and adjacent fence materials.
‘Super heavy duty’ gates are typically constructed of galvanised steel for durability and to complement adjoining fence materials.
Locks and keys

Vehicle gates must be secured by:
- A padlock operable by both council and external parties such as emergency services.
- Provide either a two (minimum) or a four separate keyed access to suit the location such as Council, emergency services, other utility service providers.
- A four lock access requires an extra plate on the inside of the lock box.
- Provide a shroud around each locking mechanism for weather proofing and to prevent vandalism.
- Padlock and Council Parks 30 key – contact Council (Environmental Operations) for further information.
Note: For the most appropriate/preferred location for vehicle access, gates, consult Council (Environmental Operations) for environmental reserves.
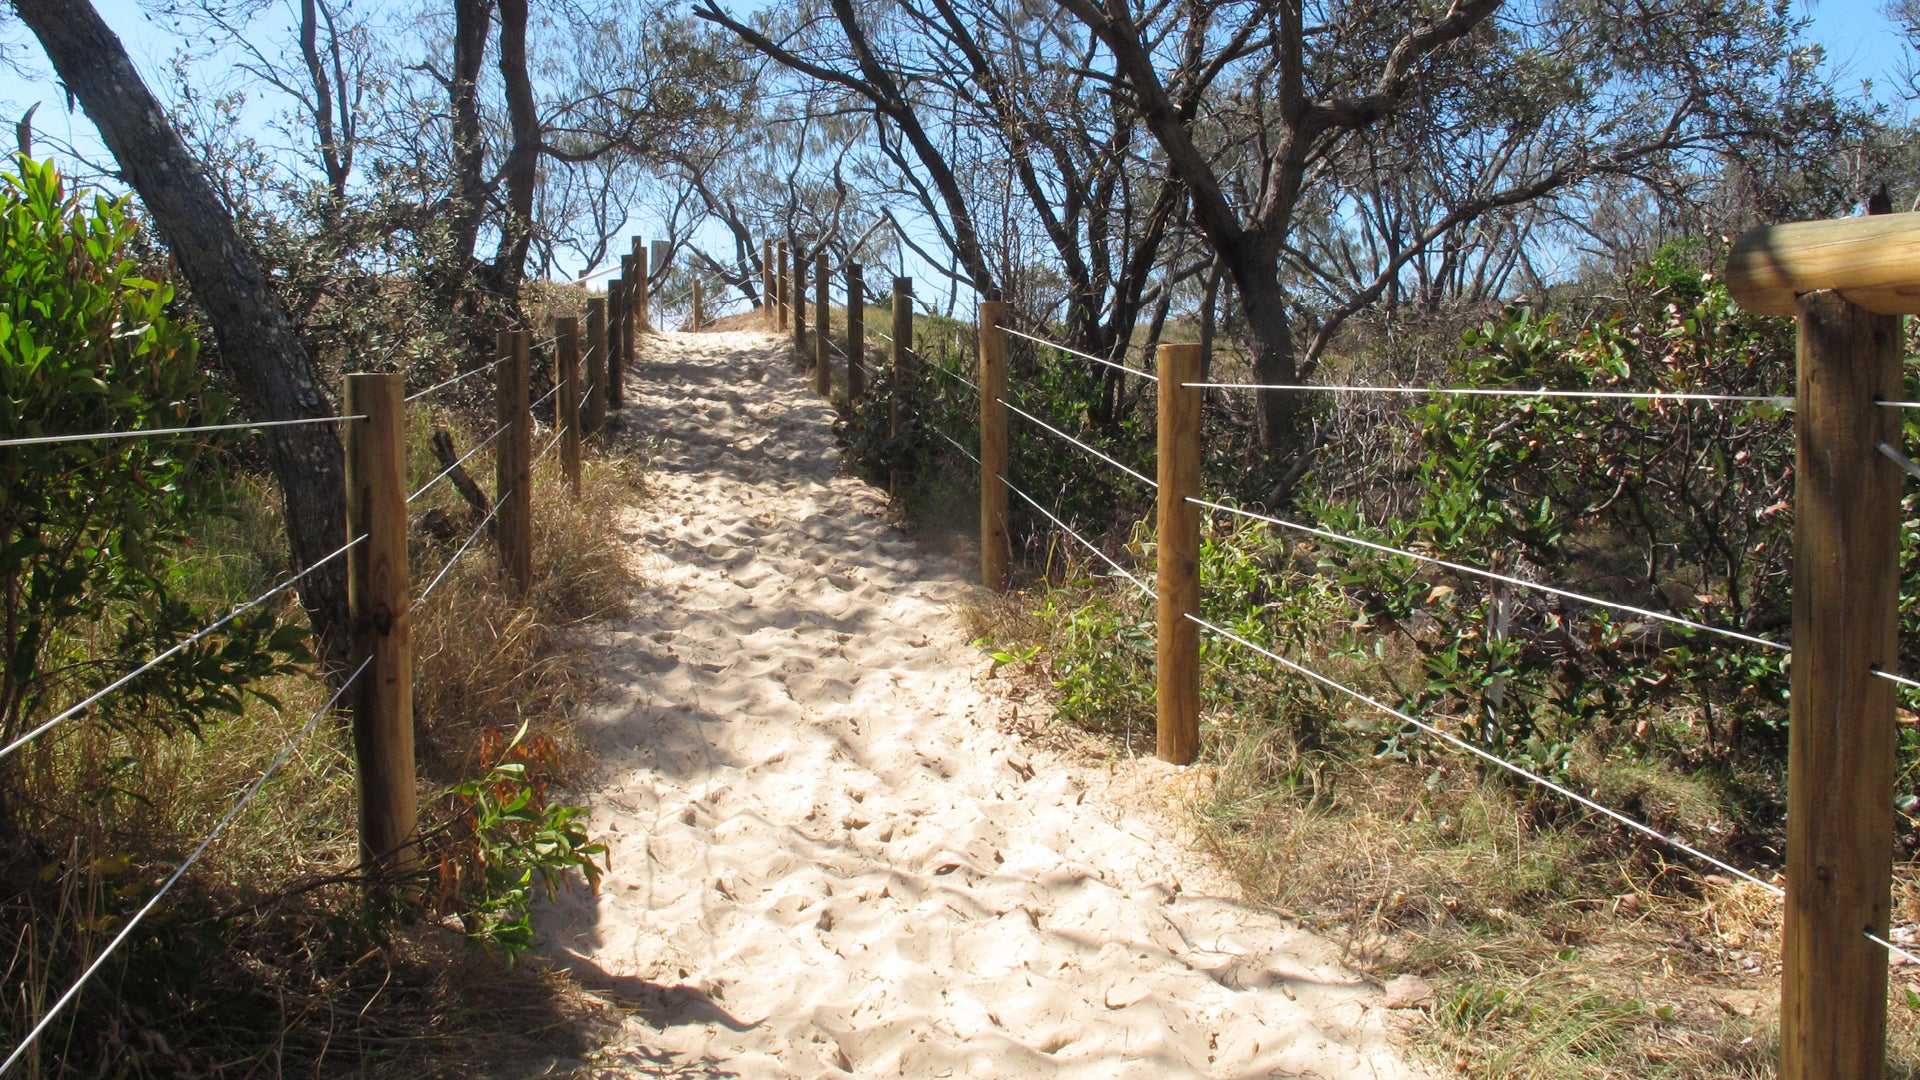
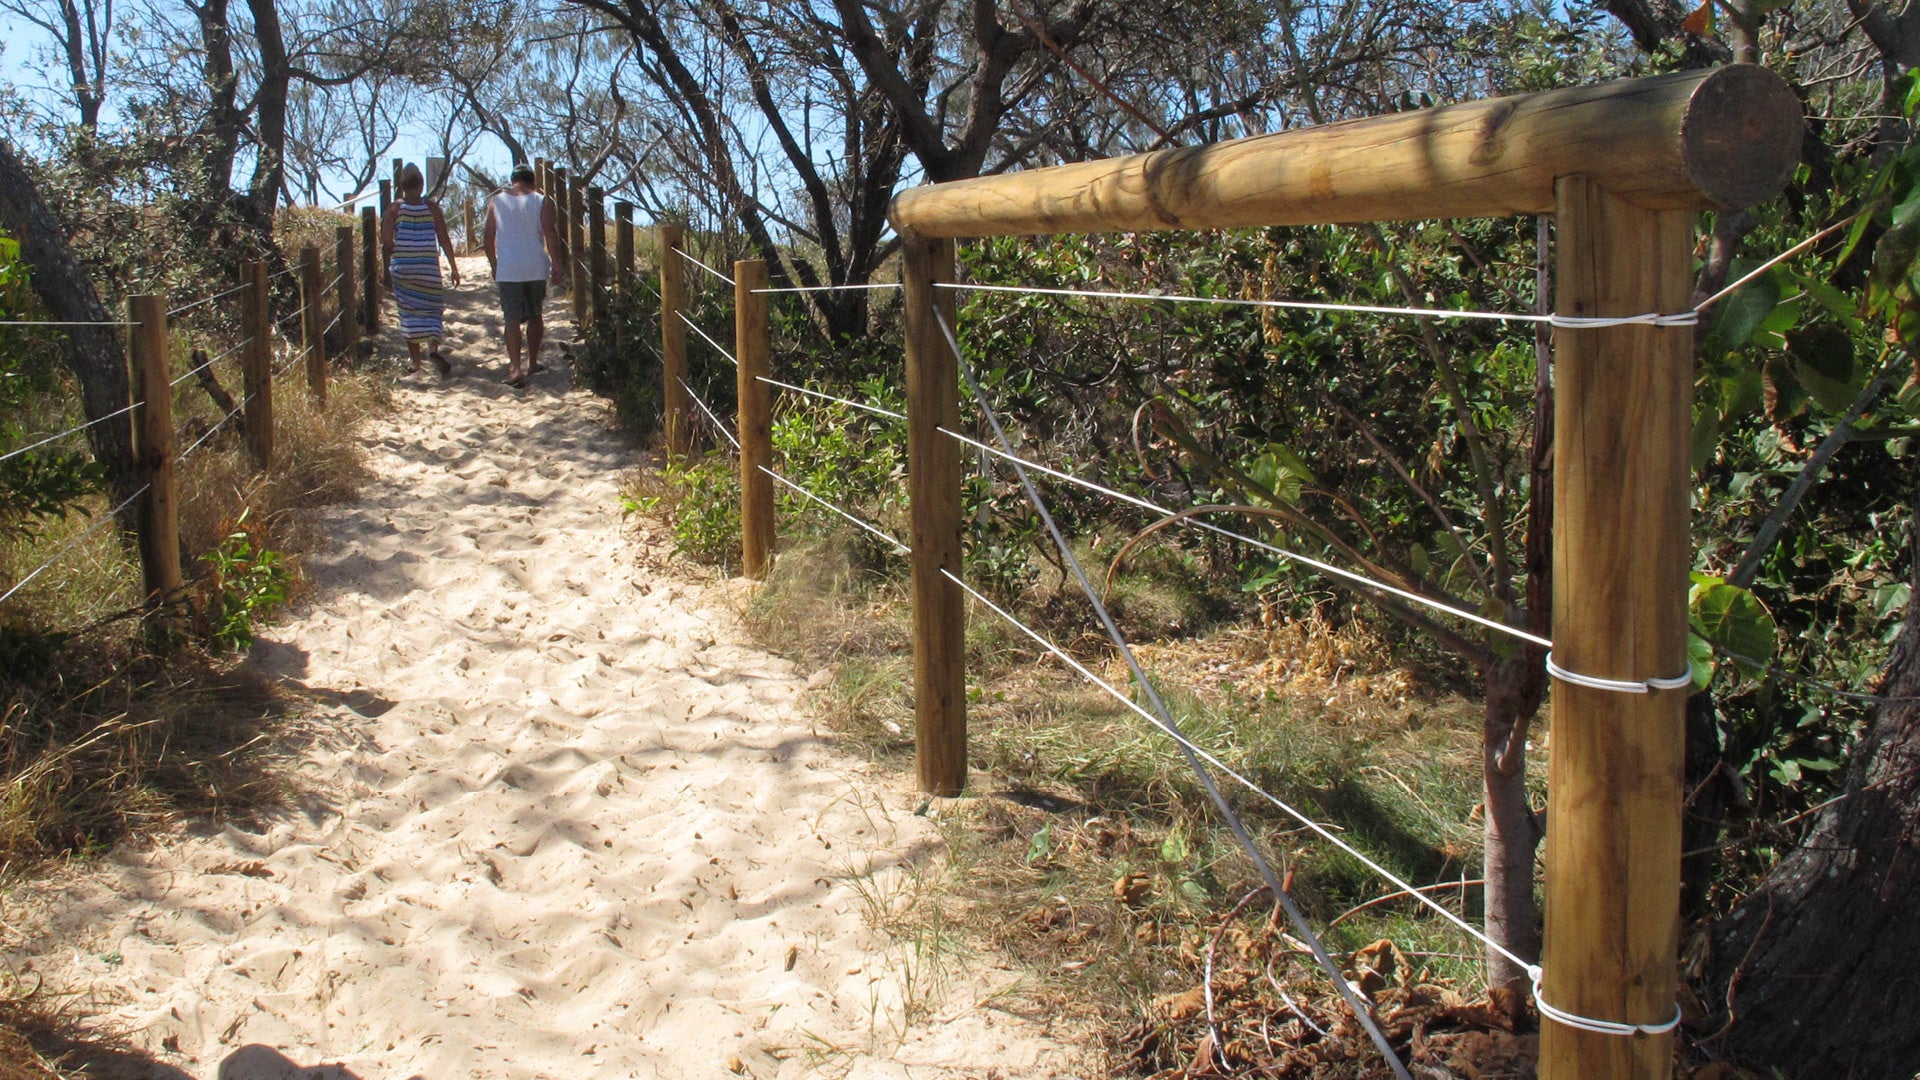
Beach access and habitat protection fence
Purpose
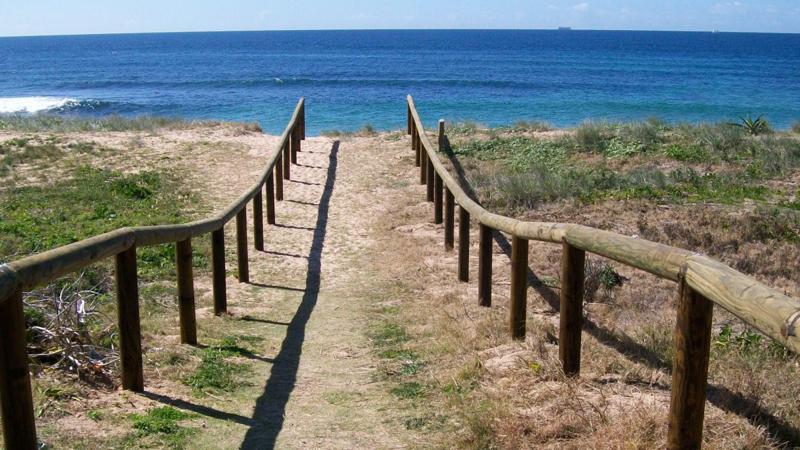
Fences installed at coastal environments (such as a beach access) have been designed for a site specific purpose such as dune stabilisation or habitat protection.
Some of these fence types may also be suitable for environmental reserves.
Planning
The figure below demonstrates fence design for beach access and habitat protection. These fences are detailed in LIM Beach infrastructure.
Design
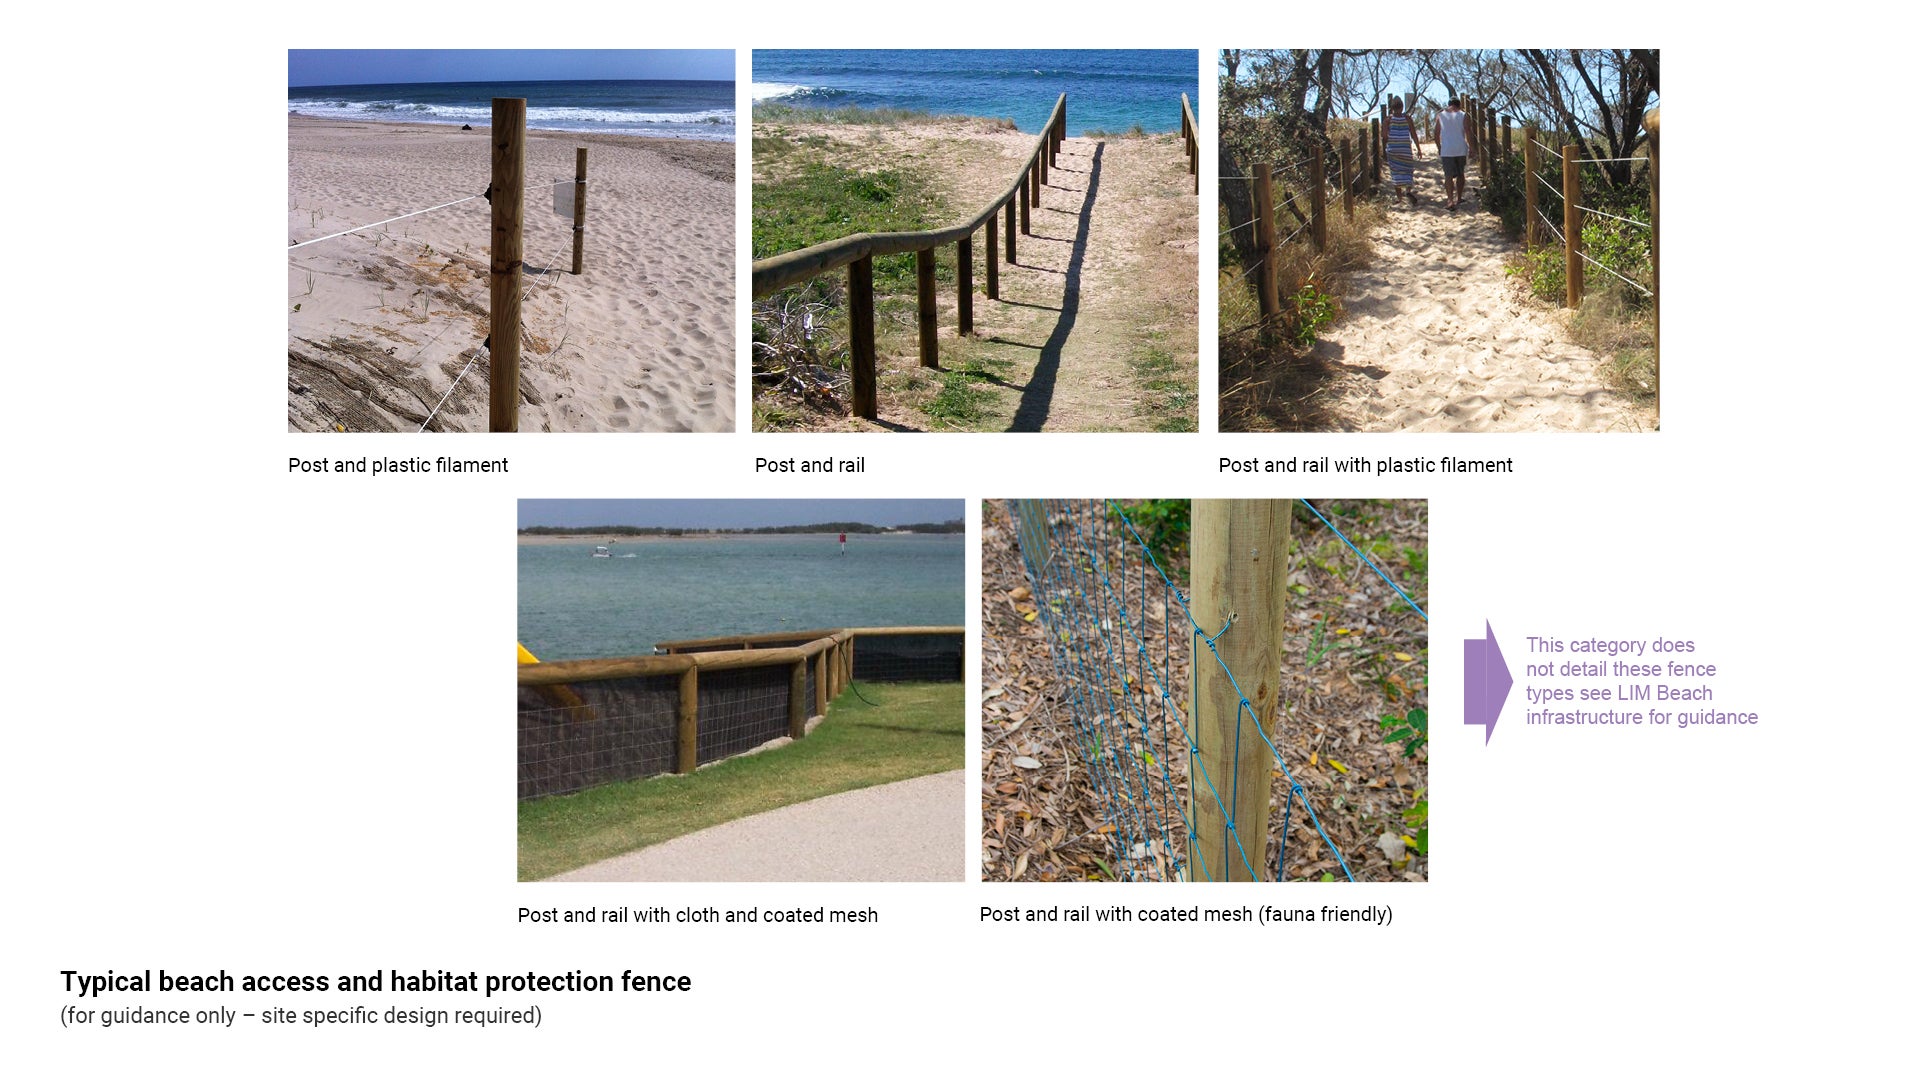
- Post and plastic filament – designed to clearly mark boundaries and to deter access to private land or sensitive areas such as:
- dunal areas that require re-establishment after a storm event.
- dunal areas chosen by nesting turtles.
- Post and rail – designed for public amenity areas and heavily used access tracks.
- Post and rail with plastic filament – designed to restrict pedestrian access and reduce impact on vegetation within coastal or other areas.
- Post and rail with cloth and coated mesh – designed to trap sand and protect pathways and sensitive dune areas from sand build up and sand blow.
- Post and rail with coated mesh (fauna friendly) – protection fence designed to prevent impact on vegetated coastal areas or the like and to restrict access from pedestrians and unwanted animals such as dogs.
See the following for further guidance:
- Figure 2: Typical beach access and habitat protection fence.
- LIM Beach infrastructure for post and rail fencing, typically installed at beach accesses and dunal protection fencing.
Figure 2: Typical beach access and habitat protection fence
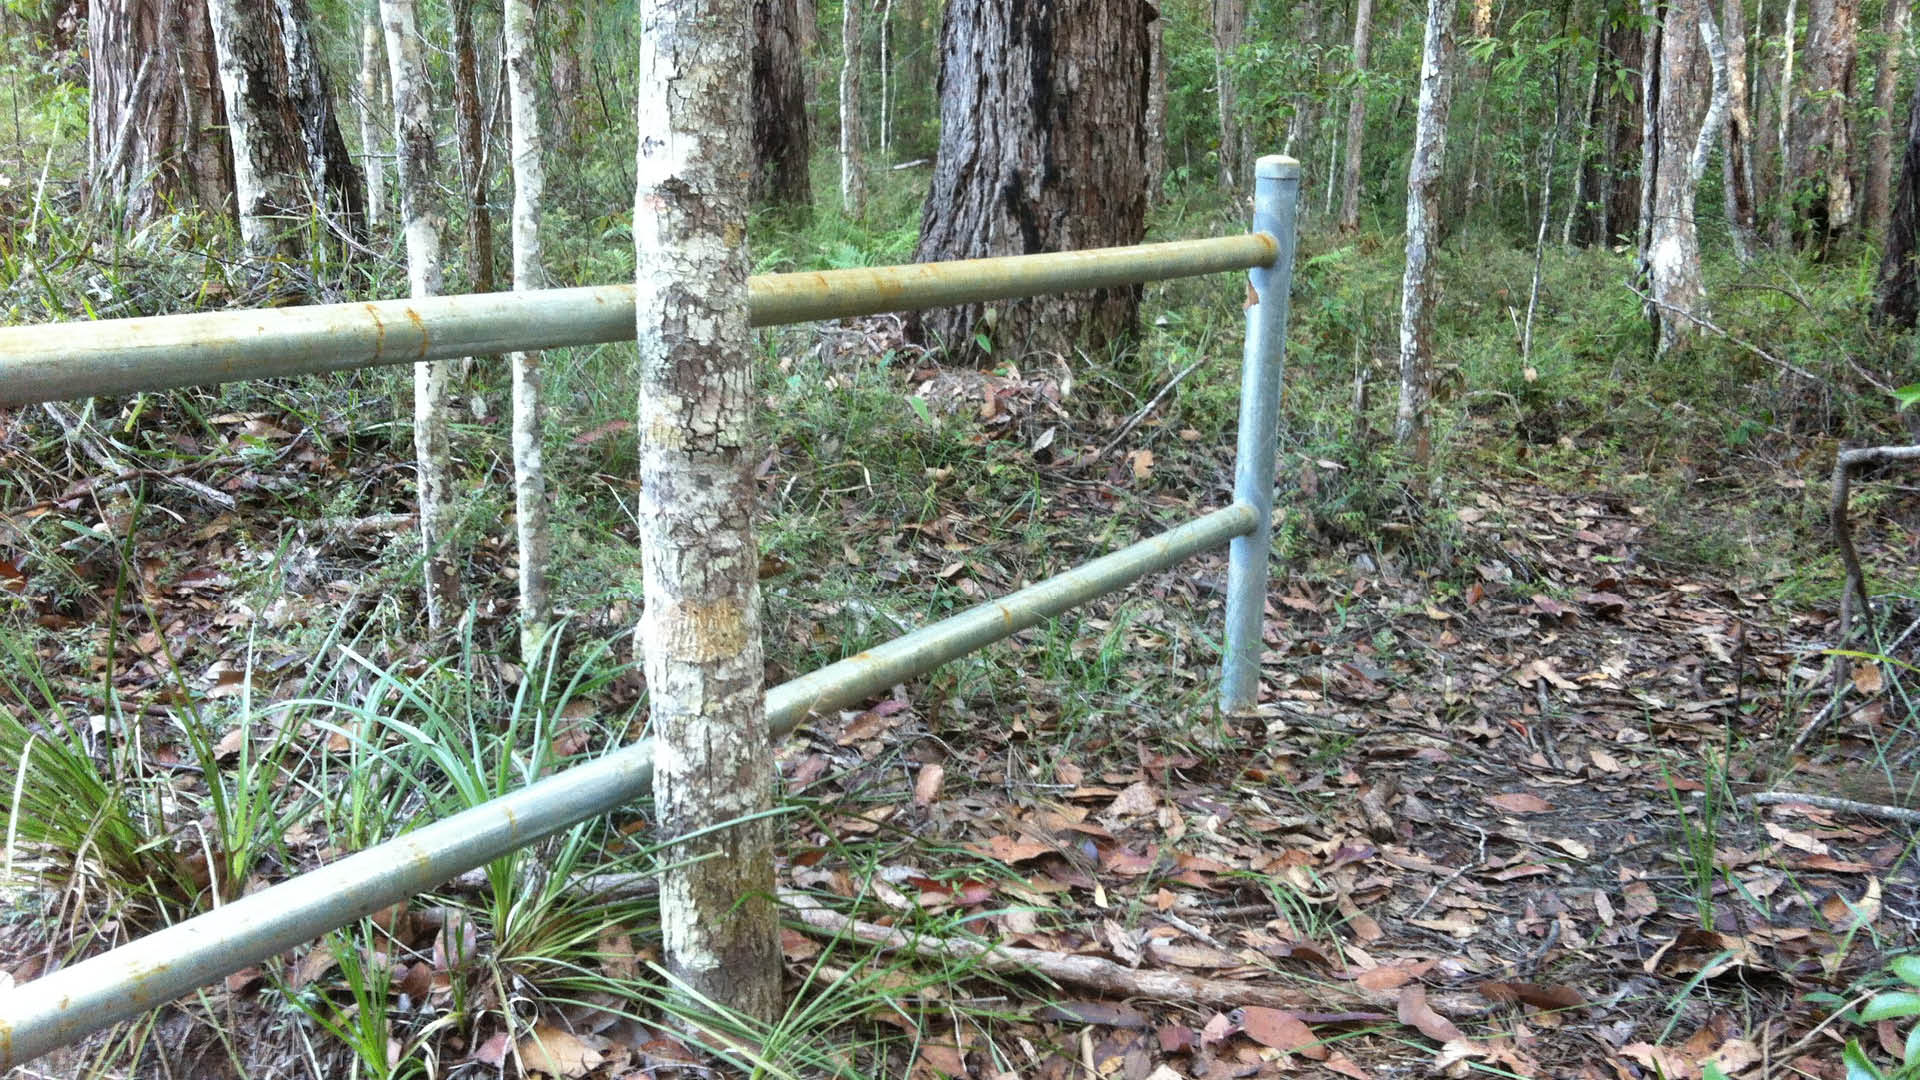
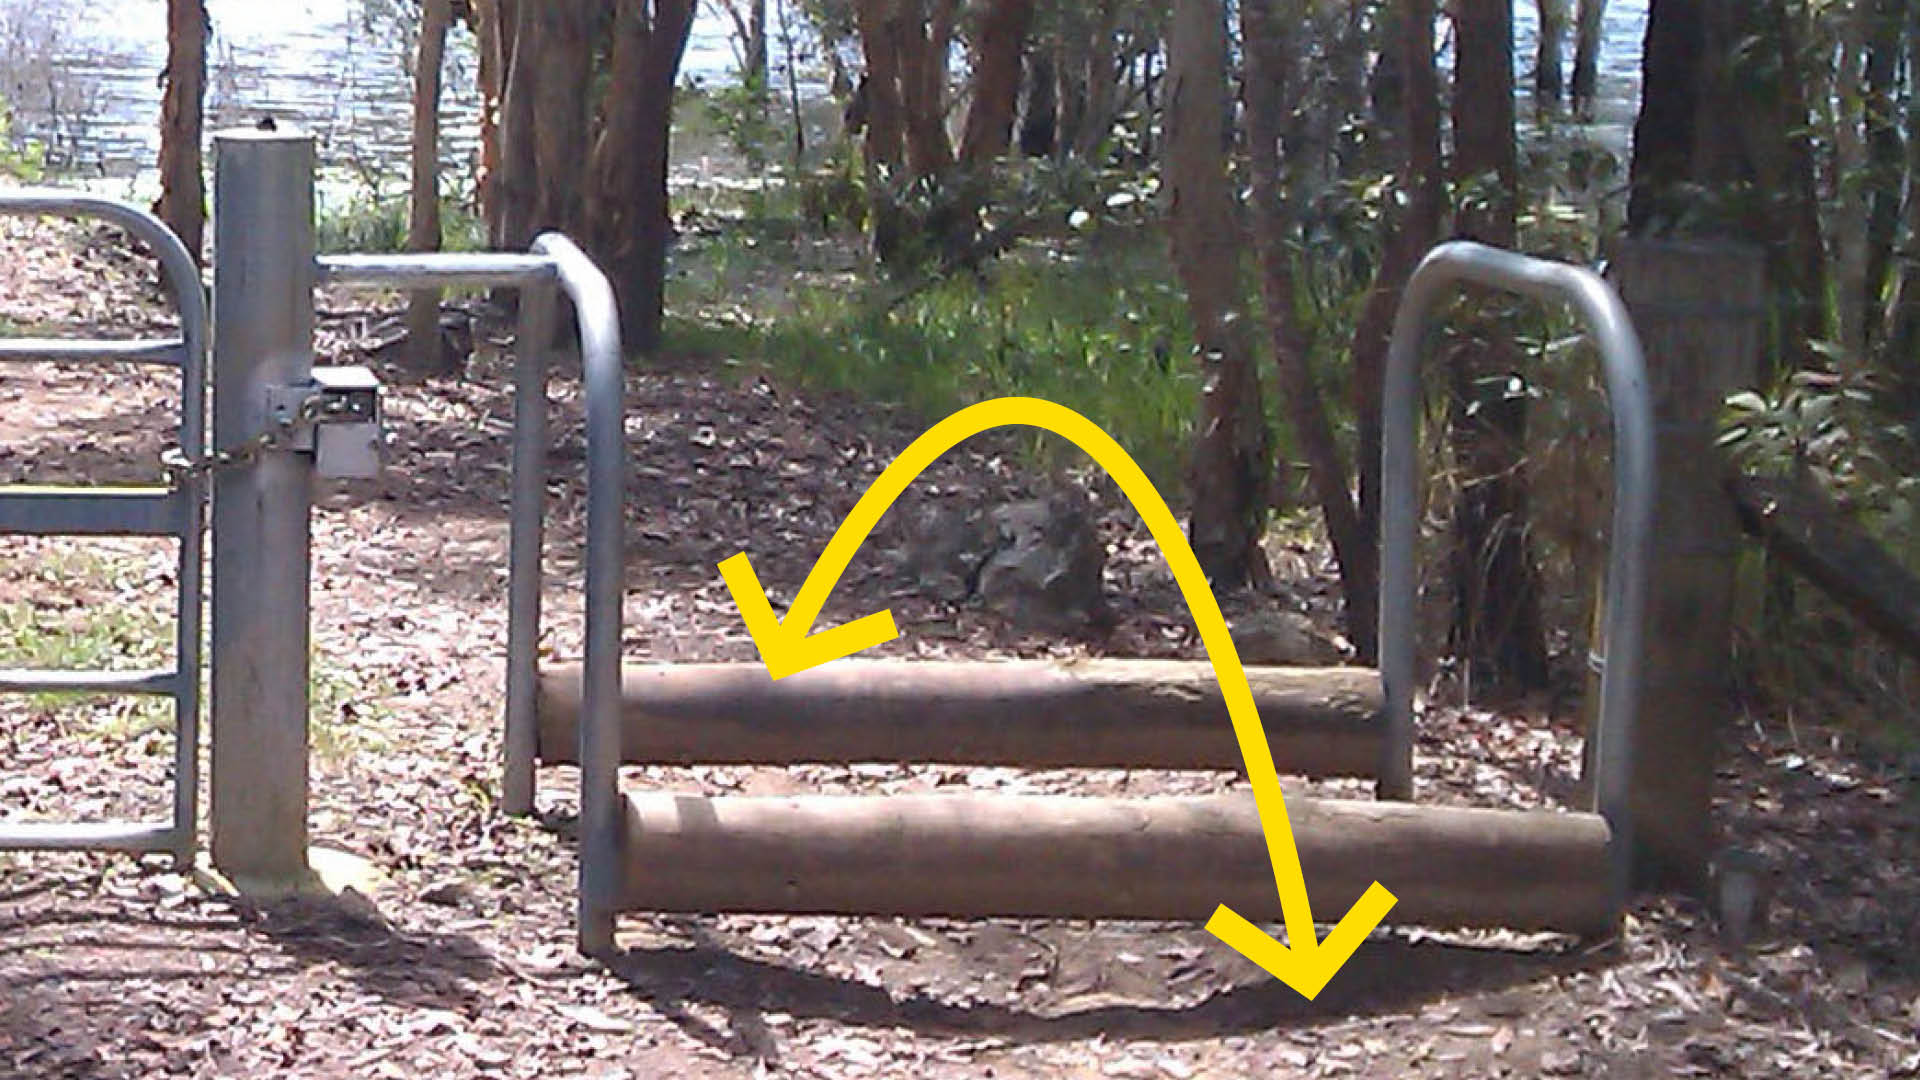
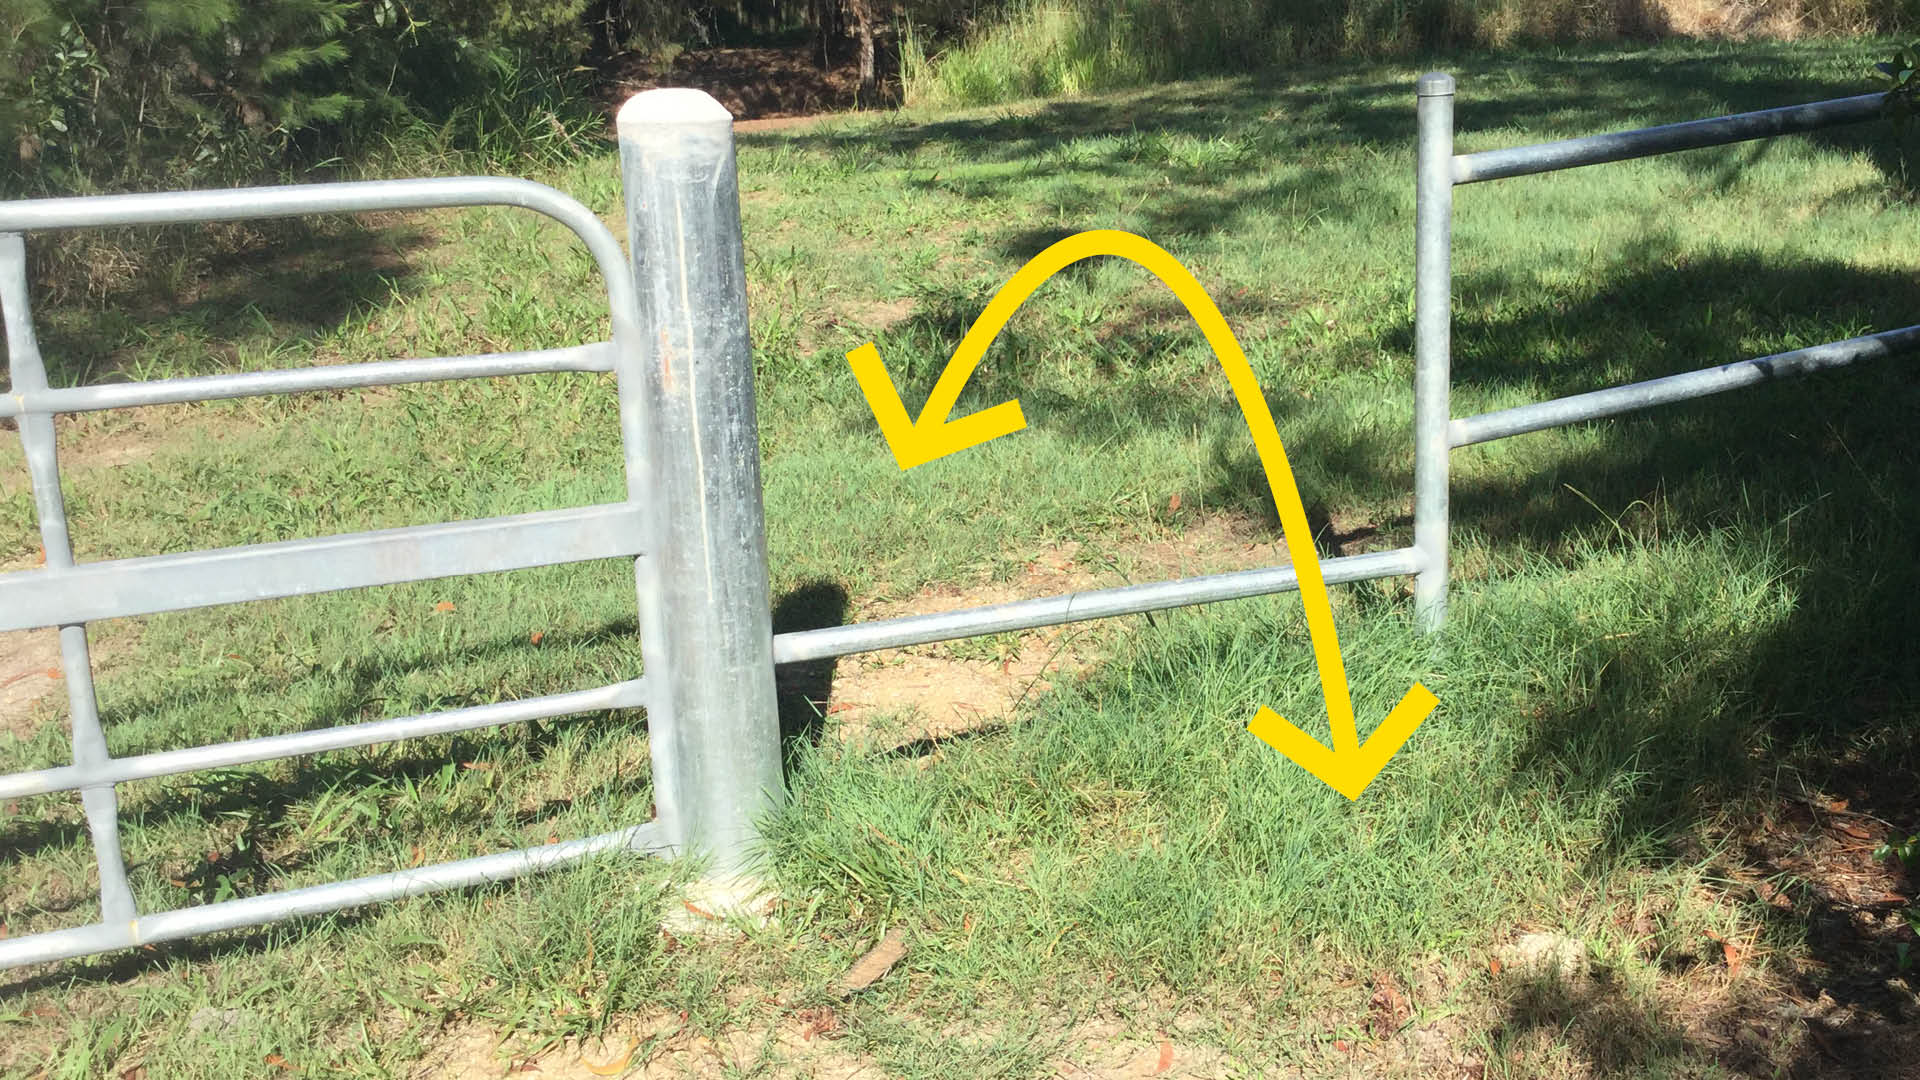
Horse step overs
Purpose
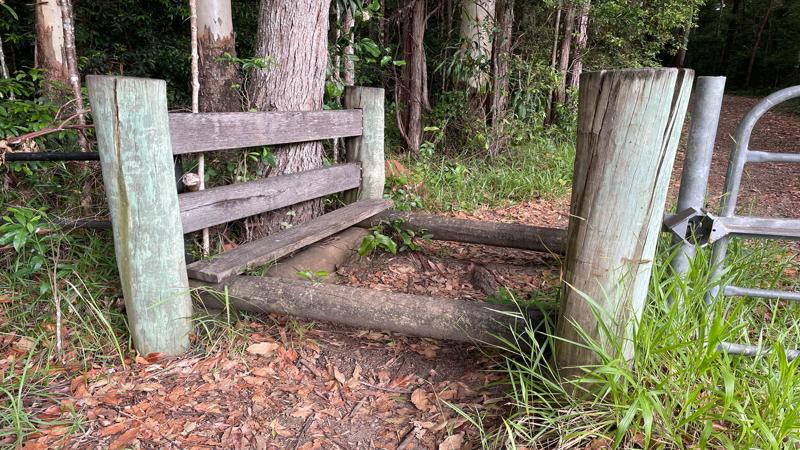
Horse step overs (cavalletti) are used at specific environmental reserve trail entry points, to restrict unauthorised vehicle and motor cycle access, while allowing pedestrians, bike riders and horse rider entry.
Key attributes:
- A cavelletti is comprised of horizontal rails (single or double) at horse knee height, spaced a ‘horse step’ length apart.
- A horse can step over each rail in turn to pass through and or over the cavelletti.
- A pedestrian can step over the horizontal barrier and individuals riding mountain bikes, can lift their bike over.
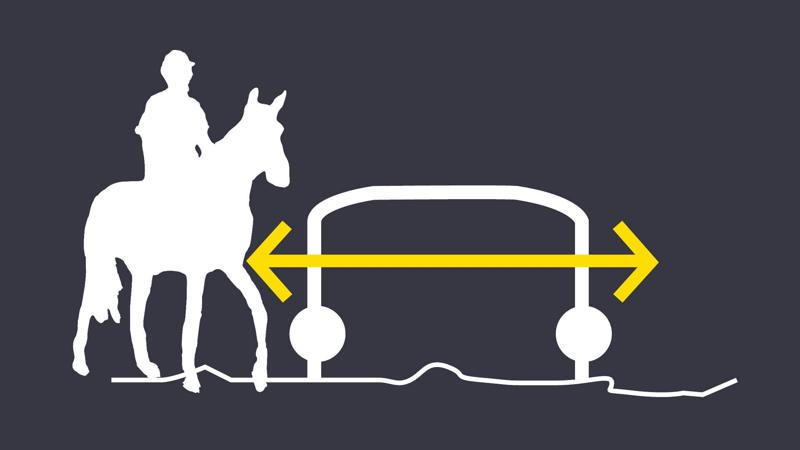
Double step over
Preferred at locations where there are known unauthorised vehicles entry attempts and or at locations with infrequent use or low visual surveillance. A double step over should comprise:
- 2 x horizontal rails installed at a height which is comfortable for a horse to step over (maximum 350 mm above ground level)
- 2 x horizontal rails set apart minimum 1200 mm.
- Width for step-over is a minimum 1750 mm clear to allow for horse and rider.
- Side fence or other barrier (boulders or vegetation) is a minimum 1.0 m high.
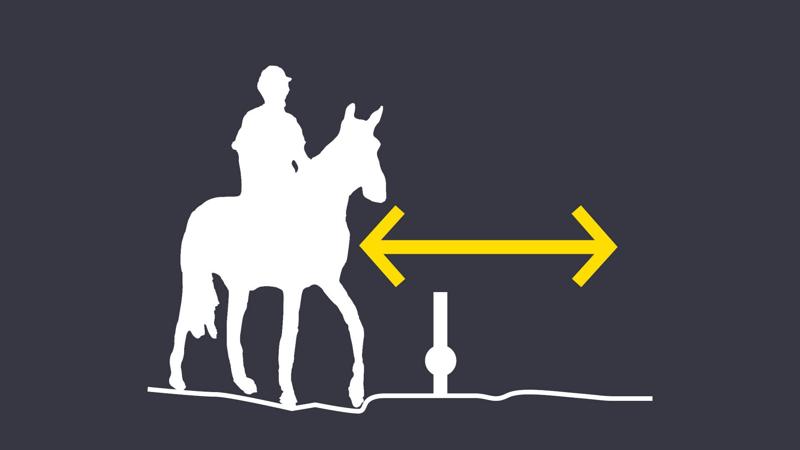
Single step over
Preferred at locations where there is frequent use/high visual surveillance. A single step over should comprise:
- 1 x horizontal rail installed at a height which is comfortable for a horse to step over (maximum 350 mm above ground level)
- Side fence or other barrier (boulders or vegetation) is a minimum 1.0 m high.
Planning
Step over design should consider the following:
- Install at a trail suitable for horse riding, and where there is a likelihood of unauthorised vehicle access.
- Before and after the step over must have near level ground to provide an even surface for horse and rider.
- Fences and gates adjacent to roadways, must comply with road related standards and guidelines (clear zones, spearing hazards).
Design
Design the horse step over to include the following:
- Materials should complement any existing fence and the surrounding environment.
- Ensure the step over is installed with a fence (one or more fence panels) either side, or position natural elements (such as vegetation or boulders) to prevent unauthorised vehicle entry.
- Signs may be fixed to the gate posts where required (no sharp edges which could injure horse or rider).
- Post tops – all timber post tops to be angled at 15 degrees to prevent water damage. Galvanised post tops to be capped.
- Rails – all timber rails to have arrissed edges for safety and superior finish, all galvanised top rails to be welded to galvanised posts.
- All footings must be designed and installed to engineers specifications.
Consider the following when selecting materials:
- the level of use.
- any potential unlawful entry.
- adjacent fence materials.
Horse step overs are typically constructed of galvanised steel and or timber for durability and to complement adjoining fence materials.
- Materials selection should consider – the level and type of use, potential unlawful entry and adjacent fence material
- Gates/step over, must appropriately match the adjacent fence material or natural elements (i.e. vegetation, stones, boulders).
See Table 6: Typical horse step overs.
Table 6: Typical horse step overs
Typical example | Type/name and purpose |
 |
Timber post and step over |
 |
Galvanised post and timber step over |
 |
Galvanised post and step over |
Fauna fences overview

Fauna movement incorporates the daily travel for food, shelter and water, which often places native wildlife in conflict with traffic, humans, domestic pets and predators.
- Typically fences are needed on the margins of major reserves, especially where the reserve is close to major roads.
- In many situations there is a need for a fence to aid native wildlife to move safely through/over a landscape where there may be high risk to safety and survival.
Installation of the correct fence type is dependent upon:
- the type of native fauna present.
- the surrounding landscape.
- risk factors such as traffic, heavily built-up areas and the presence of feral animals.
For further guidance and design specifications regarding fauna fencing, contact
[email protected]
There are two types of fauna fences: 'fauna friendly fences' or 'fauna exclusion fences'.
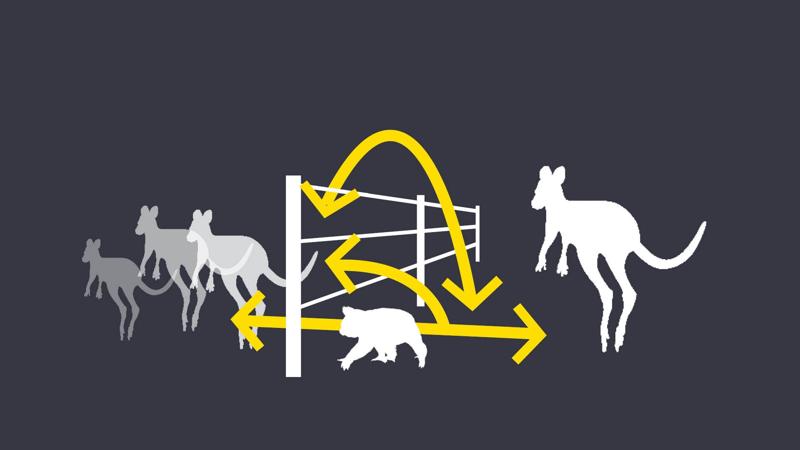
Fauna friendly fences
A fence that enables fauna to pass through, over or under. The fence does not disrupt the native wildlife feeding, breeding, social patterns or migration.

Fauna exclusion fences
Fences installed to keep fauna from entering harmful environments
Fauna friendly fences
Purpose
Fauna friendly fences allow native wildlife to maintain movement throughout their habitat. These fences can significantly add to the ability of movement for species such as; koalas, possums, wallabies, kangaroos, echidnas and bandicoots, to survive in urban areas.
Unsuitable fencing can present an obstacle to fauna movement:
- Barbed wire used in fencing poses a significant risk of entanglement and death for walking, jumping, flying and gliding fauna.
- Fences erected across fauna corridors and habitat can create barriers which disturb feeding, breeding, social patterns and migration.
Fauna friendly fences generally do not cater for individual fauna species, rather a variety of similar sizes, behaviours and modes of mobility. However specialised fences may be required for specific fauna applications.
See Table 8: Typical fauna friendly fences.
Planning
Prior to installing a fence, consider:
- the management intent of the site.
- Fauna Management Plan requirements.
- the species of native animal(s) present.
- the requirements for movement around/within site.
- the type of fauna fence which will best protect those species present.
- fences adjacent to roadways, must comply with road related standards and guidelines (clear zones, spearing hazards).
- fencing installed during the construction phase of projects (e.g. road upgrade, new development etc.) must be made fauna-friendly to allow for wildlife movement to be maintained for the duration of the works.
Design
Fauna fence design must consider the following:
- The fence must allow fauna to move through or across and over, in two directions.
- Minimum gap of 200 mm between horizontal elements. This gap creates a ladder structure that is easily climbable.
- Design to incorporate horizontal/vertical gaps a minimum of 300-400 mm between the finished ground level or between vertical post. This gap is suitable for a range of fauna such as wallabies to pass underneath or past without harm. If larger animals, such as eastern grey kangaroos are present, larger gaps may be needed.
- Do NOT use barbed wire for any fence. Select another fencing material or use plain wire such as nylon sighter wire (no steel), or glow in the dark material.
- Many animals have difficulty seeing wire fences. Improve visibility by using plastic coated wire (typically blue or white) or attaching reflective material along the top wire.
- Fire breaks that have been cleared close to or against exclusion fences can deter smaller fauna from crossing. Fire breaks close to fauna friendly fence is not preferred.
- The movement of wildlife can be assisted by planting native trees and shrubs both sides of a fence line.
- Overhanging tree limbs or vine growth can assist in the safe passage by fauna.
- Sections of fence could be removed and replaced with vegetation for integration of the fence with the natural environment.
- All footings must be designed and installed to engineers specifications.
Table 8: Typical fauna friendly fences
Typical example | Type/name and purpose |
 |
Galvanised post and chain mesh wire |
 |
Timber post with wire |
 |
Post and rail with plastic filament (LIM Beach infrastructure) |
 |
Tree stump against fence |
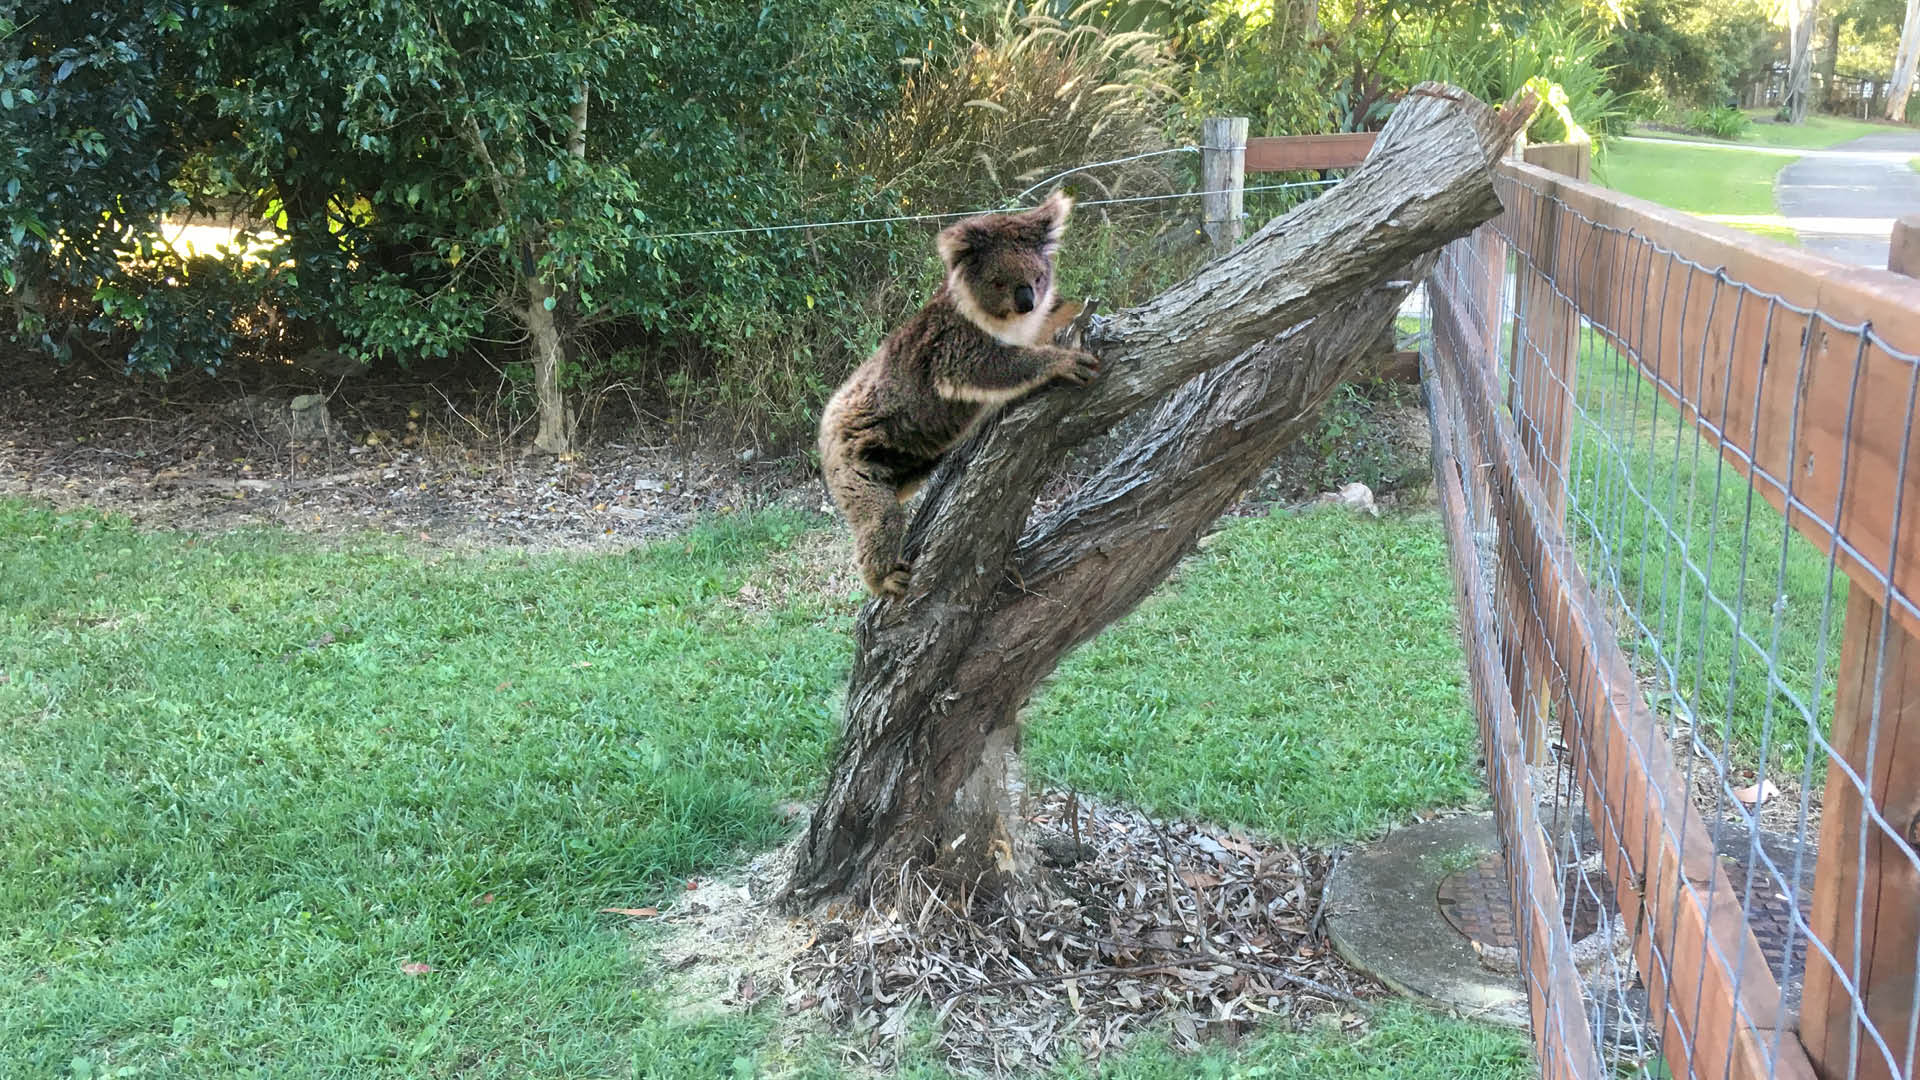
Additional elements to aid koala populations
Some fence designs can trap koalas and leave them vulnerable to attack by predators, such as the domestic dog. They may also restrict or create a barrier for koala access to food and shelter.
Koala friendly fence designs are simply items used to aid fauna to climb over existing fences to maintain movement between habitat areas.
- The fence should be easily scalable by koalas and other arboreal fauna.
- Select materials that can be easily gripped such as timber fences with round rails and posts, or chain wire mesh infill.
- Any material attached to the fence is to be webbed or latticed to provide footholds for koalas.
- Incorporate trees or sturdy shrubs up against the fence to allow easier climbing and to provide shelter for koalas.
- Larger and wider panels at the top of the fence can create a walkway to keep koalas off the ground and away from predators such as dogs.
- The placement of a pole on an angle against a fence can allow movement for koalas and other fauna and provide a quick escape when needed.
See Table 8: Typical fauna friendly fences – tree stump against fence (above).
Additional measures to protect native fauna
Consider the following supplements to fences and gates:
- Traffic calming structures, such as road speed humps.
- A reduction in speed limits.
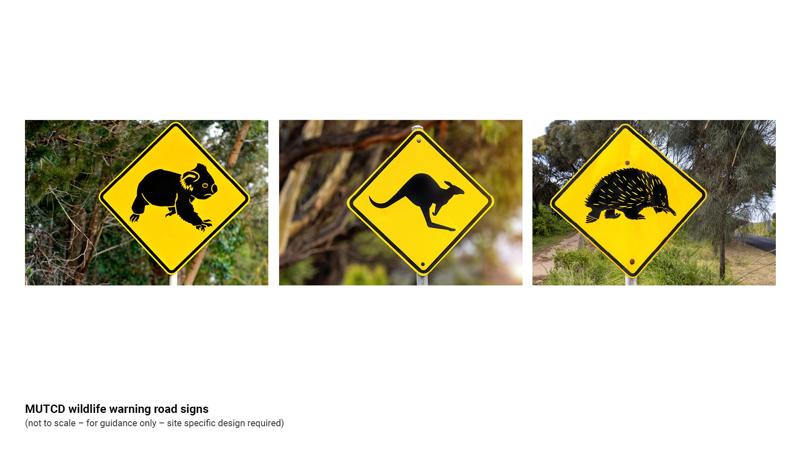
- MUTCD (Manual of Uniform Traffic Control Devices) signs warning about the presence of fauna in the area.
- Installation of signs advising local residents and visitors about native wildlife (such as a koala movement, crossing area). The sign provides awareness for local residents to restrain dogs particularly between the hours of 6 pm and 6 am.
- Supplementary plates installed directly under the wildlife warning sign.
See LIM Environmental management of fauna and flora for further guidance:
Fauna exclusion fences
Purpose
Fauna exclusion fences are installed to prevent native wildlife movement from a safe area into an area which may bring harm to the animal.
This fence type is often used where a bushland parcel (habitat area) is adjacent to a major road corridor or urban development. The fence can be used to ‘funnel’ or redirect native wildlife towards a suitable or safe crossing point.
There are a variety of fauna exclusion fences designed specifically for different animal groups:
- Koala exclusion fence (including other tree-dwelling animals)
- Frog exclusion fence
- Kangaroo exclusion fence (including wallabies).
Overall planning considerations
When designing an exclusion fence the following must be considered:
- Exclusion fence is most effective when used in conjunction with culverts and land bridges.
- Chain wire mesh placed beneath the fence may be required to prevent animals such as echidnas from burrowing beneath the fence.
- Chain wire or coated mesh size must be an appropriate aperture size (pitch) for the identified fauna species.
- Material with a range of mesh spacing to accommodate a variety of animal species and sizes, may also be selected to provide a variation of gaps to prevent some animals (such as wild dogs) entry, while allowing smaller animals entry (such as echidnas).
- Bushfire can be devastating for native fauna. When providing security/exclusion fences, escape routes must be planned for fauna to use in the event of a bushfire.
- The fence must be maintained. Fallen trees, erosion and vandalism can create breaches for fauna to escape into a danger zone.
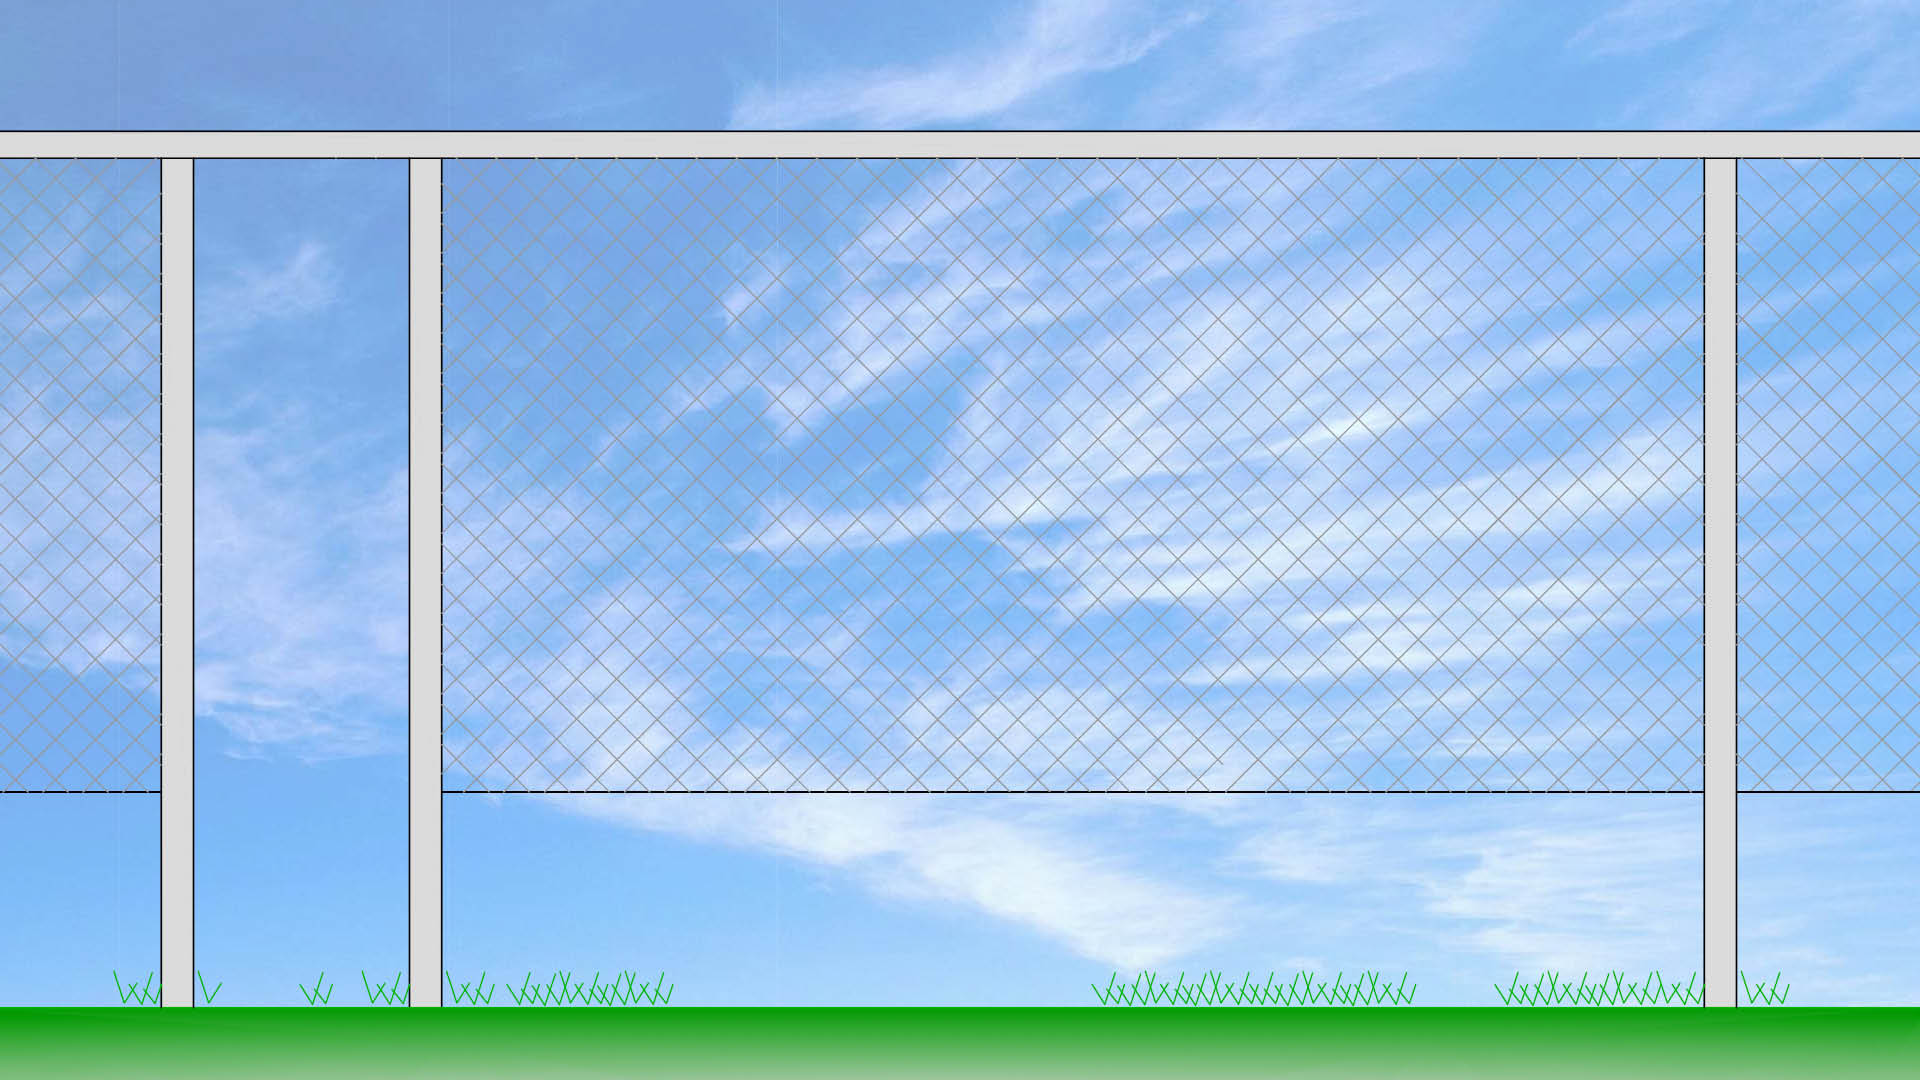
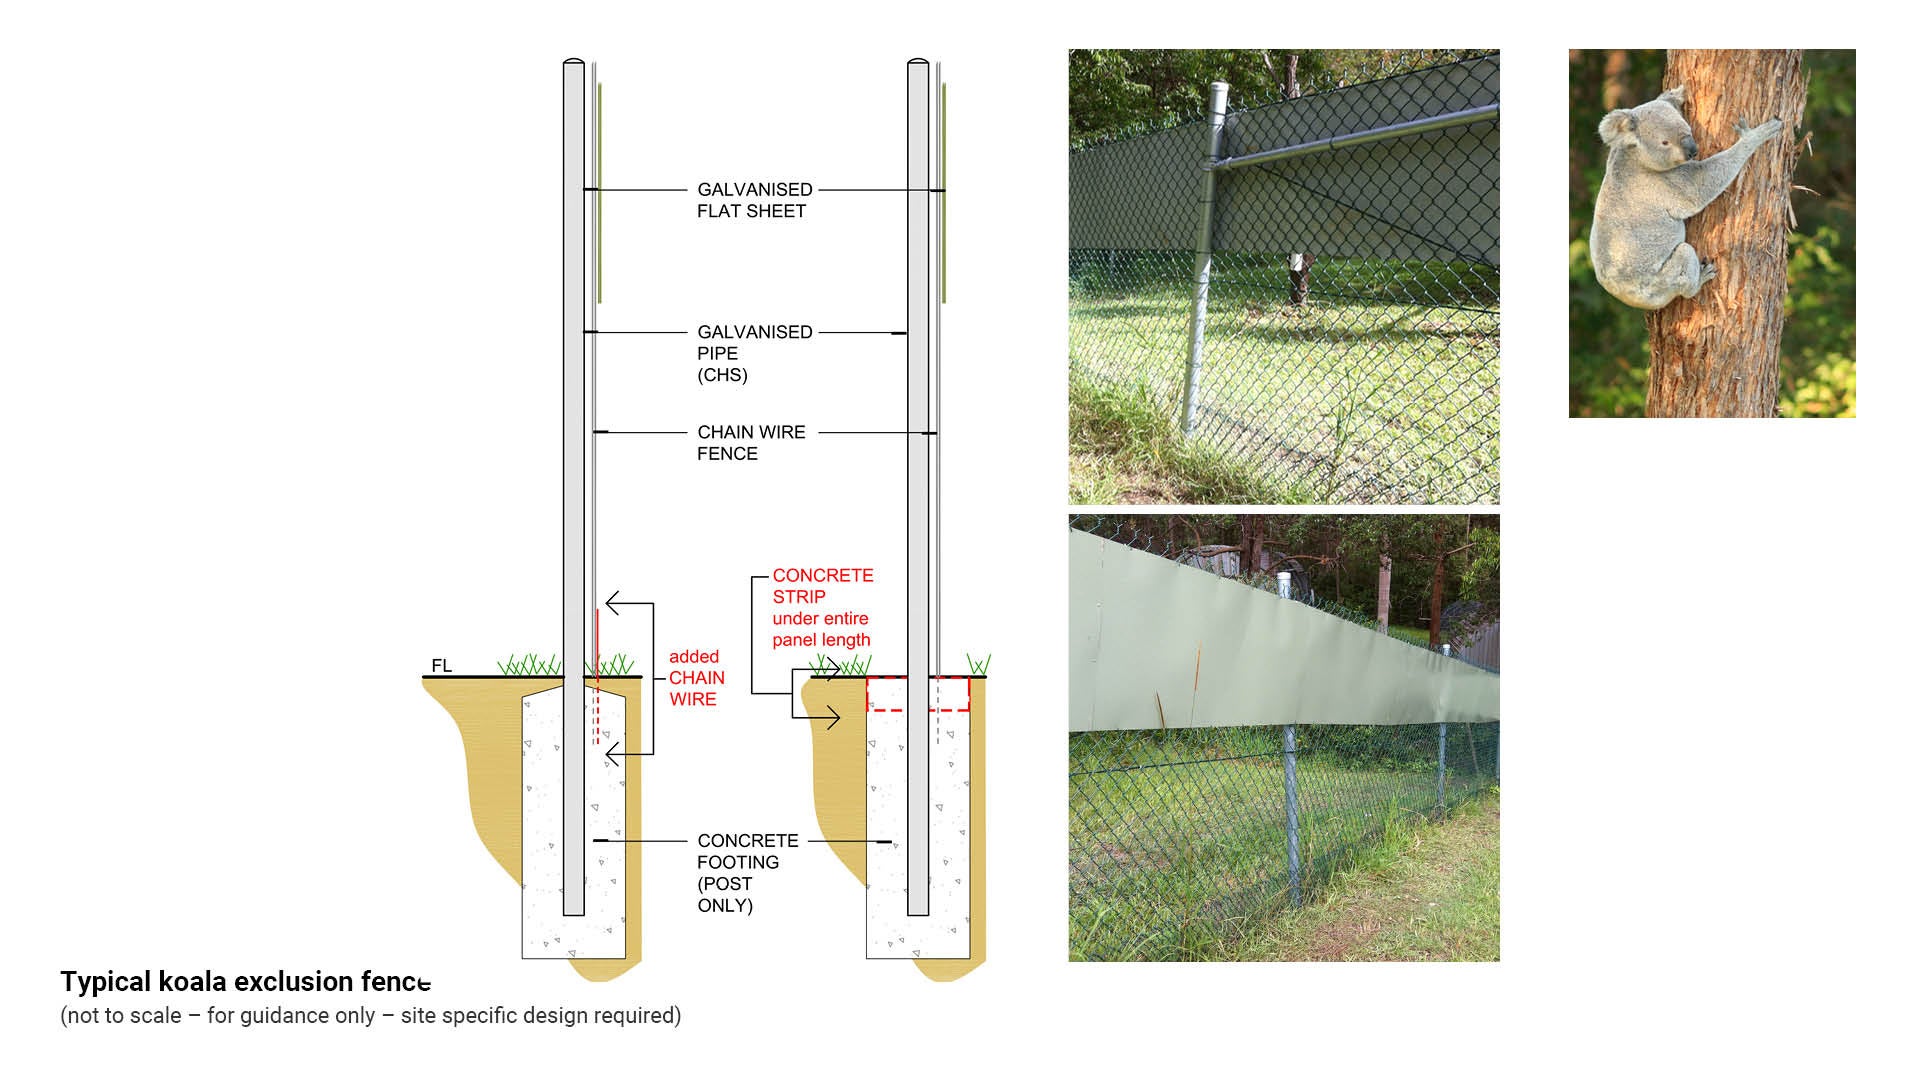
Koala exclusion fence
Purpose

Koala exclusion fences are designed to restrict and direct the movement of koalas and other tree-dwelling animals, like possums, from entering dangerous areas. The fences guide these mammals away from roads and other places where they could be injured or killed. Threats to koalas include:
- Loss of habitat.
- Fragmentation of habitat.
- Injury/death by the motor vehicle.
- Injury/death by domestic dog attack.
- Increased disease due to stress caused by the above.
Design considerations:
Specialised fencing to prevent koalas from entering areas of danger should consist of the following design elements:
- Select Colorbond (or equivalent), with the smooth metal positioned at the top of the fence
- The sheeting provides a slippery, non grip surface, which prevents koalas or other arboreal fauna from climbing over.
- Colorbond sheeting is to be a minimum 650 mm high. Overall fence height must be at least 1.5 m above ground level.
- A natural light colour for the smooth metal sheeting should be selected to complement the environment such as, Colorbond ‘pale eucalypt’, ‘wallaby’, ‘mangrove’, ‘gully’ (or equivalent).
- No gaps at the base of the fence panelling.
- Consider using a concrete strip along the entire length of the fence to prevent burrowing with chain fence set 50 mm into the strip or
- For greater stability and strength without a concrete strip. Create a double layer of chain wire mesh at the base of the fence at least 300 mm height as well as setting the fence into the ground 200 mm.
- Ensure there are no entrapment or crushing points (i.e. appropriate gaps at gate openings).
- Position the fence at least 3.0 m away from any tree or sturdy shrub from which a koala could jump to the top of the fence.
- Existing trees can be shielded from koala access by applying a smooth metal tree guard around the trunk.
- Pedestrian and vehicle gates installed where required. Continue the same design as the fence panels to ensure uniformity of design. (Hot dipped galvanised CHS posts, PVC coated black or green wire mesh laced to posts, galvanised flat sheet (colorbond or perspex), mounted at top).
- Minimum height of fence to be 1.5 m (prefer 1.8 m).
- All footings and optional concrete mowing strip must be designed and installed to engineers specifications.
See Figure 4: Typical koala exclusion fence.
Figure 4: Typical koala exclusion fence
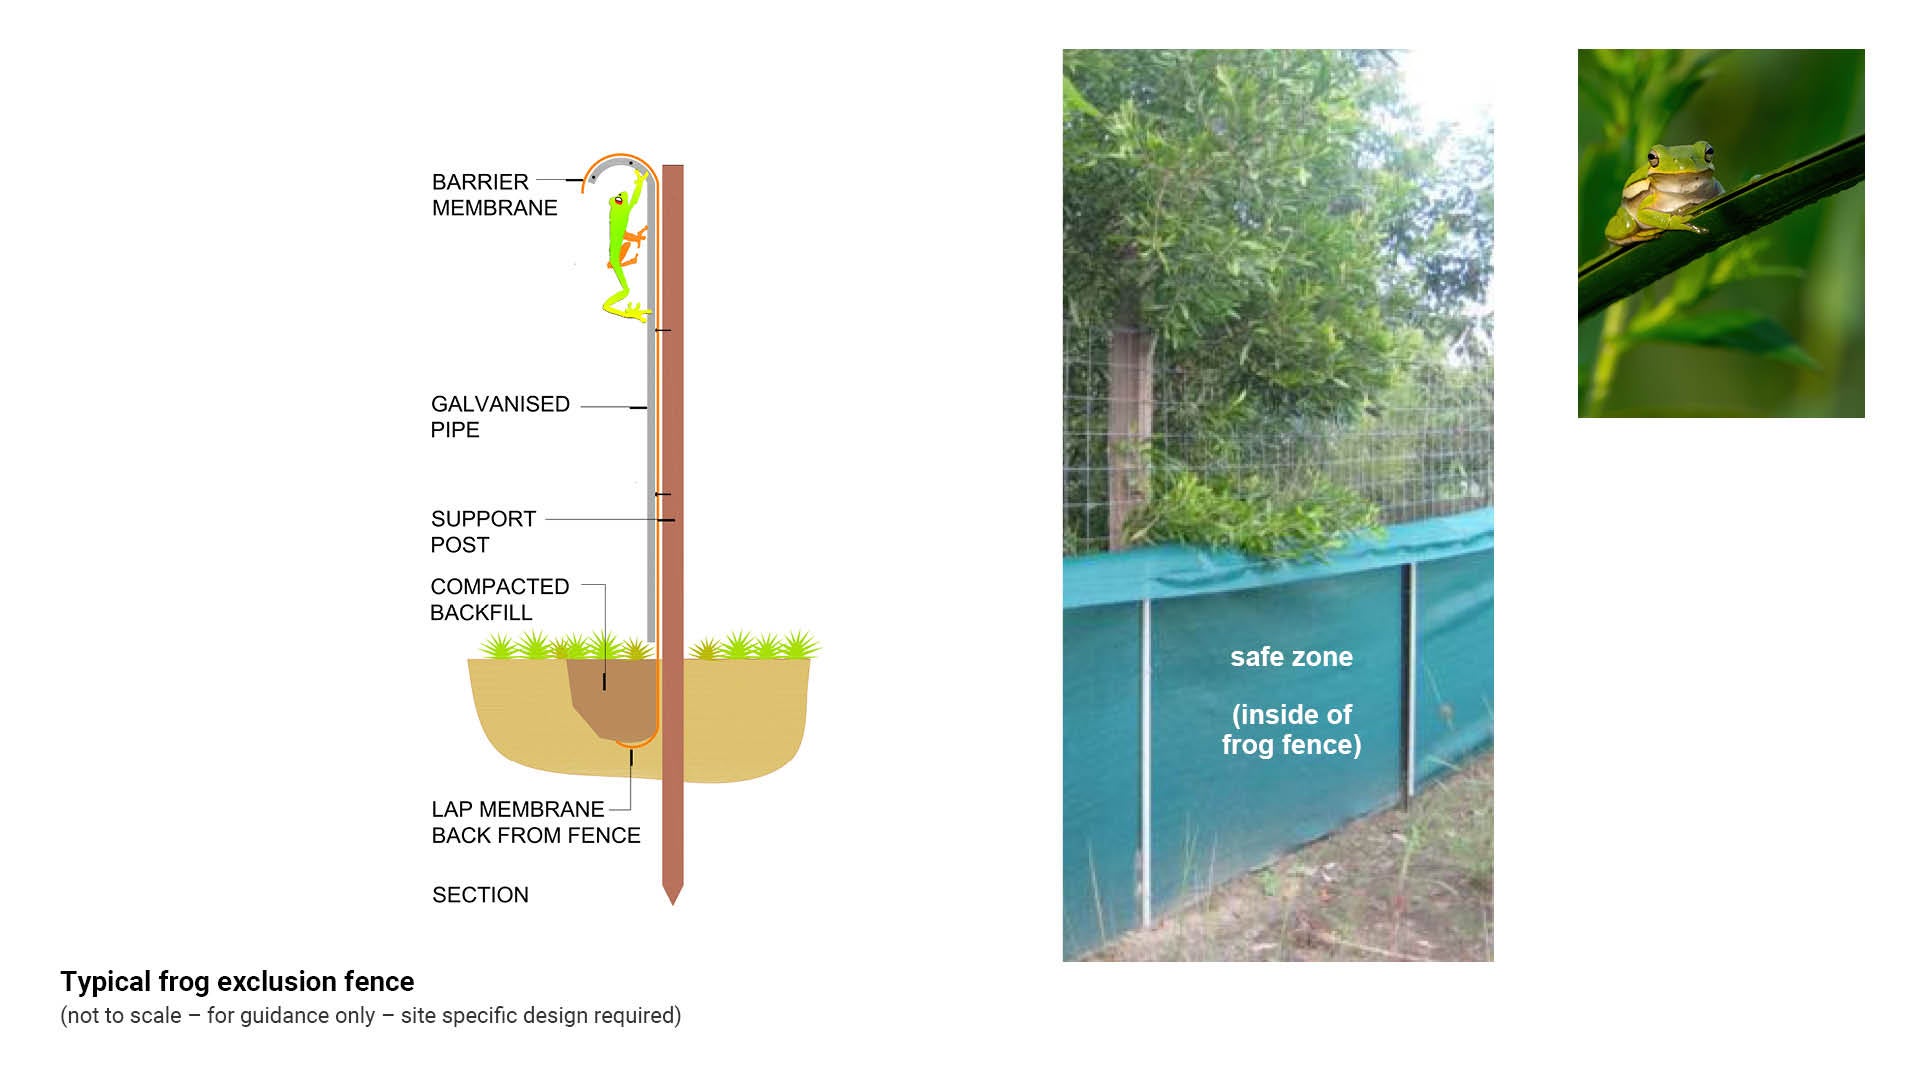
Frog exclusion fence
Purpose

Frog exclusion fencing is used to restrict the movement frogs venturing out of a safe area and entering a hazardous area, such as a construction zone or road corridor.
Design considerations:
The fence must comprise the following elements:
- Prior to installation of frog fence, identify the frog species at risk. This will determine the height of the fence. Height is determined by species of frog. Some frogs have the ability to jump to heights of almost 1.2 m (preferred minimum fence height).
- All pedestrian/vehicle gates must continue the same design as the fence to maintain the level of protection the fence provides and to maintain a consistent appearance.
- The length of the fence must be sufficient to confine frogs inside the safe zone, created by the fence barrier.
- Must contain no gaps to ensure fence and gate keep the identified frog species inside the designated safe environment.
- Posts which support the barrier membrane should curve in towards the area which is deemed safe.
- The barrier membrane (green or black knitted shade cloth, above 80%) should be attached to the curved posts to create an overhang. The overhang at the top of the fence barrier is key in preventing frogs from climbing over.
- The barrier membrane is to extend 200 mm below the finished ground level to prevent burrowing frogs from venturing outside the safe zone.
- Vegetation must be kept a minimum 1.0 m clear of the inside of the fence – the safe zone. This is to prevent any frog using the vegetation to climb over the fence.
See Figure 5: Typical frog fence.
Figure 5: Typical frog fence
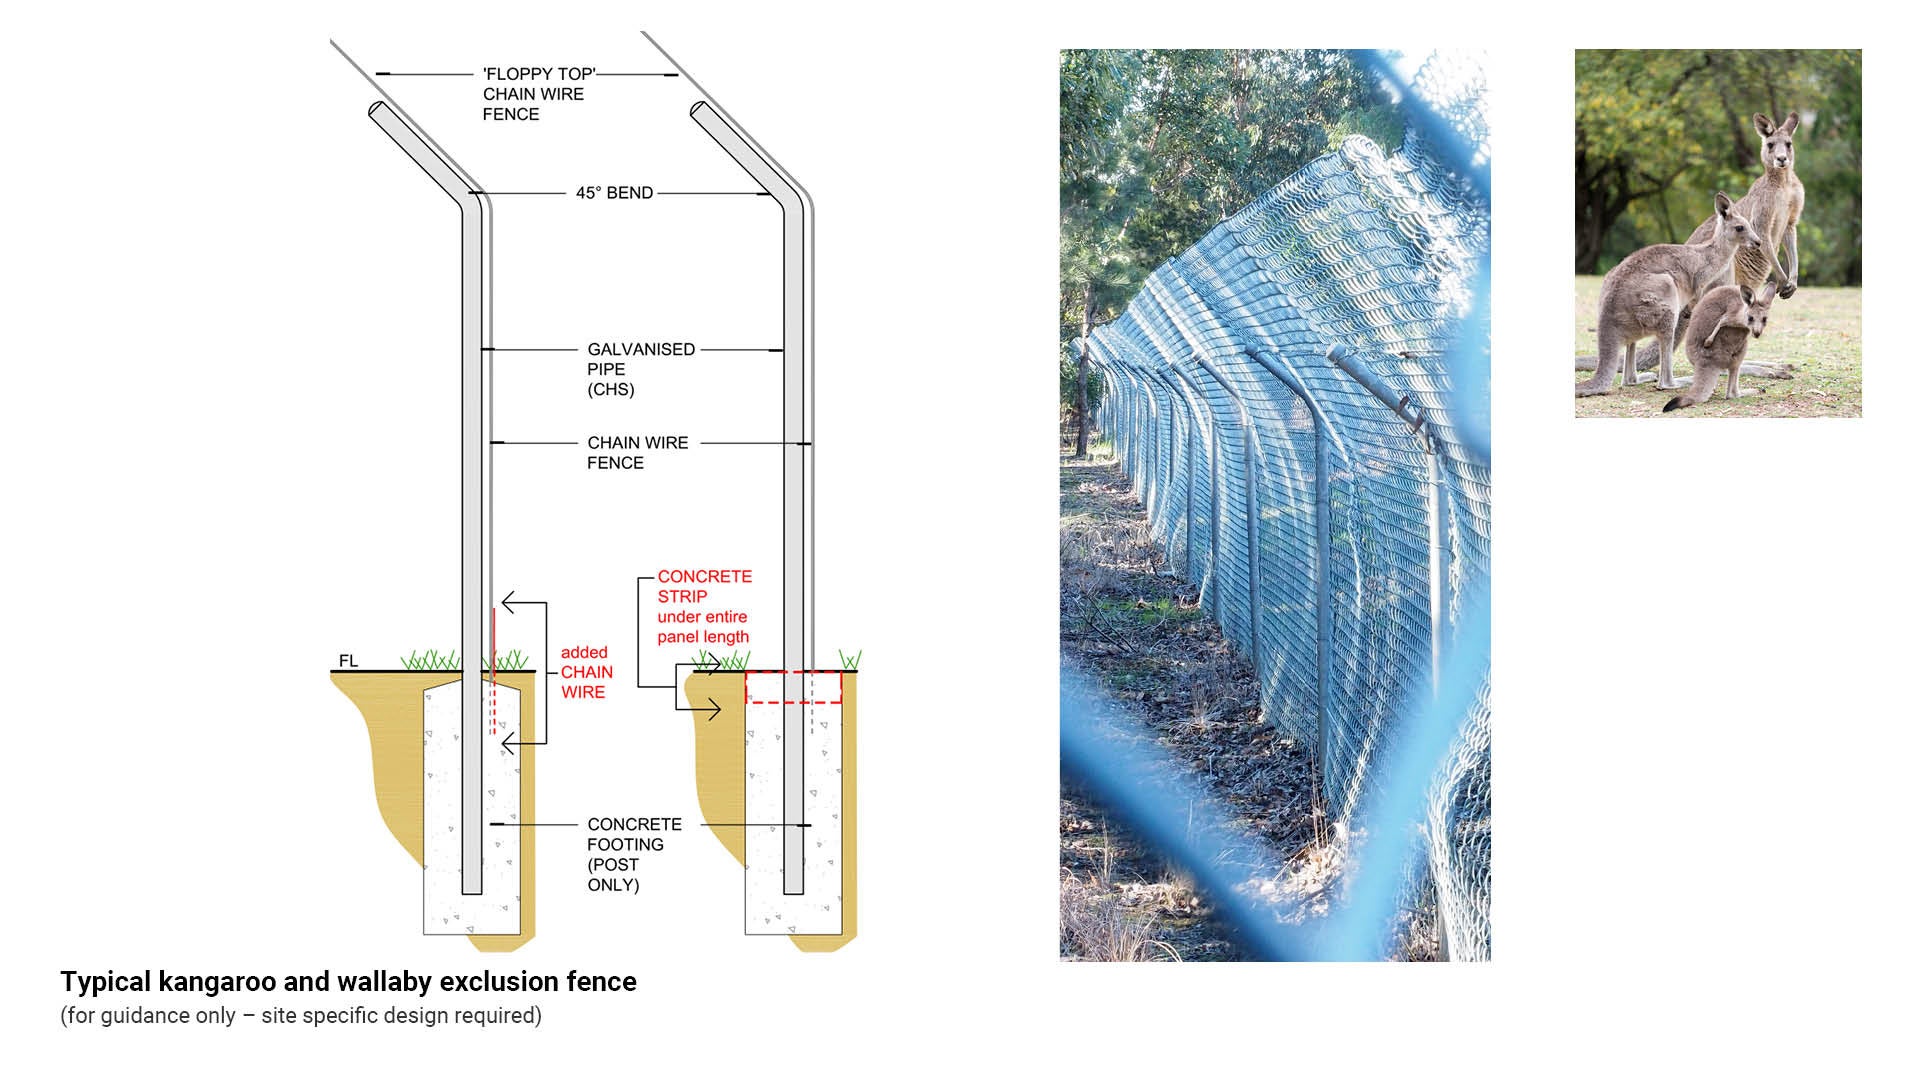
Kangaroo exclusion fence
Purpose

An exclusion fence specifically is designed to restrict and direct the movement of kangaroos and wallabies from danger areas such as roads. The fences may be erected for the following reasons:
- To reduce potential conflict between kangaroos and humans in urban areas. Kangaroos have been known to cause significant damage to property and to people.
- To protect and redirect kangaroo and wallaby species from entering road corridors.
- To provide a safe habitat area for native wildlife, away from predators such as wild dogs.
- To prevent wild dogs and kangaroos from entering land used for crops and grazing.
Design considerations:
The design should consider the following:
- Barbed wire is not to be used.
- All pedestrian/vehicle gates must continue the same design as the fence to maintain the level of protection the fence provides and to maintain a consistent appearance.
- Superior quality galvanised chain wire mesh, galvanised steel posts, hold down pipes and wire cable, with all caps welded. (The average weight of a male grey kangaroo is approximately 66kg).
- The overall height of the fence must be at least 1.8 m above ground level as the average grey kangaroo can stand to almost 2.0 m tall.
- Fences must maintain clear sight lines for motorists.
- Fences must be clearly visible to kangaroos. The most common damage occurs at dusk and dawn when the mammals are on the move. If the fence is not visible to the kangaroo, it may cause damage to the animal.
- When movement of a kangaroo is obstructed by a fence that they cannot crawl through or under, they are likely try to jump over it. They do this by moving as close to the fence as possible and then they make an almost vertical jump. To prevent the kangaroos from getting close enough to position themselves to jump over the fence, the top part of the fence must be sloped inwards at an angle of approximately 45 degrees.
- Design must contain a ‘floppy top’.
- The use of a fence apron is recommended to deter burrowing and digging.
- added chain wire mesh hinged to fence panels (preferred method). The separate length apron typically sits 200 mm above ground and below.
- concrete strip below the entire length of fence panels, 250 mm W x 100 mm H.
- fence panel extended below surface level (not preferred). This method may cause unnecessary force on the fence panels, effecting the useful.
See Figure 6: Typical kangaroo and wallaby exclusion fence.
Figure 6: Typical kangaroo and wallaby exclusion fence
Wetlands fencing
Purpose

Fencing at and around wetlands and other waterbodies, is installed to create a visual and physical barrier in order to:
- prevent unauthorised entry.
- provide a visual deterrent and to prevent accidental falls.
Planning
Consider which type of fence is best suited to the level and usage at the site:
- Perimeter fence design (typically installed to secure a site – creates both a visual and a physical barrier. The perimeter fence is a closed loop with keyed maintenance gate entry by authorised personnel only. This fence type excludes access by unauthorised vehicles and pedestrians.
- Barrier fence design (typically installed where there is a risk of falls – creates a visual barrier. The fence is open ended.
Design considerations:
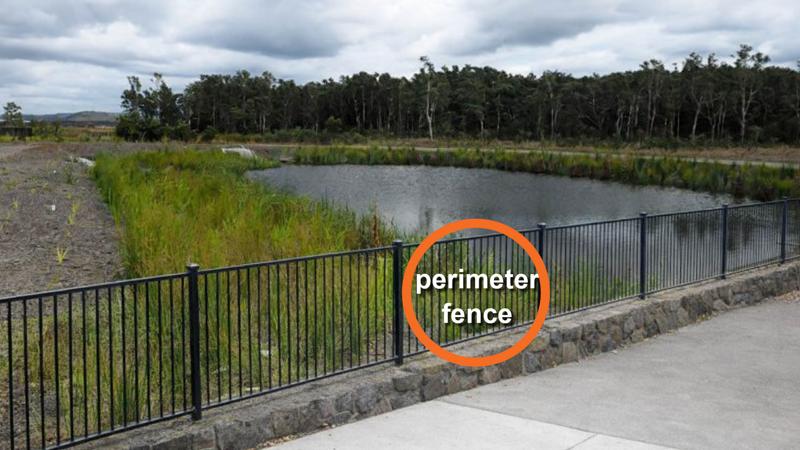
Wetland perimeter fence must include the following attributes:
- Designed to keep unauthorised people from entering.
- Must be designed by a suitably qualified engineer.
- Fence must comply with the appropriate standards and guidelines and consider site conditions and requirements.

Wetland barrier fence must include the following attributes:
- Designed to provide a highly visible barrier.
- Must be designed by a suitably qualified engineer.
- Fence must comply with the appropriate standards and guidelines and consider site conditions and requirements.
All fencing around wetlands must comply with all standards and guidelines. Liaise with a stormwater engineer for advice.
See LIM Fences and gates - Standards for further guidance.
Note: Standard residential pool or any other residential fencing is NOT to be used for any council facility. Construction details must be engineered to suit the application.
This component is currently in development