Suite of signs

Map and information signs
Map and information signs are designed to educate visitors so that informed decisions can be made prior entering (e.g. embarking on a trail). The signs encourage appropriate use of the recreation site (e.g environment reserve with recreation trails) and advise about restricted or unauthorised access.
Download the full LIM Signage suite Catalogue.
Technical drawings and artwork templates
Embellishment | Drawing (DWG)/Artwork template and samples | Supplier | ||
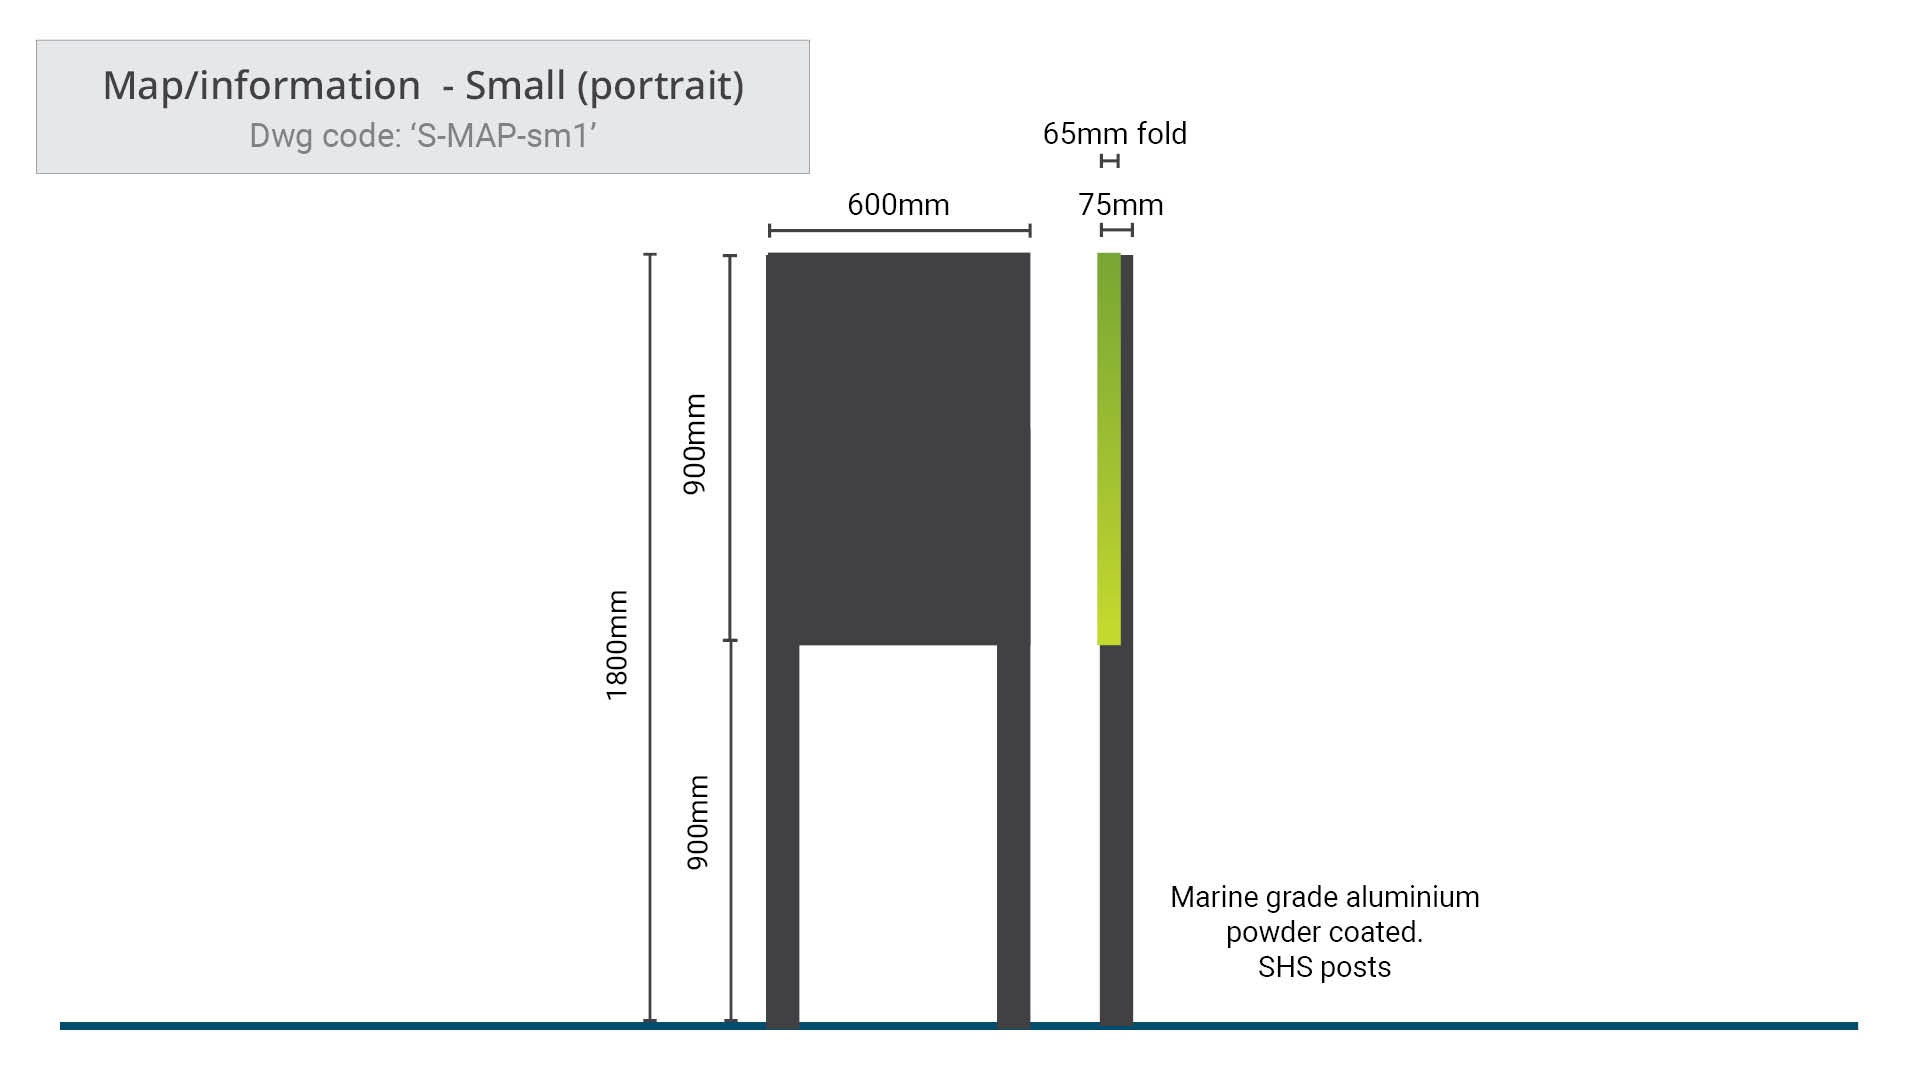 Map and info sign - Small (portrait) |
| No supplier specified | ||
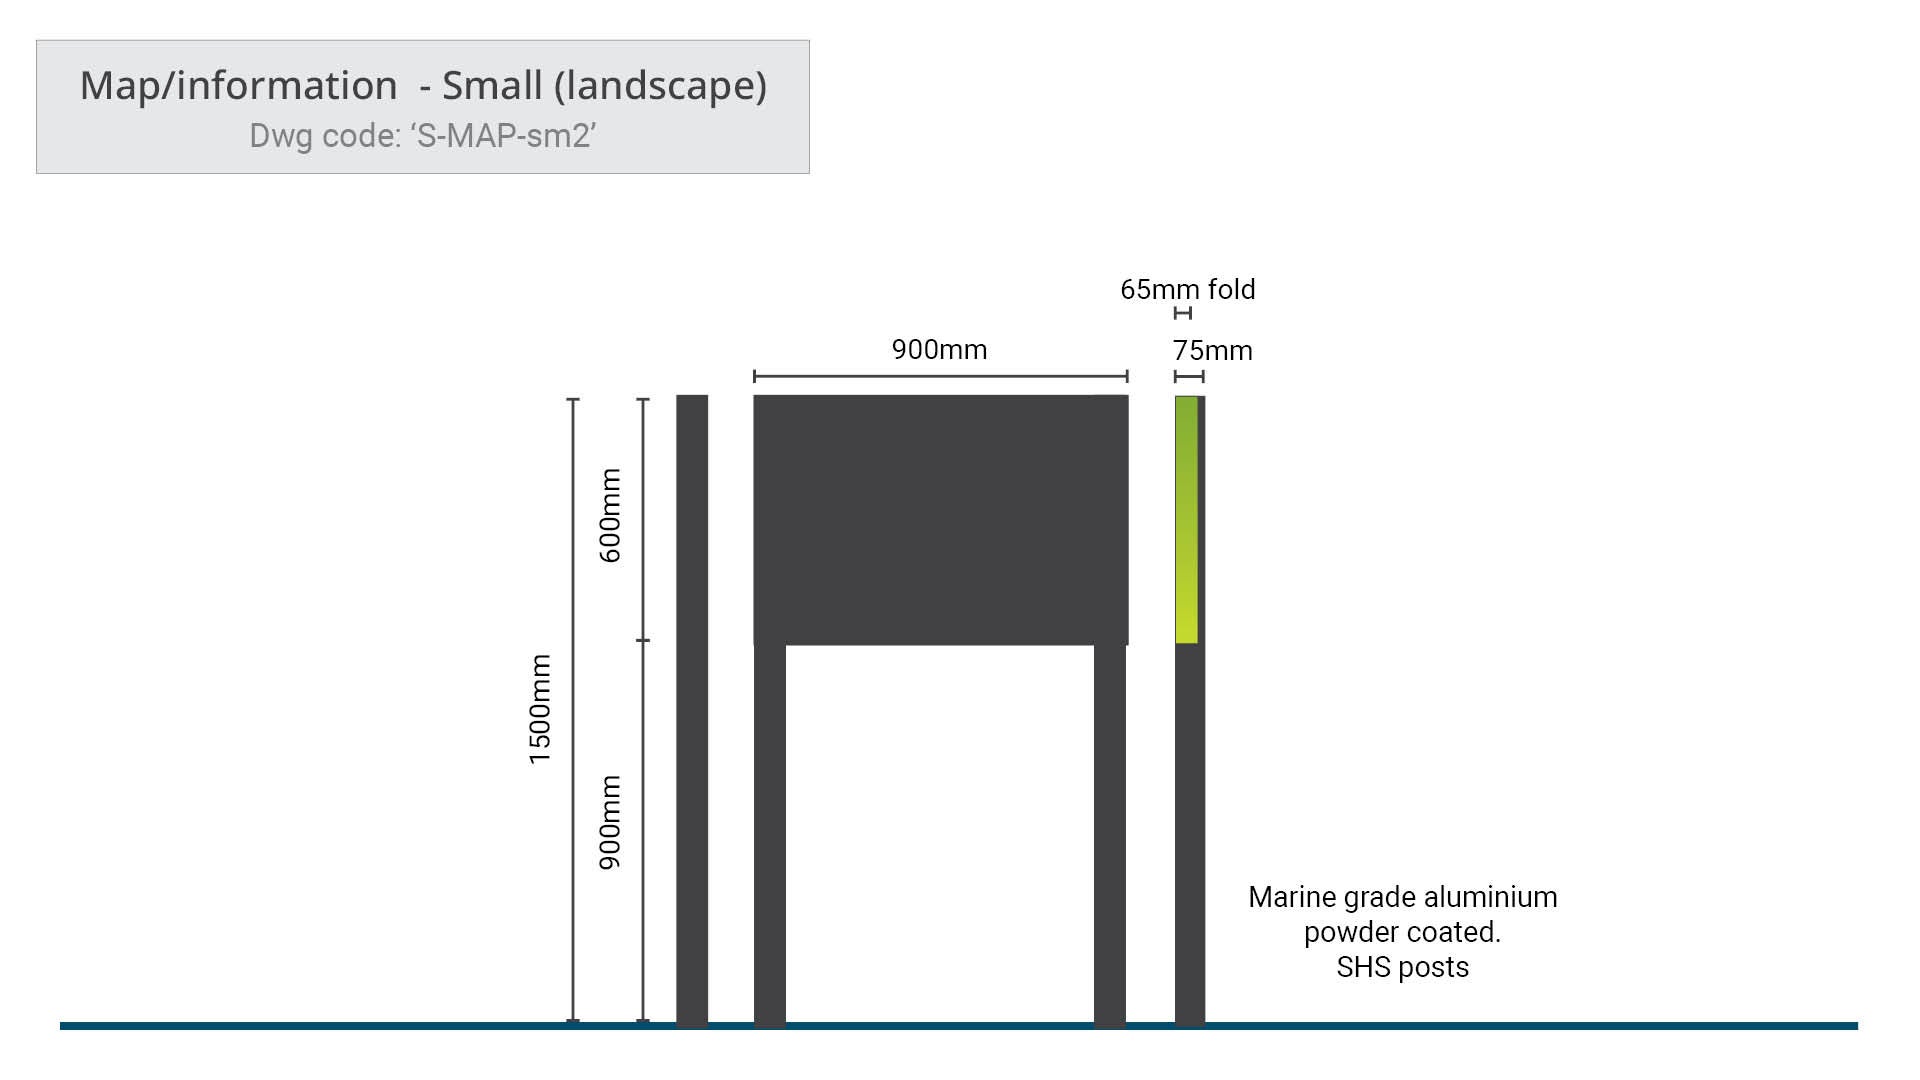 Map and info sign - Small (landscape) |
| No supplier specified | ||
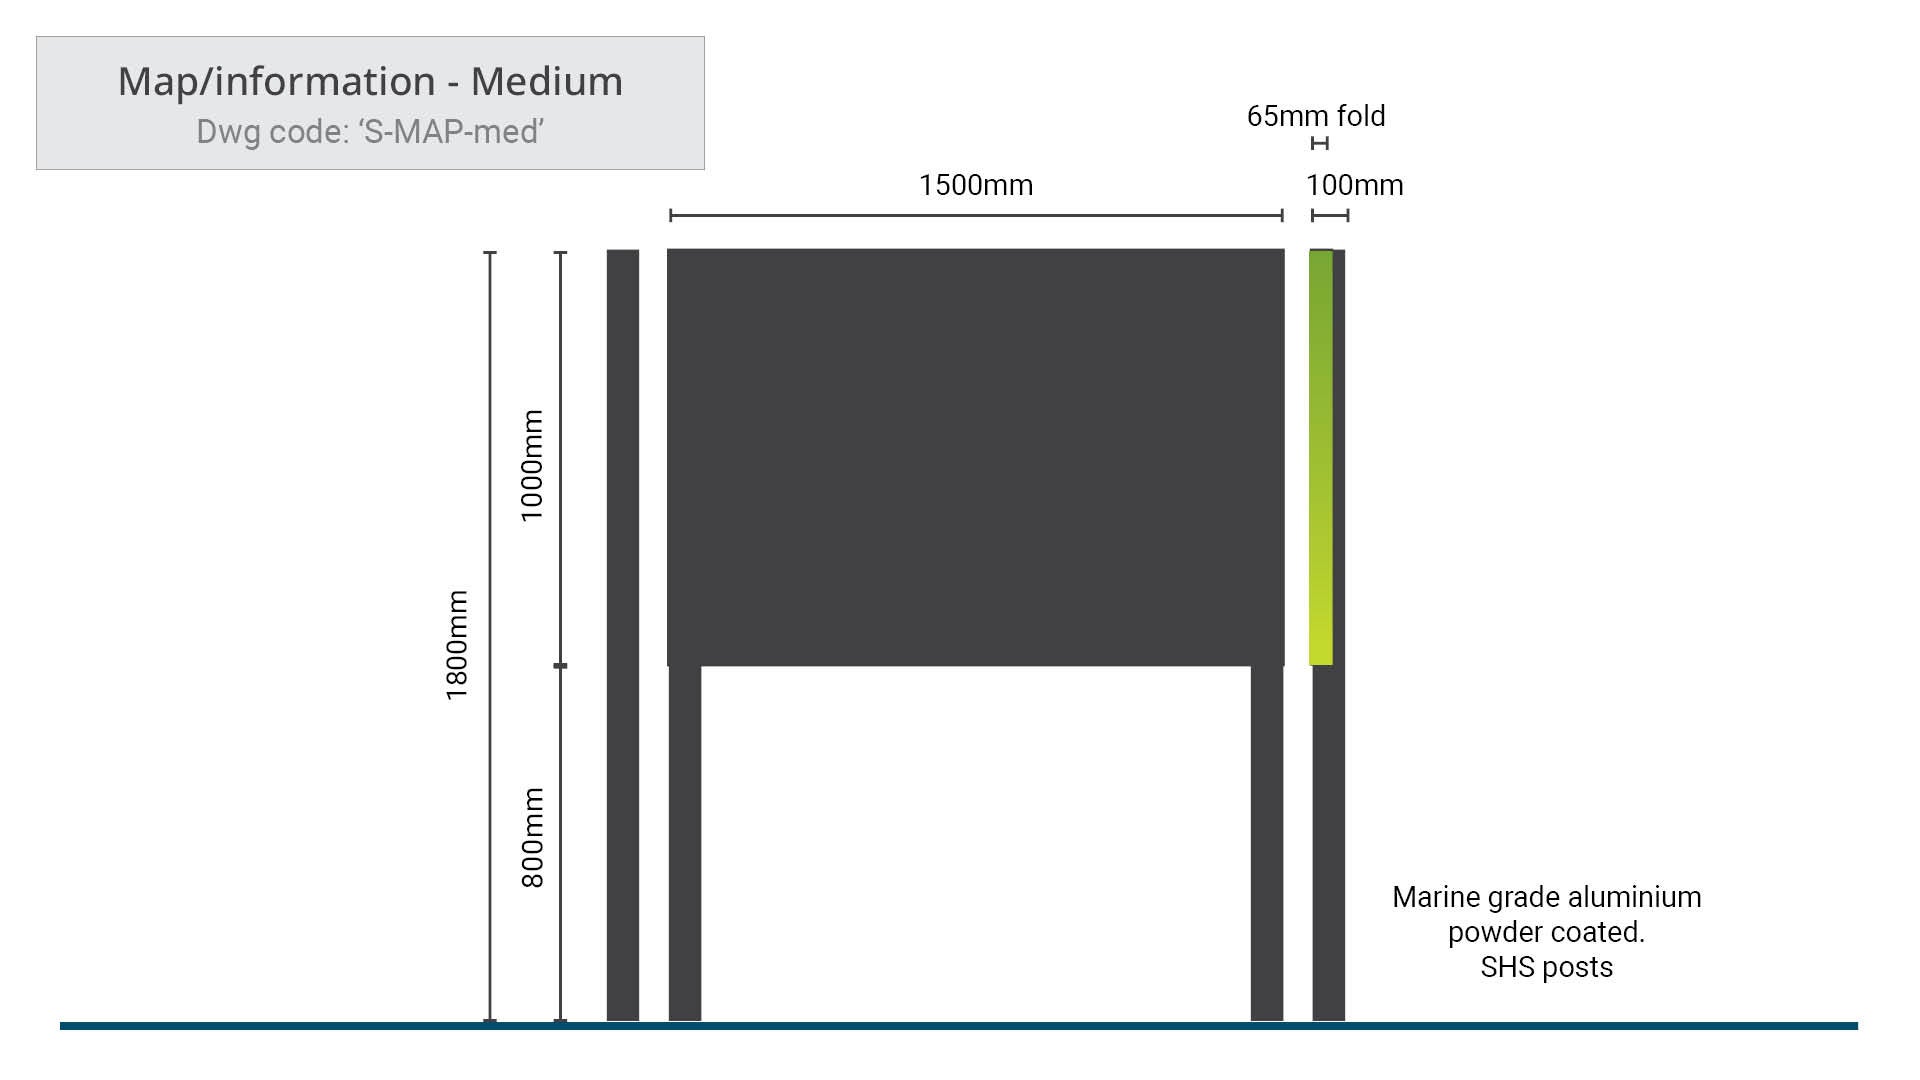 Map and info sign - Medium |
| No supplier specified | ||
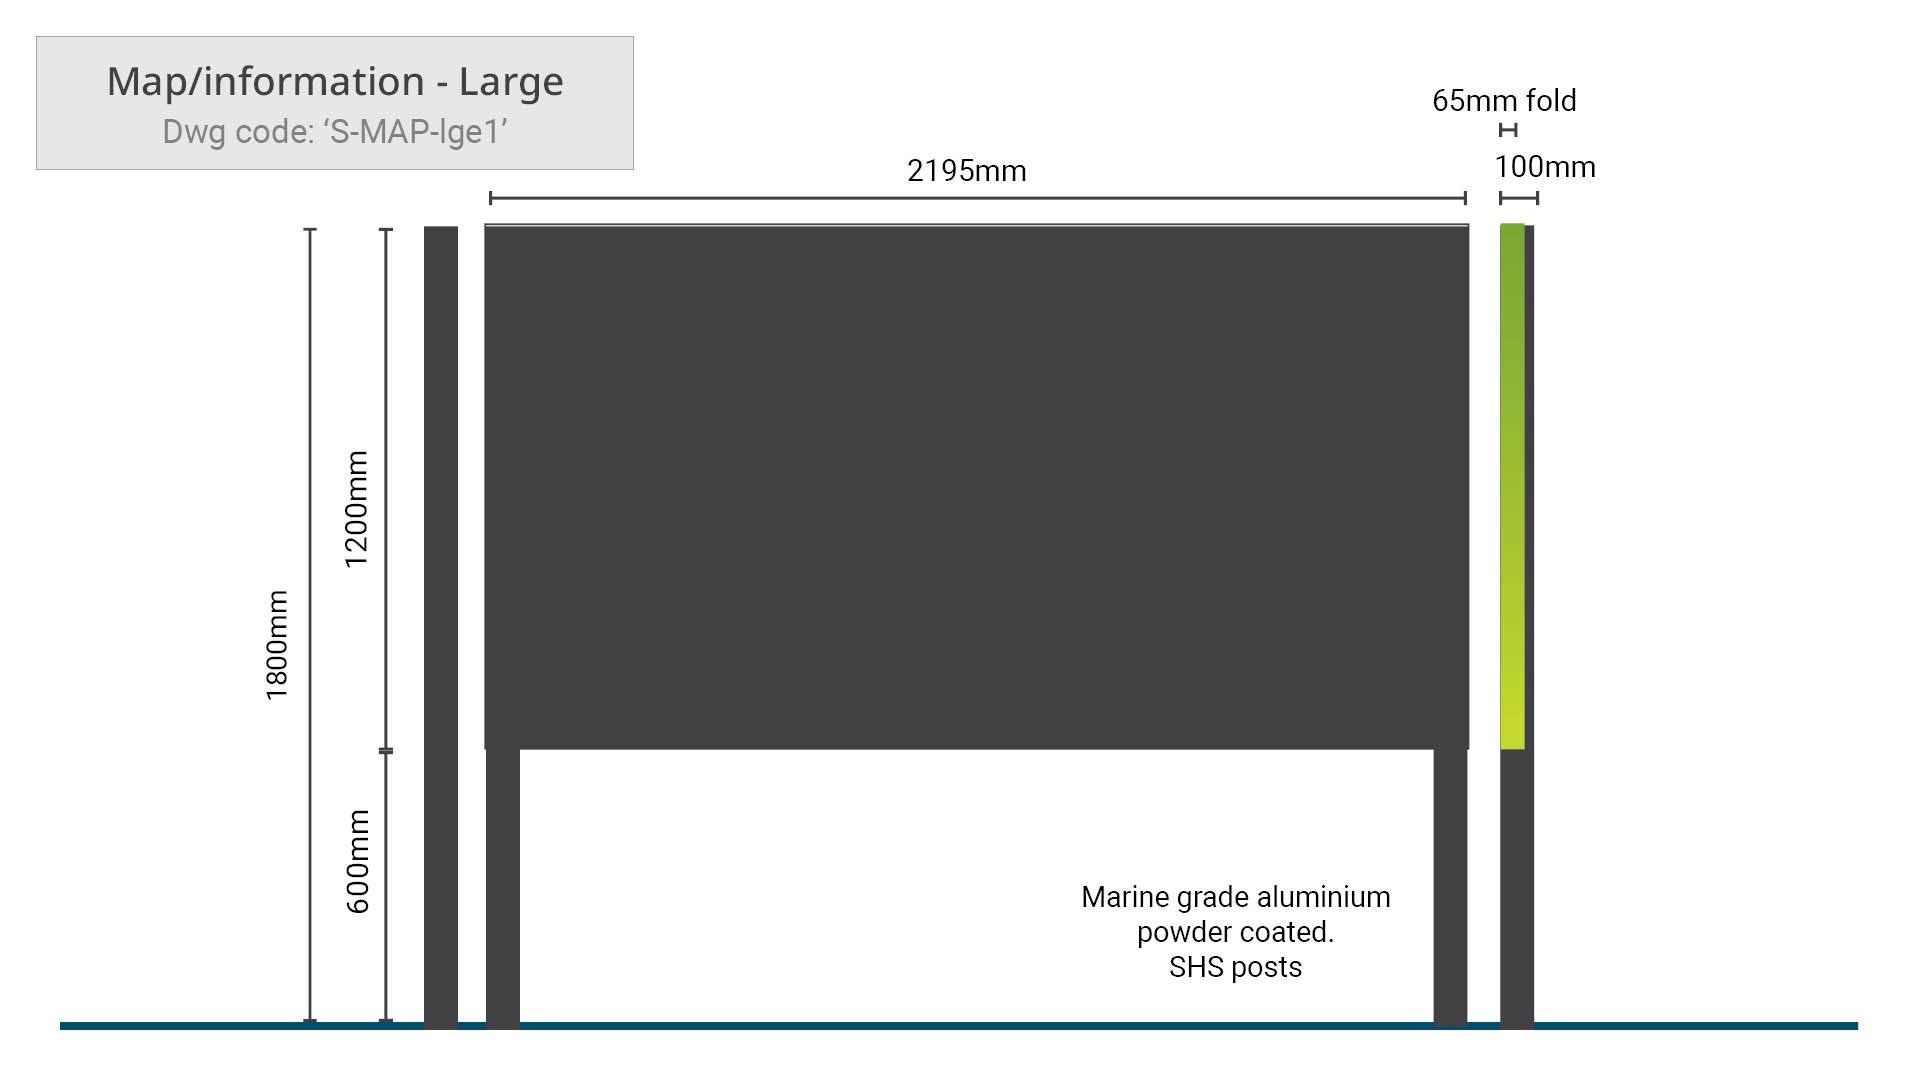 Map and info sign - Large |
| No supplier specified | ||
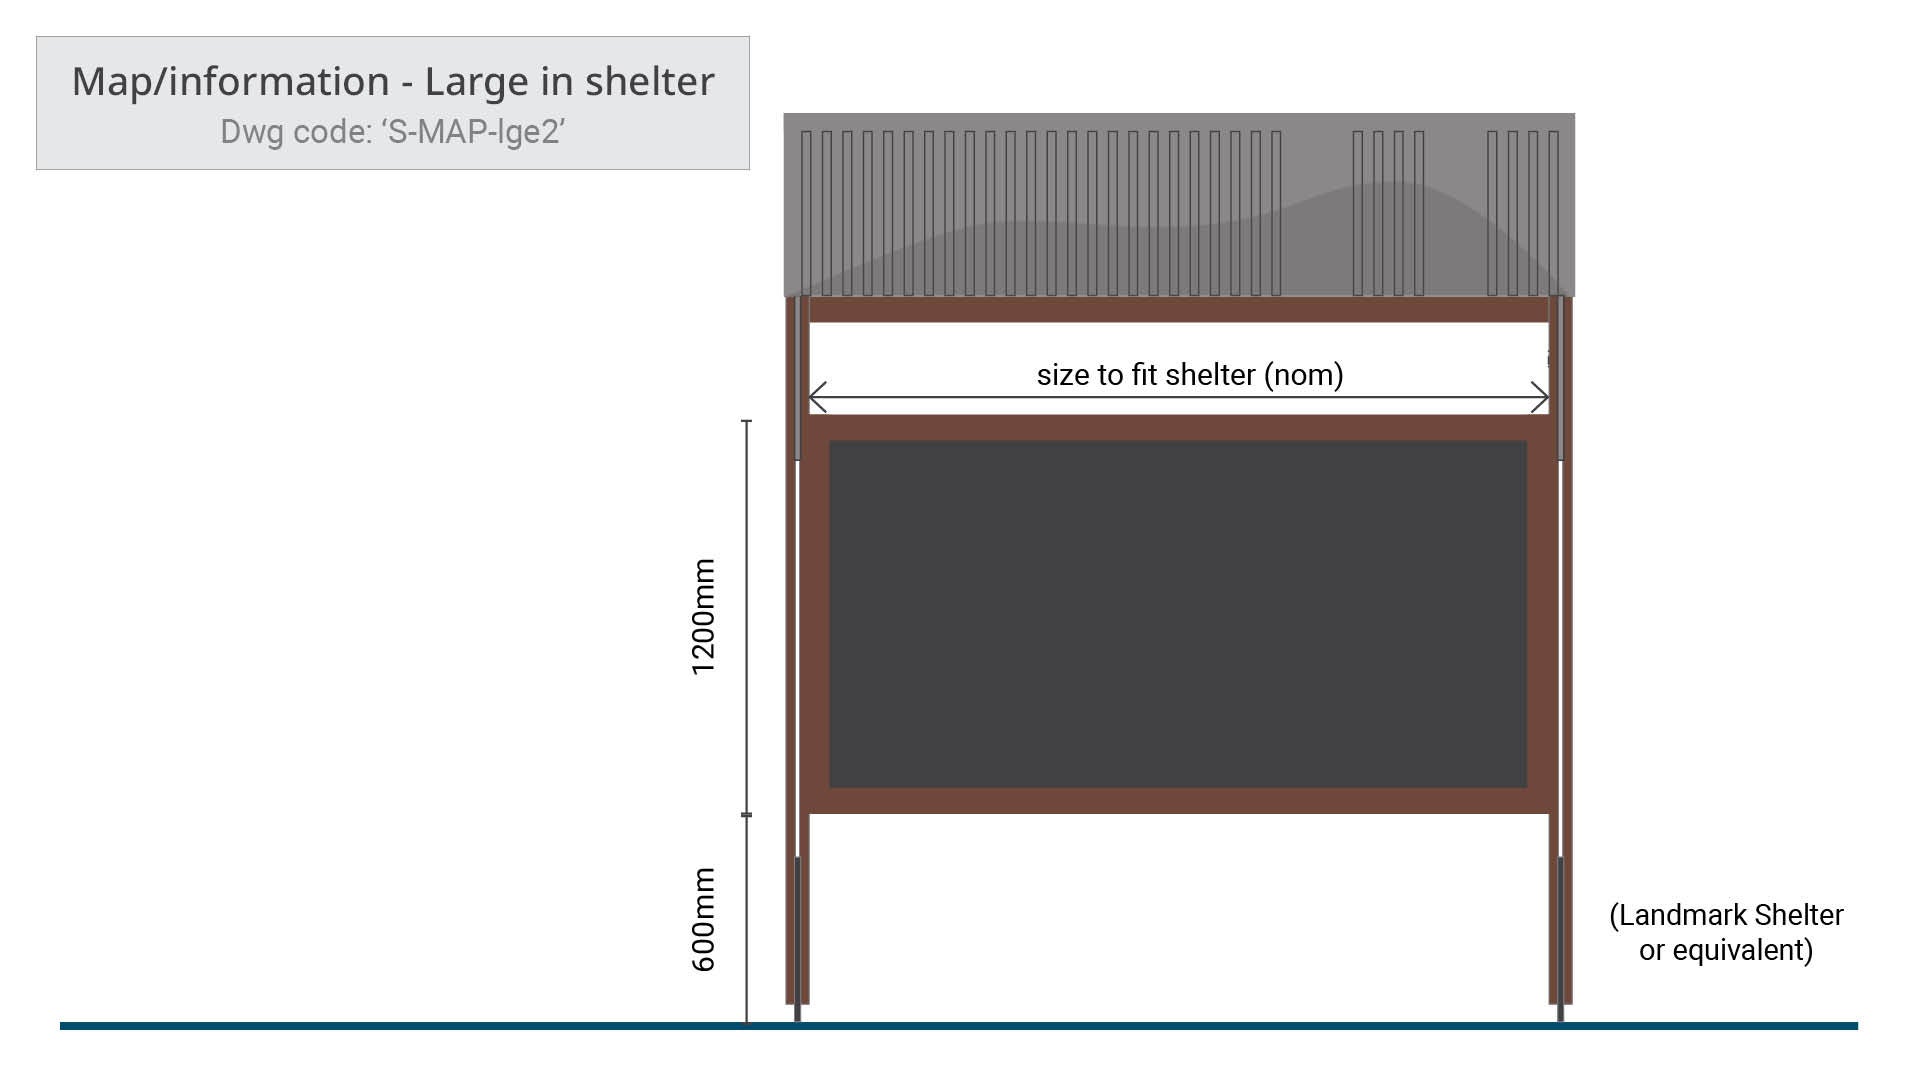 Map and info sign - Large under shelter |
| Landmark shelter (or equivalent) |
Purpose
A Map and information sign is a pedestrian entry sign that typically marks the starting point for a trail network. The sign displays information about the trail, and includes a map locating the trail and any associated attractions and destinations. The map may also be supported by photographs and regulatory information.
These pedestrian level signs are typically used by the following recreational users:
- Mountain bike riders
- Bush walkers
- Horse riders
- Canoe/kayak users.
The sign is typically placed at primary entry points (network trail entrance points):
- close to the entrance of a car parking facility.
- along side a pathway, track or trail (where possible), to be easily accessed and read
- where there are multiple access points, additional signs may be required, but care should be taken to avoid visual clutter. Selecting one of the smaller versions or medium version sign is recommended for secondary access points.
All content is displayed with the intent of minimising risk and enhancing visitor experience. Map and information signs may provide a variety of content:
- Trail network map, available attractions, destinations and facilities
- Educational material
- Photographs and illustrations
- International recognised pictograms which identify facilities within the reserve
- Code of conduct
- Warning, safety and general regulations.
Planning
General
The following should be considered prior to installing the sign:
- Analyse the path network system in the site to determine key entry points. It is important to keep the installations of entry signs to a minimum, to avoid visual clutter and confusion.
- Decide if the sign content warrants single or double sided panels.
- Double sided signage is preferred when installing a large free standing panel or a large under shelter sign panel. Due to the structure size, both sides should be used to maximise the facility space.
- When installing a shelter to house a Map/information sign, and the content does not require a double sided display, consider co-locating the sign with a Noticeboard. See Noticeboard for further guidance.
- Plan to incorporate Crime Prevention Through Environmental Design Guidelines (CPTED) such as ‘retain sight lines’ at the design stage of a sign project, to avoid ongoing maintenance costs such as, lift pruning of trees and vegetation, or costly re-design to enhance public safety.
- Determine if there is a continuous accessible path of travel (CAPT) to a destination (such as an equal access toilet). If so, consider installing an Wayfinding markers - equal access to the right of a Map/information sign.
- Wayfinding markers - equal access does not include map information.
- A Map and information sign should provide the best opportunity to present information in a form which can be interpreted by all users.
- Incorporate equal access elements into a Map/information sign where applicable and where possible.
- Equal access elements should be contained within the map. e.g. Grade one trails that cater for all abilities.
- These elements may include raised tactile text and pictograms, and Universal English Braille Code (UEBC).
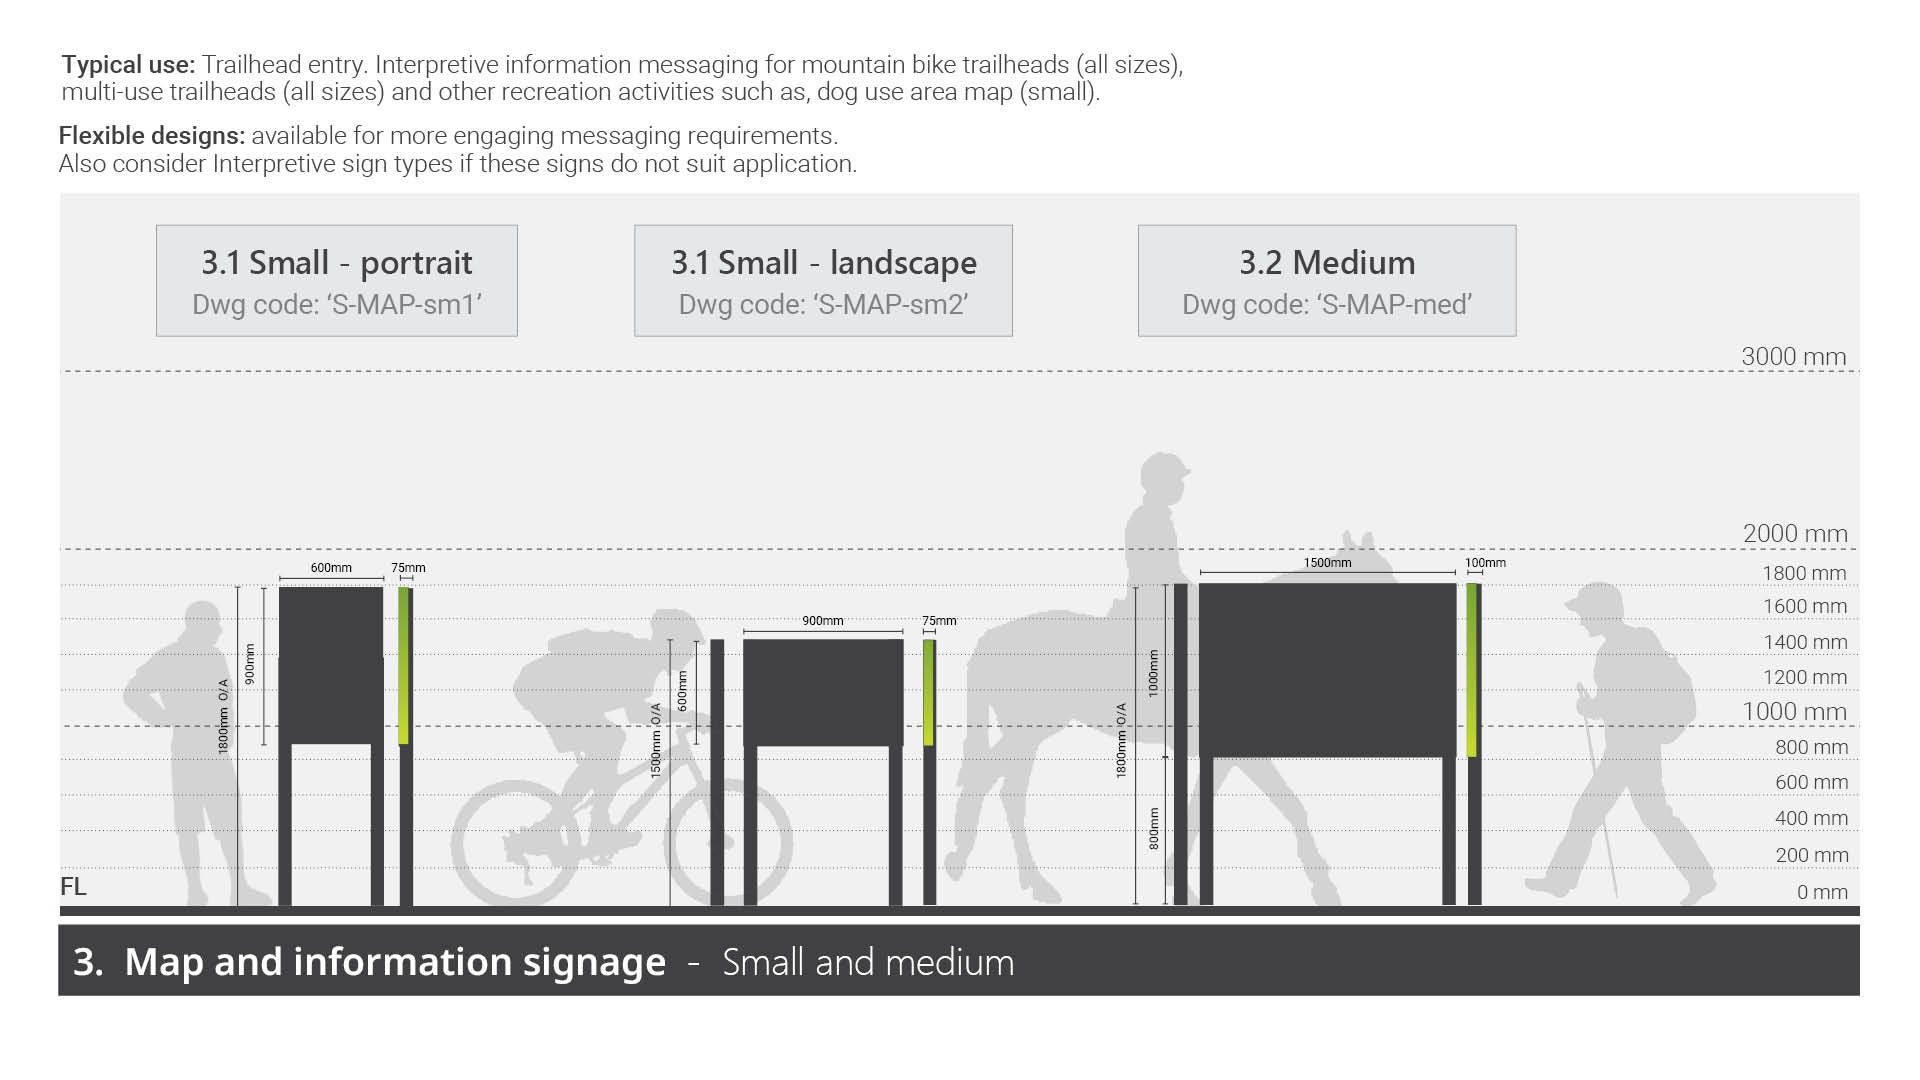
Determine sign size
There are three choices of sizes in the Map and information sign range. Selecting a the appropriate size to suite your application and site may be determined by the following:
- The level of use of the reserve.
- The volume of content required to give adequate information for a safe and informative sign.
However there are other deciding factors:
- Small (portrait and landscape)
- Recommended for low profile trail entry points
- Secondary sign located at minor entry points.
- Medium
- Where a shelter is not required
- At medium to high level use reserve entry points
- A secondary sign located at minor entry points.
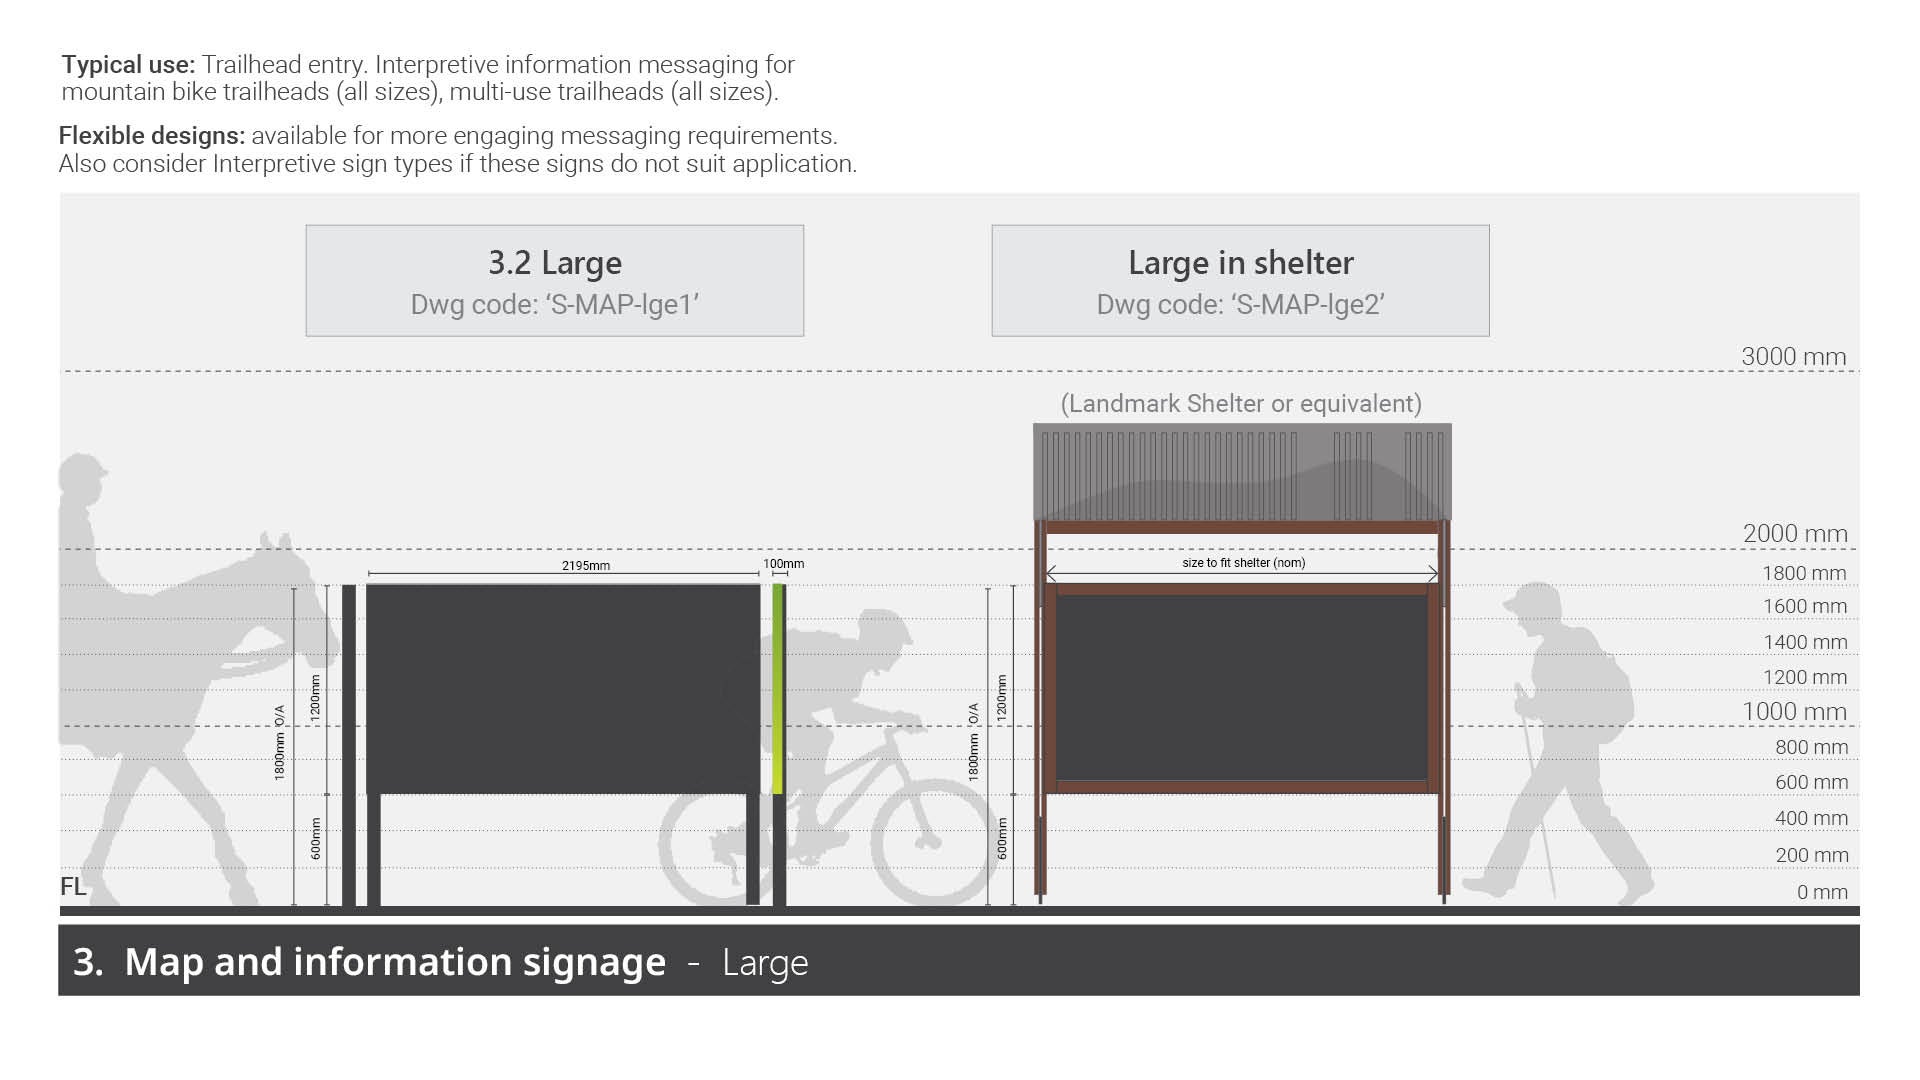
- Large (freestanding and in shelter)
- For use at high profile reserve entry points
- The added shelter is required where protection from the elements may be appreciated by trail users
- A shelter is recommended when the sign contains a lengthy message which will take time to read
- Used to create a prominent entry statement.
Design
Legal, standards and guidelines, requirements
Sign construction
- Technical drawings (DWGs) - for typical construction details for each sign type. See Technical drawings and artwork templates table (above - top of page).
- Artwork templates and samples - for approved graphic design templates and samples for alternative options (where applicable) for each sign type. See Technical drawings and artwork templates table (above - top of page).
See LIM Signage – Overarching guidelines – for Standards such as, designing for access and inclusion, traffic and road standards (where applicable).
Content and corporate branding
- Sunshine Coast Council corporate branding logo must be displayed on all signs as per Artwork templates.
- All colours must be selected from the Council corporate colour palette or otherwise approved for specific purpose. e.g. some colours, such as red, yellow and black, (not part of the corporate palette) may be used for regulatory purposes.
See LIM Signage – Graphic design guidelines – for essential guidance on components that make up signs. e.g. colour application, pictogram integration, text sizing and spacing, map implementation etc.
A Map and information sign is classified as a long message sign and must meet the optimal viewing zone height requirements of 1.2 m - 1.7 m above finished ground level.
Other
Mountain bike use the content must include the approved International Mountain Bike Association (IMBA) degree of difficulty pictograms, to be used in conjunction with directional arrows or numbers.
Content general
- All sign artwork is to be professionally designed (by a qualified graphic designer or equivalent) as vector files.
- Sign content must use a positive tone. This will influence the reader to embrace the message.
- Sign content must be accurately researched and approved by council asset custodian prior to print.
- The name of the reserve/park must be clearly displayed at the top of the sign. This information may be vital in emergencies.
- Reserve/park name and spelling must be checked against council records to ensure accuracy.
- All photography and illustrations must be high resolution and the subject must be clear.
- Photographs must have written approval for use by the owner prior to use.
- Written permission on an council talent release form is required by any person who may be identified in a photograph.
- All regulatory pictograms must be approved by Council (Community Response) prior to printing.
- Corporate branding banner
- Emergency contact information
- Council contact details (report defects/issues).
- Option to provide Raised tactile and Unified English Braille Code (UEBC) Grade 1 (where applicable). This would remove the need to install an Wayfinding equal access marker, however this is not preferred.
- Items not regulated by Council should not be included. Campaign content should not be included as they are subject to change.
Additional requirements
All Map/information signs for must include the following:
- Title (name of site, name of educational content)
- Street address (nearest access point, if the site has multiple entry points).
- Not required if sign is not used as an entry site e.g. educational sign about Turtle breeding.
- Body content text (safety/use and information).
The following may be optional:
- Map
- Site facilities/destinations/attractions
- ‘You are here’ icon. The icon (which must be a stand out element, usually achieved by the use of a strong colour)
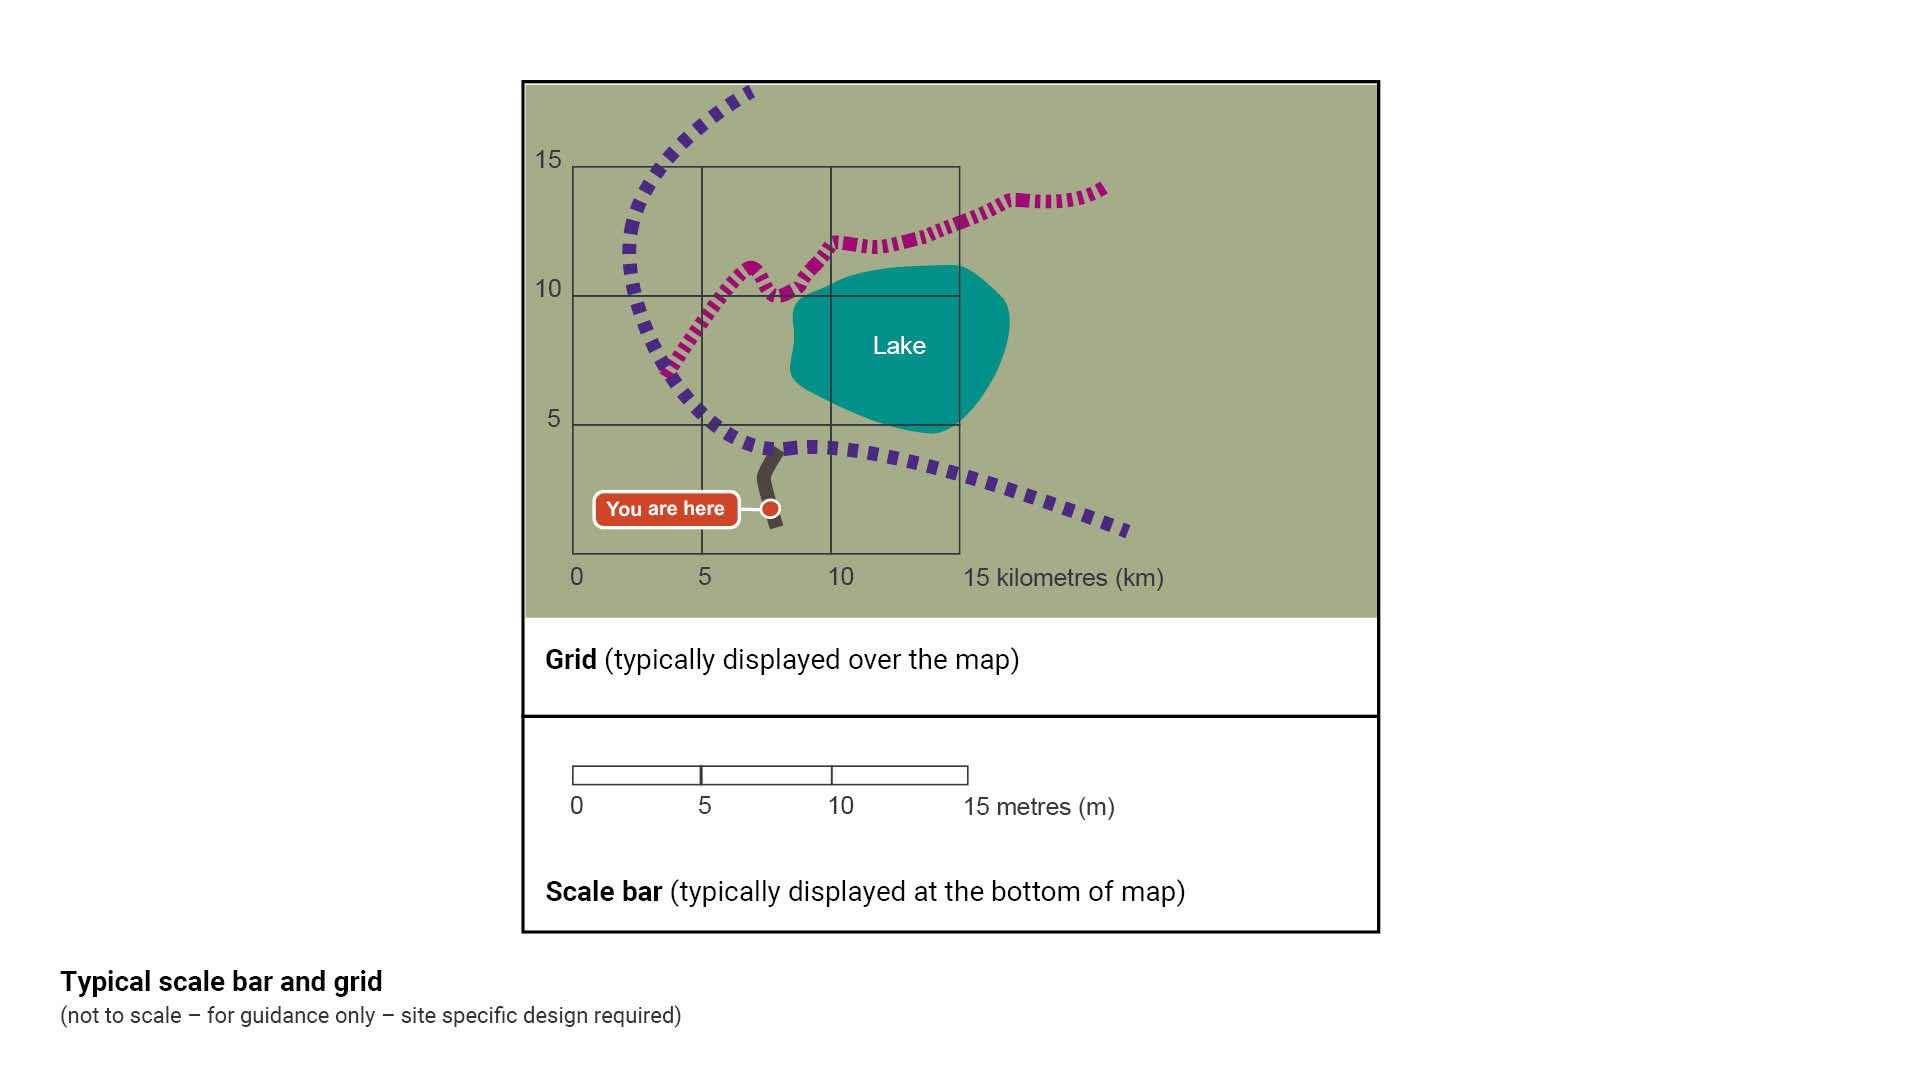
- North point (must accompany all maps) and scale bar
- Street names/landmark attractions to aid in navigation) in the area such as, services, attractions, information centre, and library
- Information specific to trails:
- Trail opening and closing hours
- Track rating class or grade
- Safest routes/trail conditions
- Trail composition (loop or one-way).
- Reserve/activities/historical/cultural information
- Rules/code of conduct and regulations
- Equipment required to complete the trail safely
- Distances and approximate times to walk/cycle/ride a horse/ paddle a canoe/kayak to destinations/points of interest
- Photographs/illustrations that support the content
- Council approved regulatory pictograms
- Activity pictograms for identification of the site facilities (typically located top right corner).
Additional content for map use
General
Additional elements may be considered as part of the Map/information sign:
- Equal access information. Where applicable, display the trail access points and facilities such as toilets
- Maps must contain distances in metres or kilometres
- A scale bar or grid to show walk-time or ride time, is helpful but not mandatory.
Figure 6: Typical scale bar and grid
Statements for use
The following statements (or similar) should be used to provide recommended safety measures when using a trail, (these include, but are not limited to):
- All trails over 1.0 kilometre in total length should include the following statements (or similar):
- items recommended for your personal safety - drinking water and a mobile phone
- wear sturdy footwear, a hat and sunscreen
- obey all safety and warning signs
- please stay on the marked trail.
- All multi-use trails must include the following:
- when riding a bicycle or horse, please wear a helmet
- ride within your ability and according to track conditions
- control your bicycle/horse
- trail is shared, please give way (see share use sign).
- All multi-use trails with bridges must include:
- a warning that there are bridges on the trail and horse riders should dismount when crossing
- Longer trails and or multi-use trails may also include the following:
- use a map or trail guide
- avoid walking in extreme heat or during high fire danger
- avoid creek crossing during floods or after heavy rain
- always carry a first aid kit
- trails should not be attempted at night
- be careful on rocky or steep sections
- when on sealed or gravel roads, keep to the verge
- taking short cuts can cause erosion and you may get lost.
Pictogram use
Multi-use
Multi-use Map and information signs must also include the following pictogram shared use:
Pictogram | Description |
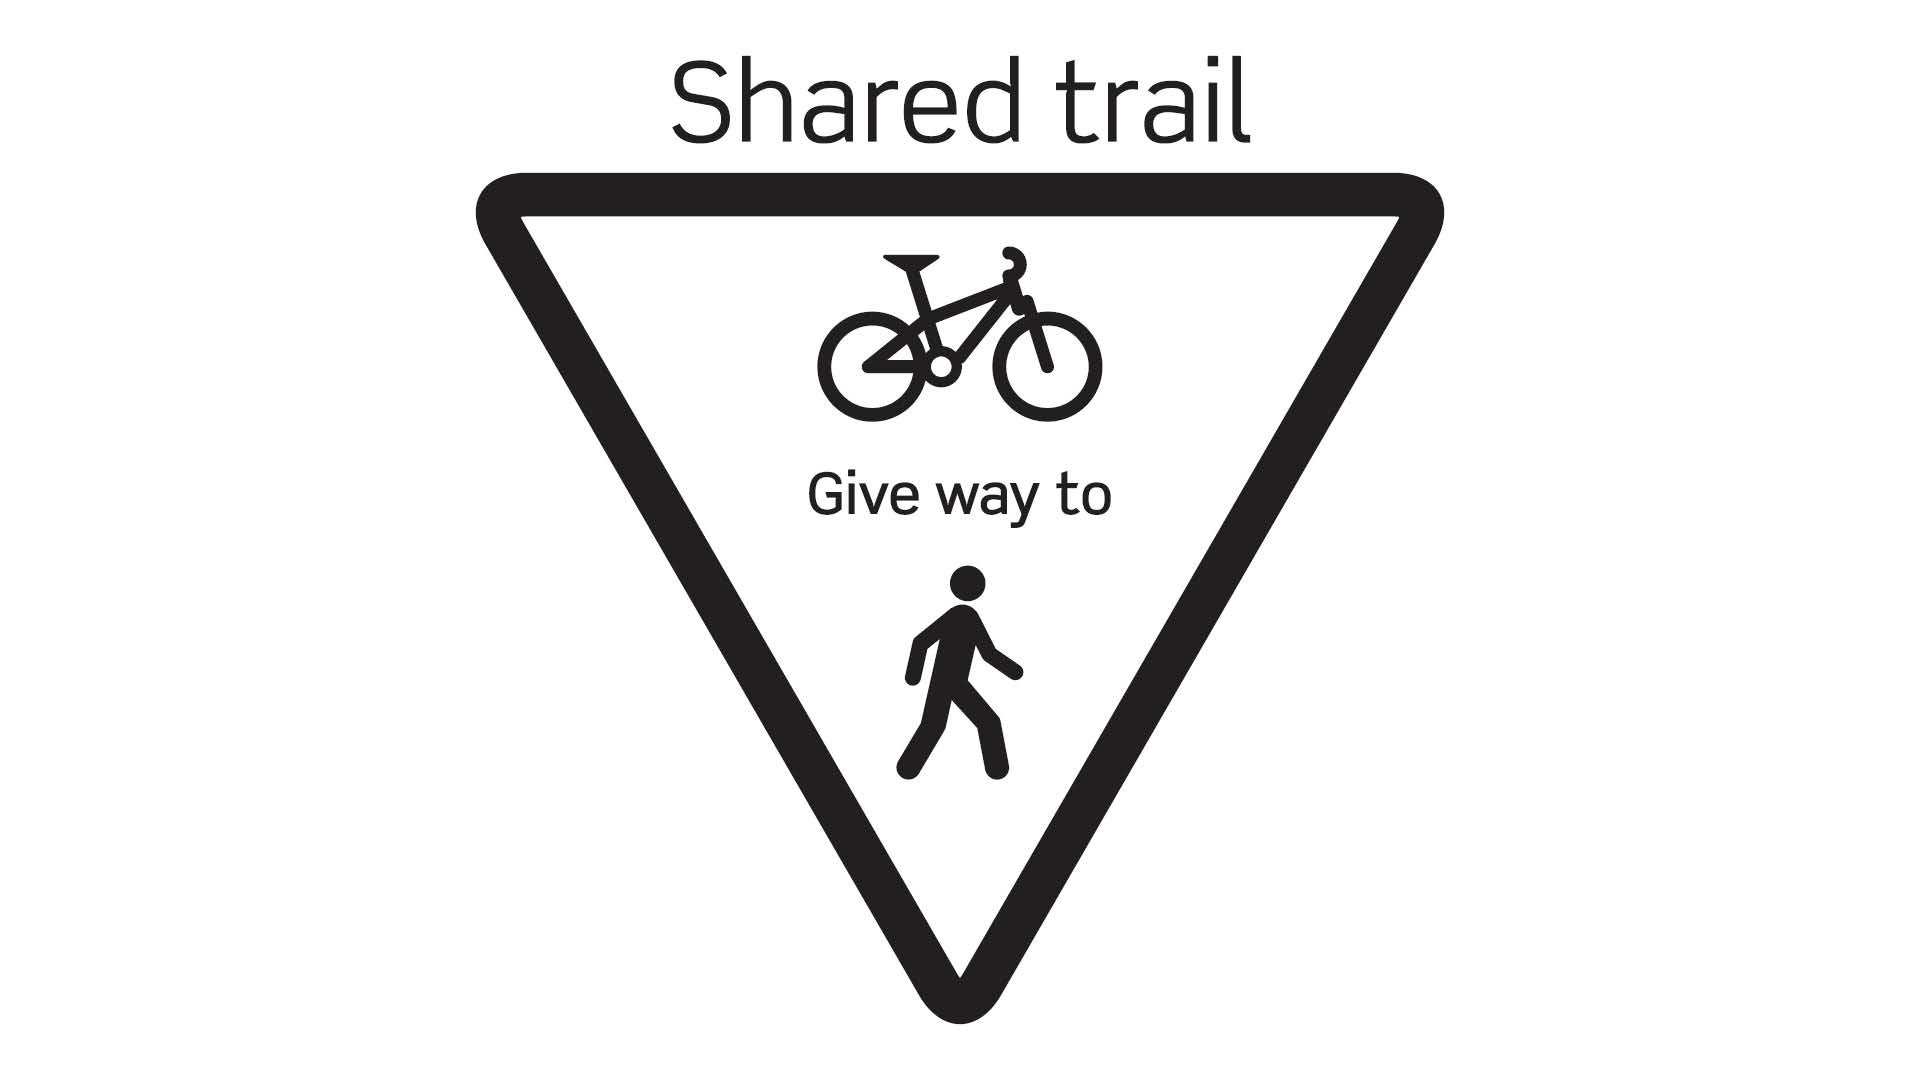  | A give way indicator/code of conduct sign. |
Walking/horse use
Map and information signs used for a walking, and or horse trail may include elements such as:
- Trail options and length of trail
- Personal safety precautions/code of conduct
- Equipment recommendations
- Special conditions if required
- Registration and reporting requirements
- Viewing areas
- Natural attractions/assets such as; a lake/waterfall, beaches (supported with photographs)
- Local fauna and flora information and protection requirements (supported with photographs)
- Distance in metres (m) or kilometres (km) (site specific) to the next point of interest
- Degree of difficulty of the route (surface type, stability, recommended ability of user) must be indicated on a sign by the following:
Walking trail pictograms
Pictogram | Description |
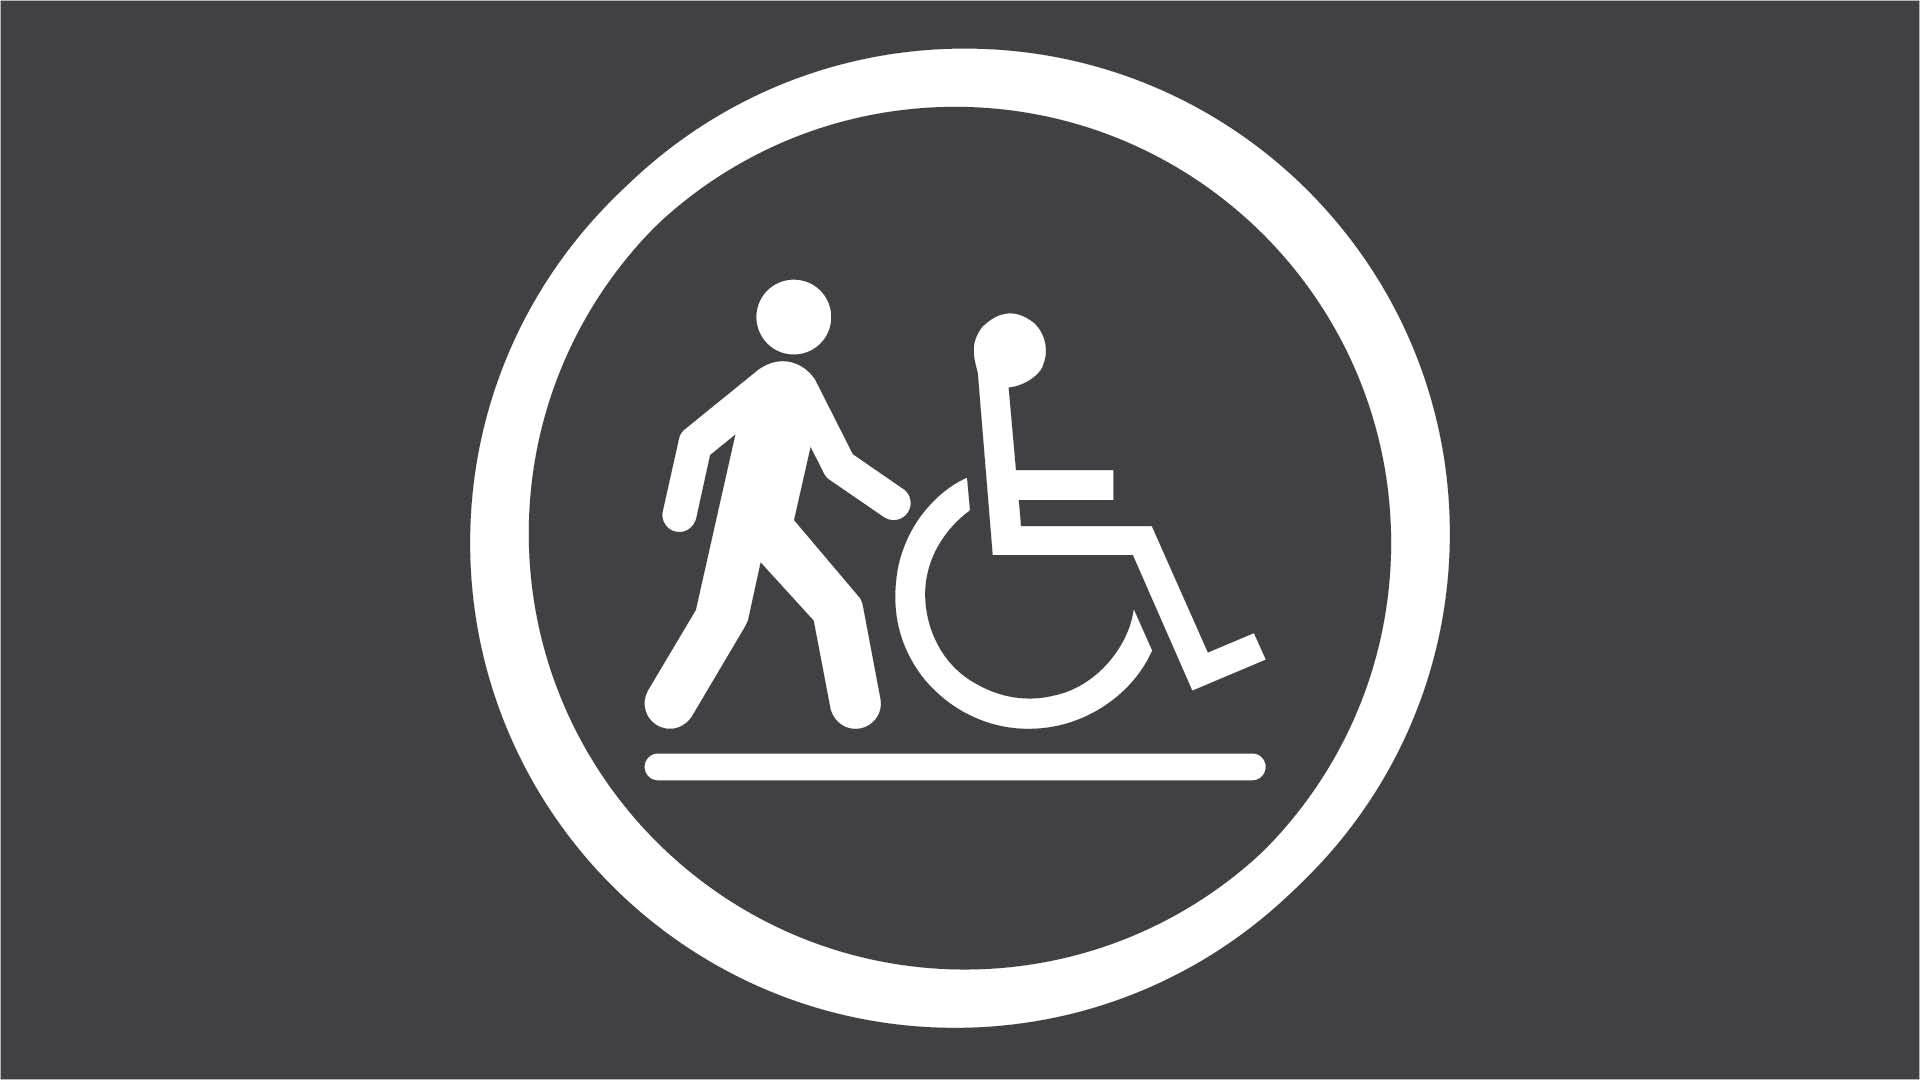 | Grade one – suitable all users, including people with low vision, people who are blind and people who use wheeled mobility devices. |
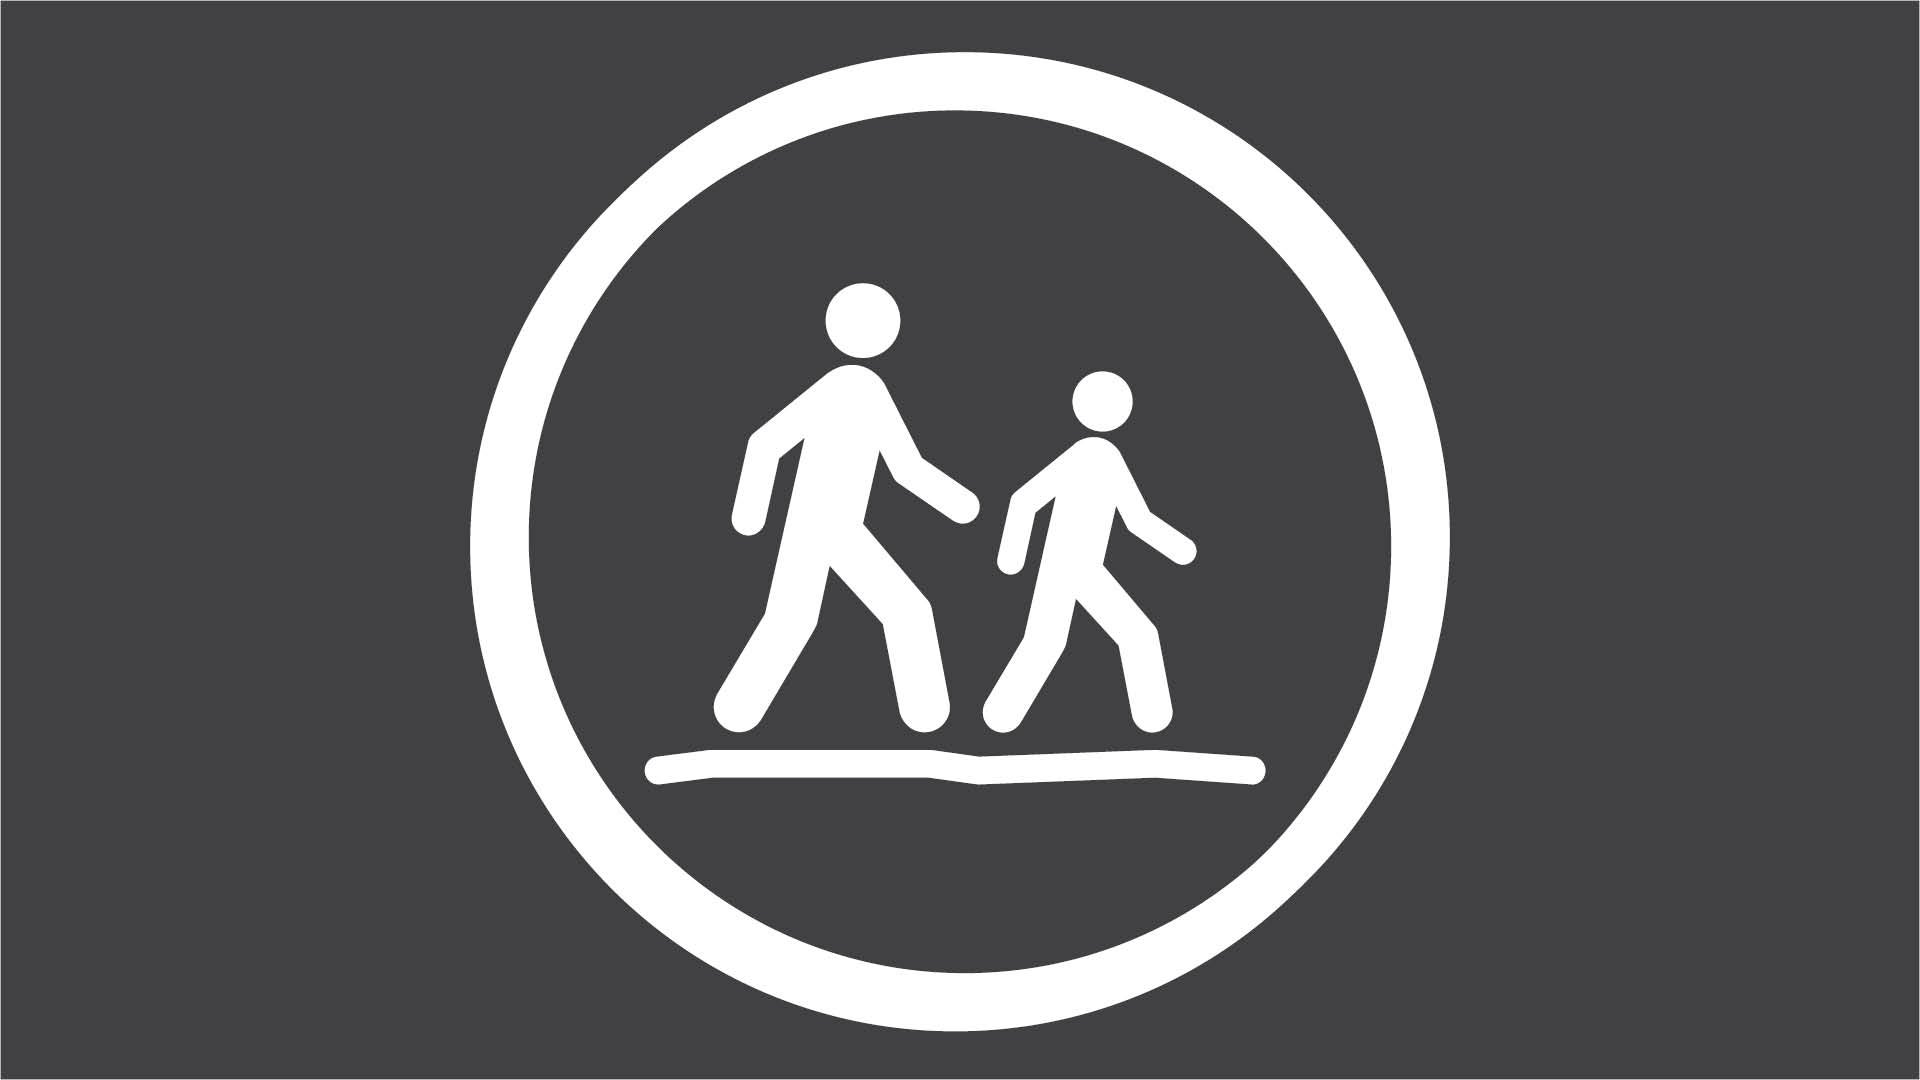 | Grade two – suitable for families with young children. |
 | Grade three – recommended for people with some bush walking experience. |
 | Grade four – recommended for experienced bush walkers. |
 | Grade five – recommended for very experienced bush walkers. |
Horse trail pictograms
Pictogram | Description |
 | Easy – suitable for beginner riders with basic skills. |
 | Intermediate – suitable for skilled riders. |
 | Difficult (black diamond) – For experienced horse riders. |
Mountain bike use
A Map and information signs used for mountain bike trails may include:
- Trail options and trail length
- Personal safety precautions/code of conduct
- Equipment recommendations
- Any special conditions
- Registration and reporting requirements
- Distance in metres (m) or kilometres (km) (site specific) to the next point of interest.
- Degree of difficulty of the route (surface type, stability, recommended user experience) must be indicated on a sign by the following:
Mountain bike trail pictograms (IMBA – International Mountain Bike Association degree of difficulty pictograms)
Pictogram | Description |
 | Easy – suitable for beginner rider with basic skills and off-road bikes. |
 | Intermediate – suitable for skilled riders with mountain bikes. |
 | Difficult (black diamond) – For experienced mountain bike riders. . |
 | Extreme (double black diamond) – strictly for very experienced mountain bike riders. |
ALL trail use
The following international recognised symbols may be utilised to manage risk on all trails:
Pictogram | Description |
 | No entry past this point – On a one way trail, direction may be controlled with the use of this symbol. |
 | Bridge ahead – Symbol provides warning of a change in the trail ahead. |
 | Beware – Used to indicate that the trail should be used at users own risk. |
Note: Track classification is a means of ranking walking trails and enables designers to gauge the signage required on a particular trail.
- AS 2156.1:2001 Walking tracks classification and signage allocates a class one to five to a track, dependant upon track attributes.
- AS 2156.2:2001 Walking tracks infrastructure design provides guidance for the design of walking track signage, depending upon classification.
- Pictograms (grade one to five) are currently used as a guide only and may not correlate to Australian Standards classification.
Note: Track classification is a means of ranking walking trails and enables designers to gauge the signage required on a particular trail.
- Pictograms (grade one to five) are currently used as a guide only and may not correlate to Australian Standards classification.
Positioning
General
- When considering potential sign locations, avoid positions where the sign may interrupt or block a prominent view. Signs should be secondary to a natural view. However, safety is paramount.
- Position signs in a planted area where possible, for ease of maintenance mowing, and to potential for avoid pedestrian collision.
- To ensure a sign panel will not be obscured in future, consider mature size of surrounding vegetation.
- To protect trees from potential damage, all signs should be installed outside of their canopy areas (drip lines). Where this is not possible, the Project Arborist should be contacted to provide advice. See LIM Site set up (including Tree protection) for further guidance.
- Where there is an existing or new pathway, all signs must meet Austroads minimum 500 mm safety offset from any path edge, to avoid collision with the sign while using the pathway.
- Position signs a minimum of 200 mm in from any slab or compacted surface edge for mowing offsets (where applicable) and visual appearance.
Additional requirements
The sign is a long message sign, therefore the following must occur:
- Where the sign is installed beside a new pathway, a luminance contrast treatment is recommended to form the sign slab and must extend the full width of the path of travel. This treatment enables people with low vision and people who are blind to identify a sign or facility adjoining a pathway.
- If an existing pathway is less than 2.0 m wide, an additional slab is required. This will provide an area for viewing the sign while not blocking the pathway.
- Allowance for deck mowers – 2.5 m clear area around embellishments (where possible) and avoid creating small, difficult to mow areas.
- Signs must be located near the commencement of a trail network and should be clearly visible from an adjacent parking area. When viewed from the parking area, the trail user should be able to identify where a trail network begins.
- Additional Map and information signs should be installed at each major entry point to the trail from adjoining areas.
- Due to the size of these signs, incorporate an appropriately sized additional slab or compacted surface treatment area minimum 1.3 m off the pathway. This provides space for a wheelchair or group of people, to position in front of the sign while avoiding obstructing the path of travel.
- To provide consistency within the trail network, additional Map/information signs must be of similar height and match the main Map and information sign. The user should recognise the uniformity of each sign when viewed separately along the trail.
- Where a shelter is installed over a sign (Large in shelter option), the slab must extend 500 mm past the roof drip line. This will prevent any washout on surrounding grass or planted areas. See LIM Shelters for further guidance.
See the following for further guidance:
- Figure 6: Typical positioning - 'Small'
- Figure 7: Typical positioning - 'Medium'
- Figure 8: Typical positioning - 'Large'
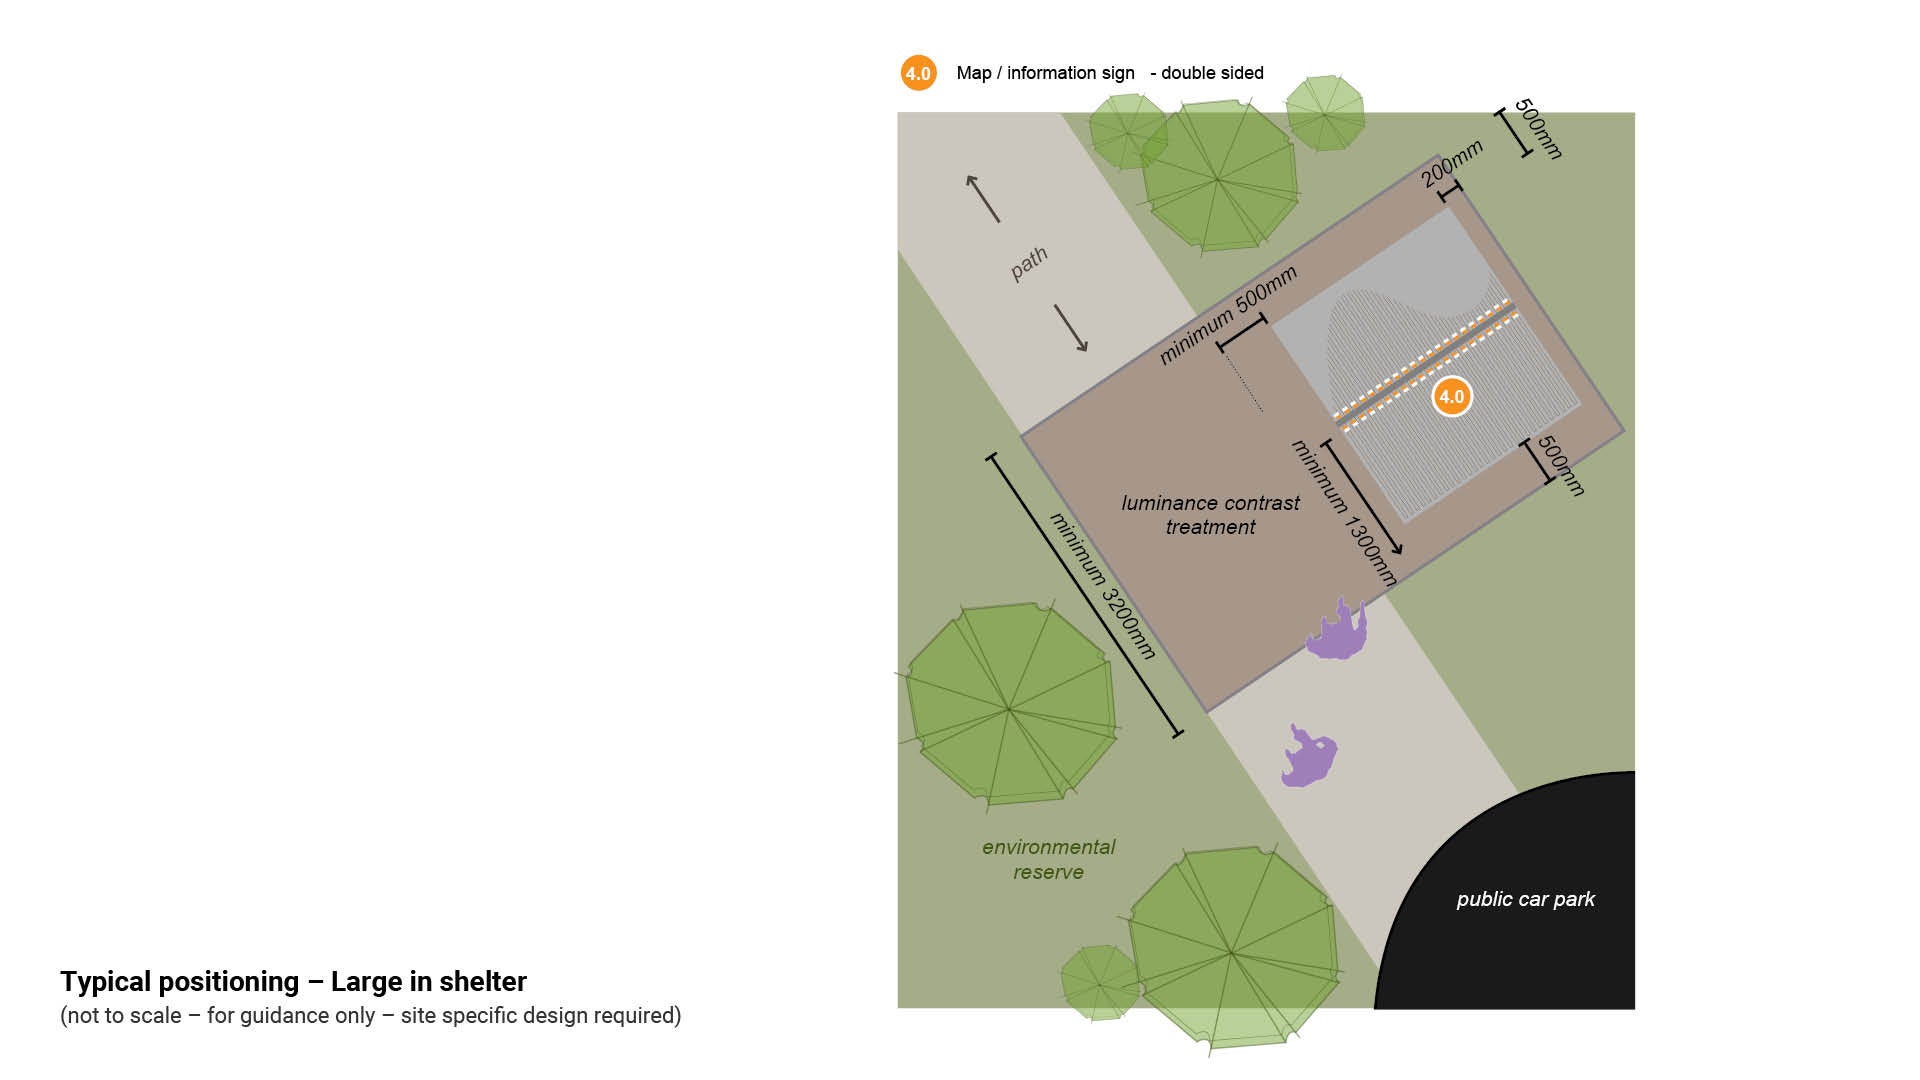
- Figure 9: Typical positioning - 'Large in shelter'.
Figure 6: Typical positioning – Small
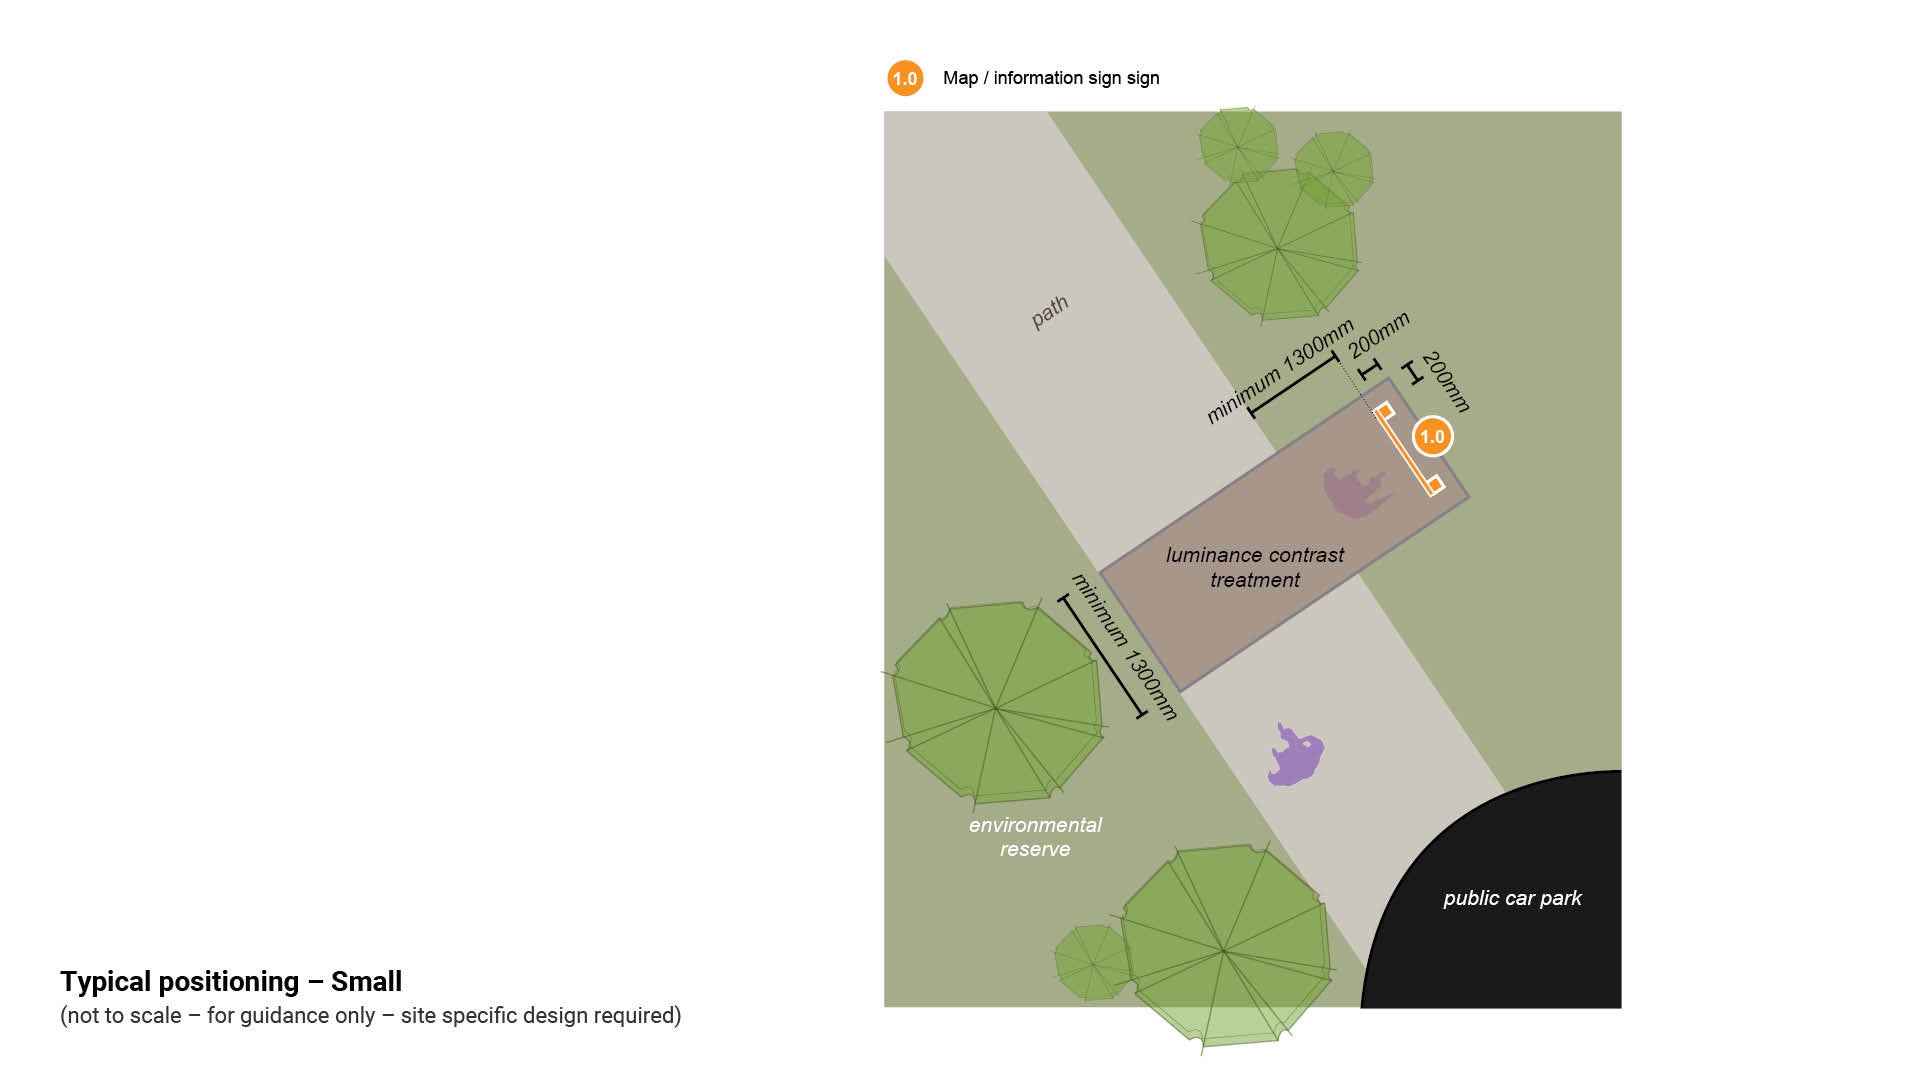
Figure 7: Typical positioning – Medium
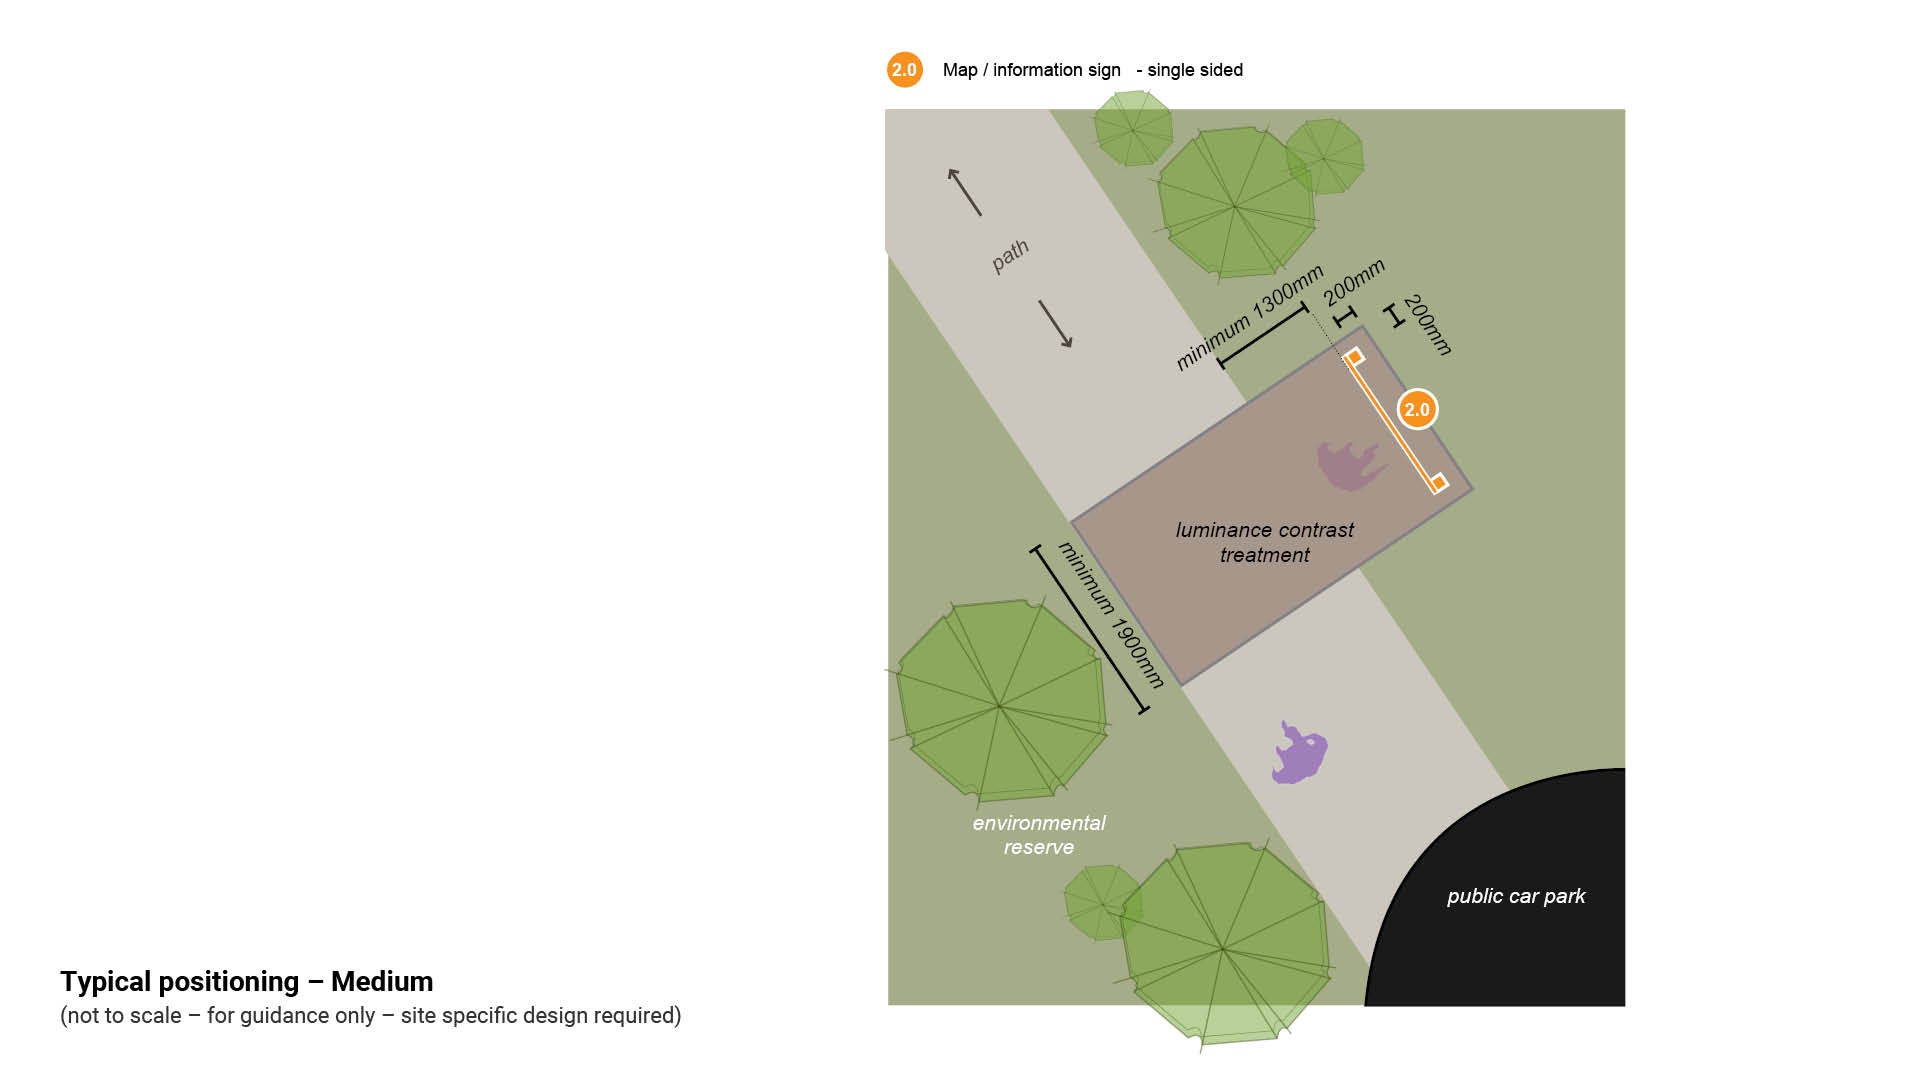
Figure 8: Typical positioning – Large
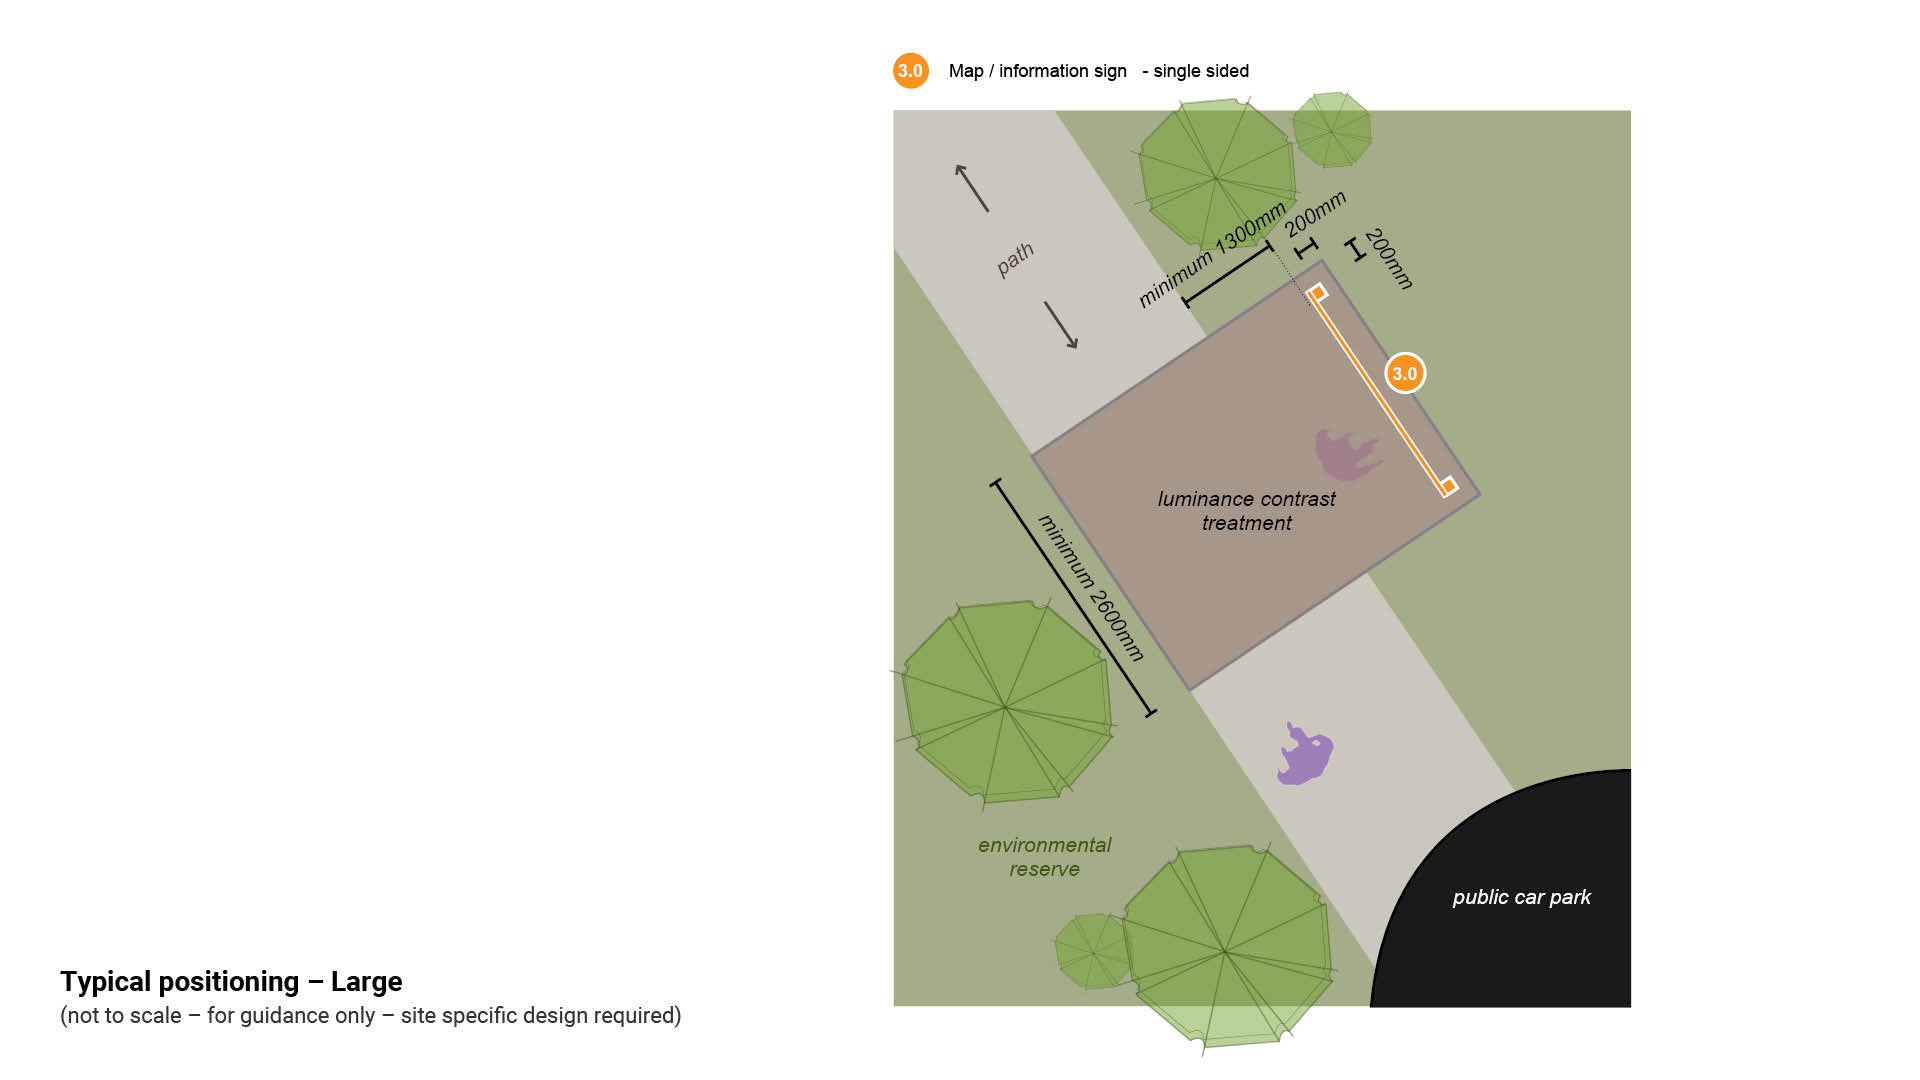
Figure 9: Typical positioning – Large in shelter
Delivery
For all developer delivered assets, contact Council (Development Services) – this includes all works associated with any development application.
For all council delivered assets, the following process should be used:
Site investigations
- Confirm council land tenure and approval process.
- Identify sign location.
- Identify physical/technical constraints.
- Obtain arborist advice (where required).
Community engagement/stakeholders
- Where applicable.
Corporate liaison and approvals
See the Technical drawings and artwork templates table in each sign type page for guidance - How to place an artwork order (internal use only) and Artwork design instructions (internal use only).
- Council (Parks and Gardens) and or Council (Environmental Operations).
- initial approval for use/application of sign.
- approval and guidance of artwork content.
- approval to manufacture signs.
- approval of location of signs.
- Council (Community Response)
- approval of any regulatory signage/componentry.
- Council (Communication)
- editing of templates
- supply of proofs for approval
- approval of corporate branding.
Deliverables
- Site plan – for sign installation.
- Technical drawings (DWGs) – sign construction details.
- Schedule of signs.
Manufacture
See the Technical drawings and artwork templates table in each sign type page for guidance - How to place an artwork order (internal use only) and Artwork design instructions (internal use only).
- In-house manufacture – Council (Transport Network Operations) - Civil Operations (Signs Technical Officer).
OR
- External manufacture – select a suitable sign fabricator.
Installation
- All relevant key stakeholders are to be notified (including contractors), and where required, attend a pre-start meeting.
- Sign location as per approved site plan.
- Installation as per technical drawings and schedule.
Finalisation
- Assets captured.
- As designed as constructed drawings (ADAC) supplied.
- Hand over to asset custodian.
This component is currently in development