Suite of signs

Temporary signs
Temporary signs are used to display a short interpretive message for a limited period of time. The signs are designed to minimise risk and improve awareness.
Temporary signs may be divided into three uses:
- Warning signs – Educate the public about potential temporary or short-lived hazards.
- Instructional/interpretive signs – Promote safety information.
- Project signs – Signs describing construction outcomes and dates, usually supported by illustrations or plans of the project.
Catalogue sample
Download the full LIM Signage suite Catalogue.
Technical drawings and artwork templates
Embellishment | Technical dwg/artwork templates | Supplier |
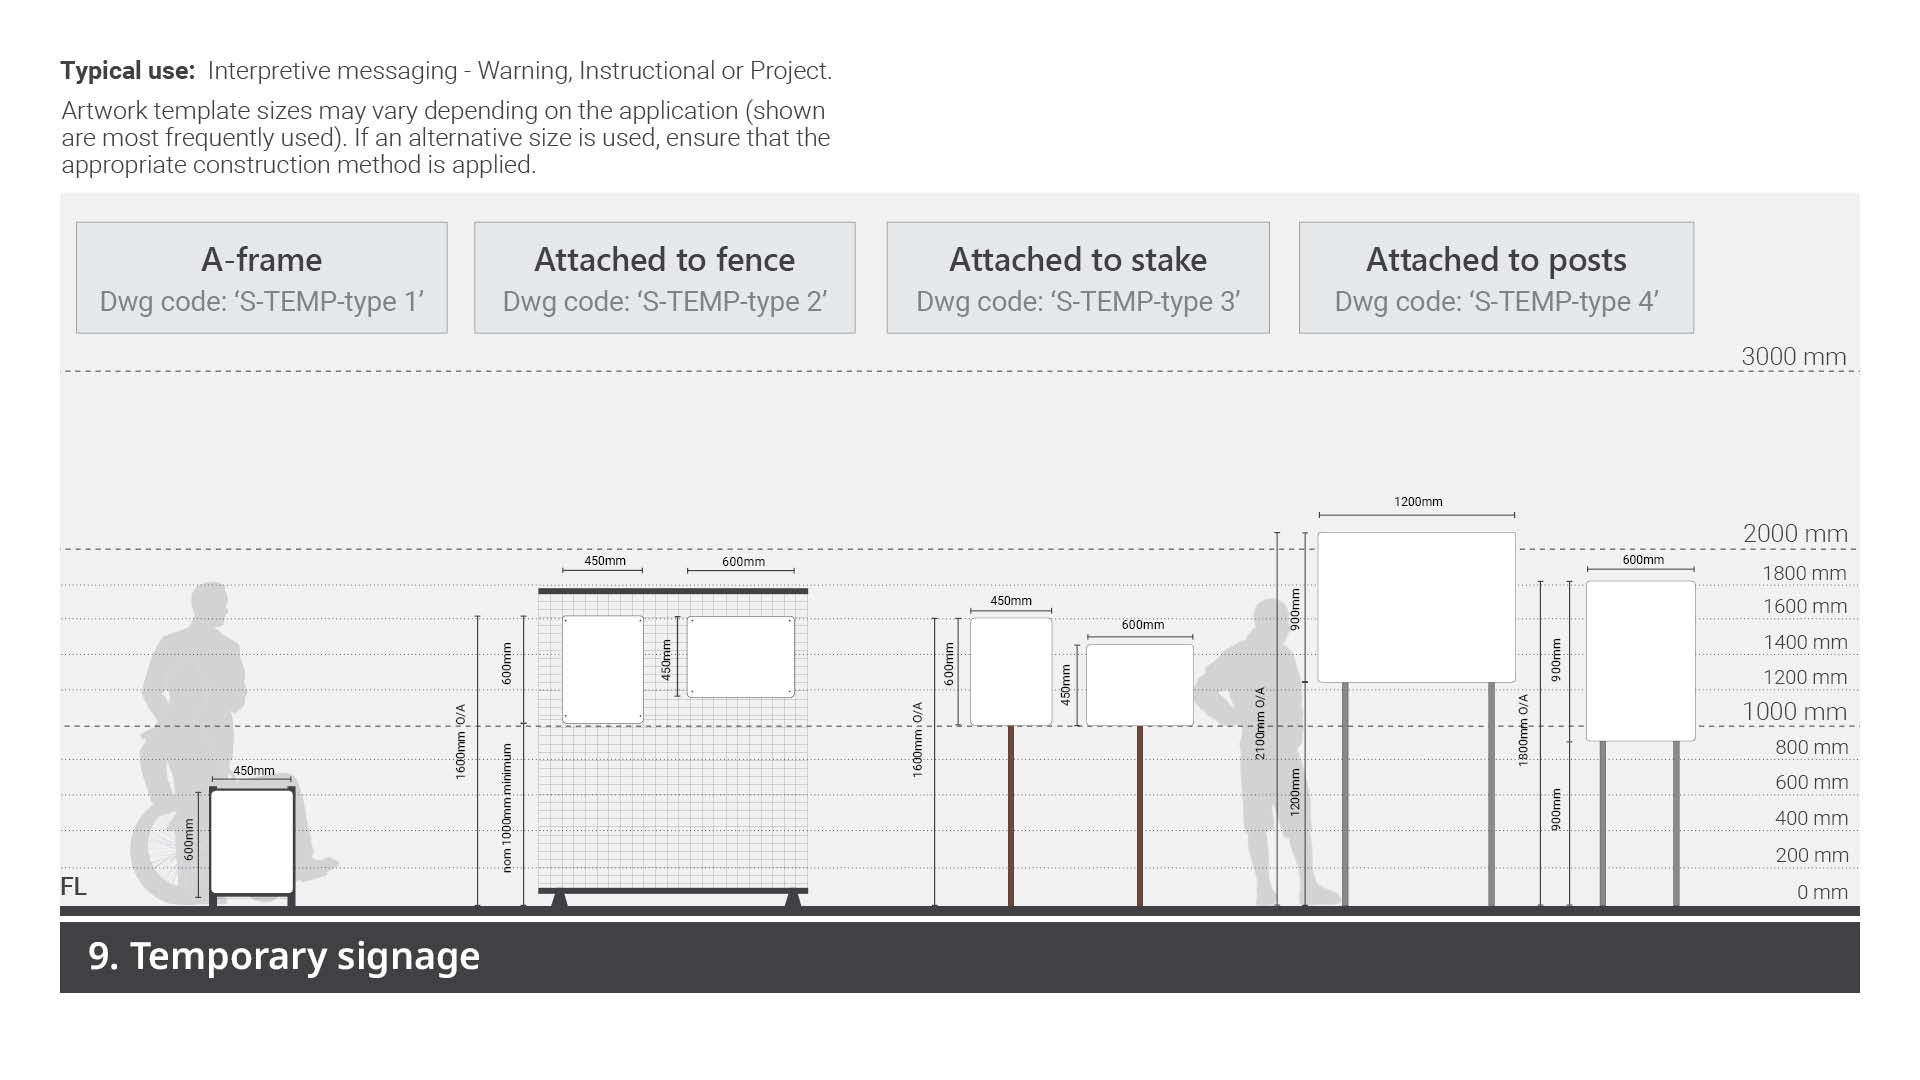
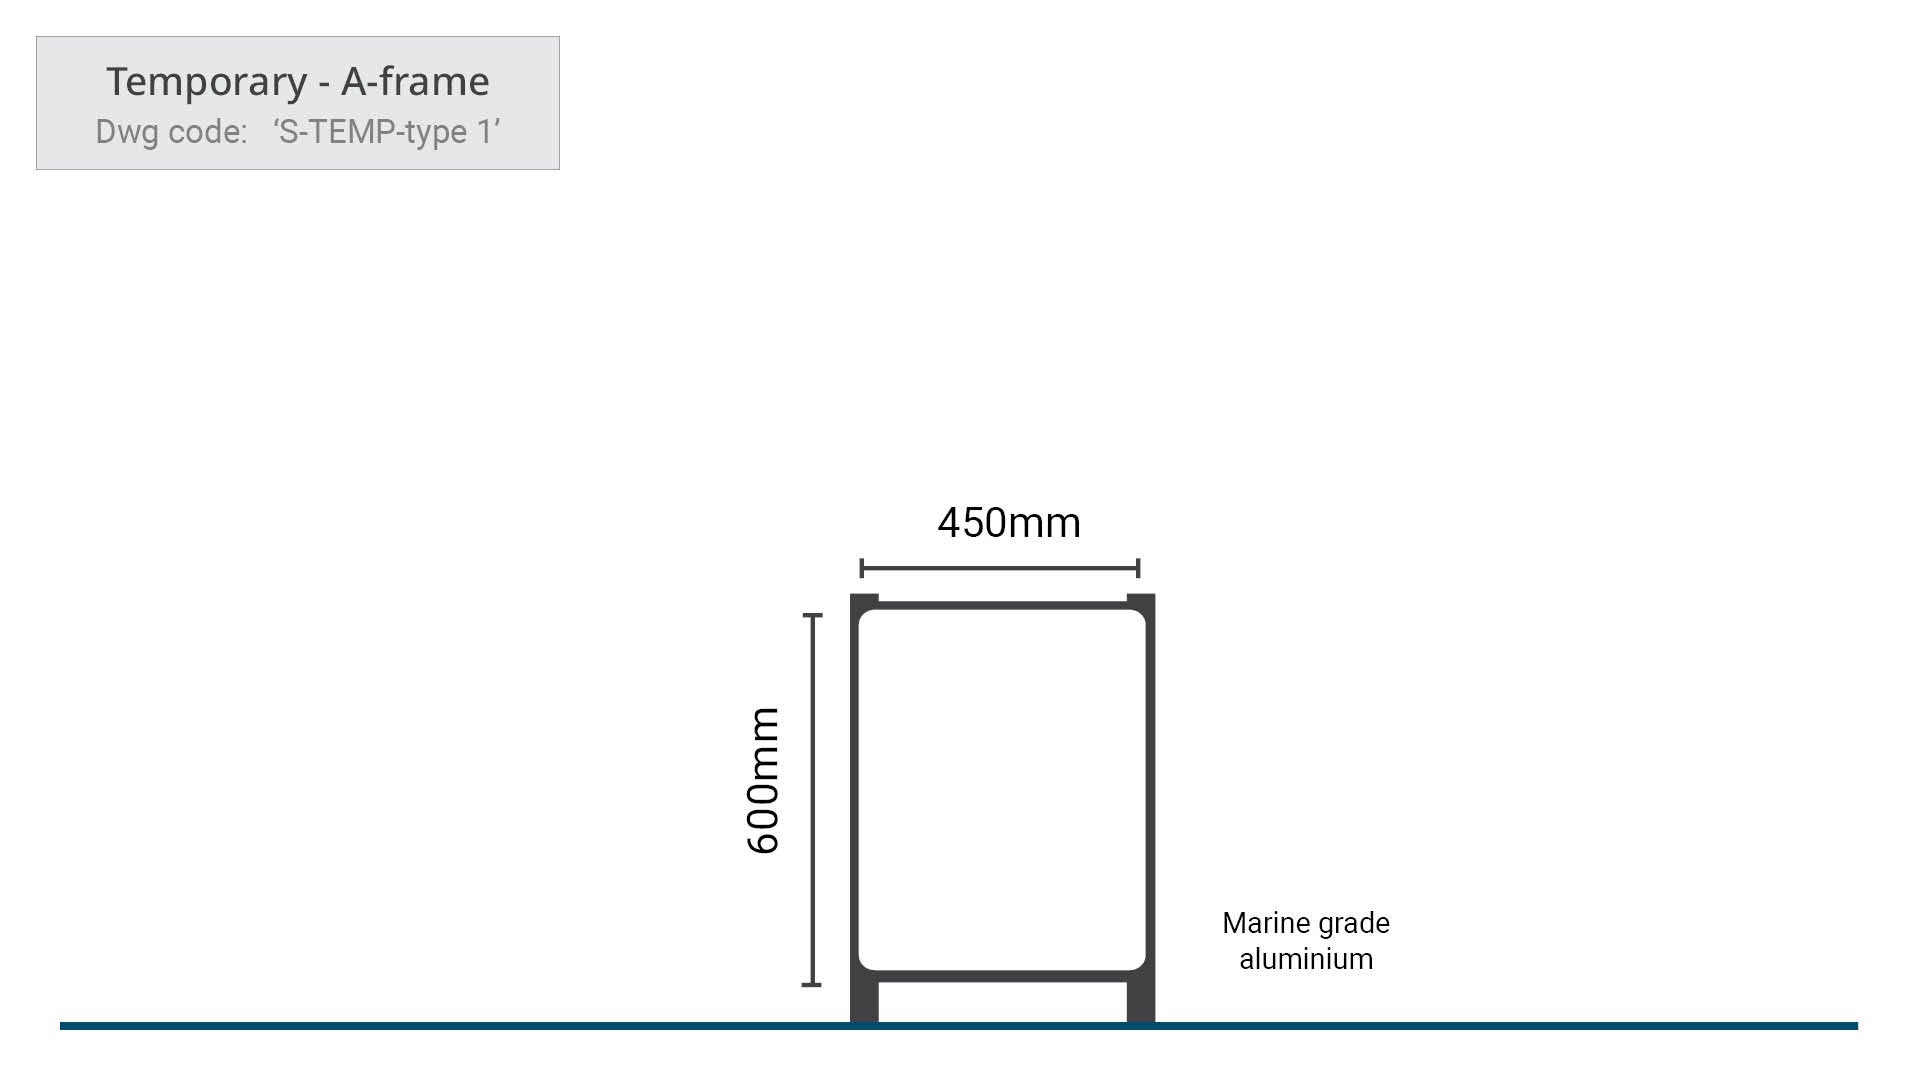 | Temporary signs - A-frame
| No supplier specified |
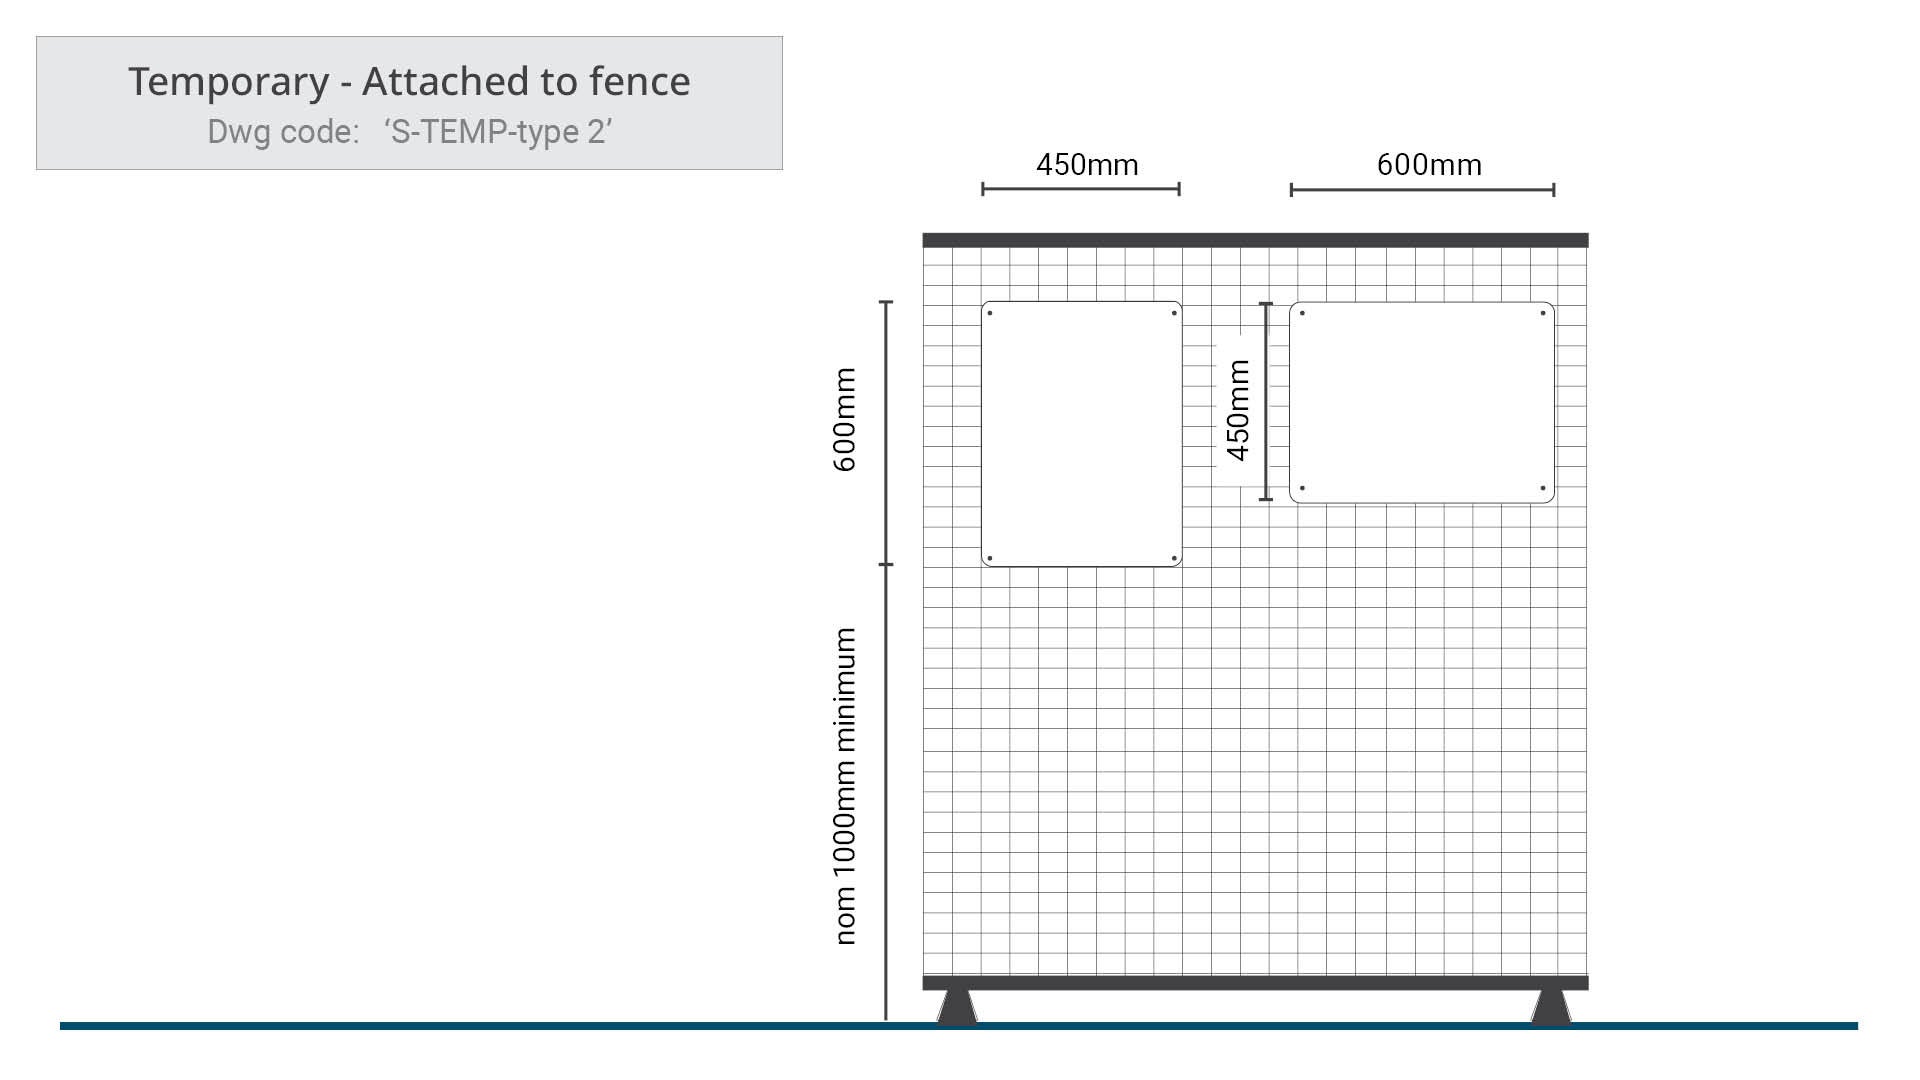 | Temporary signs - Attached to fence
| No supplier specified |
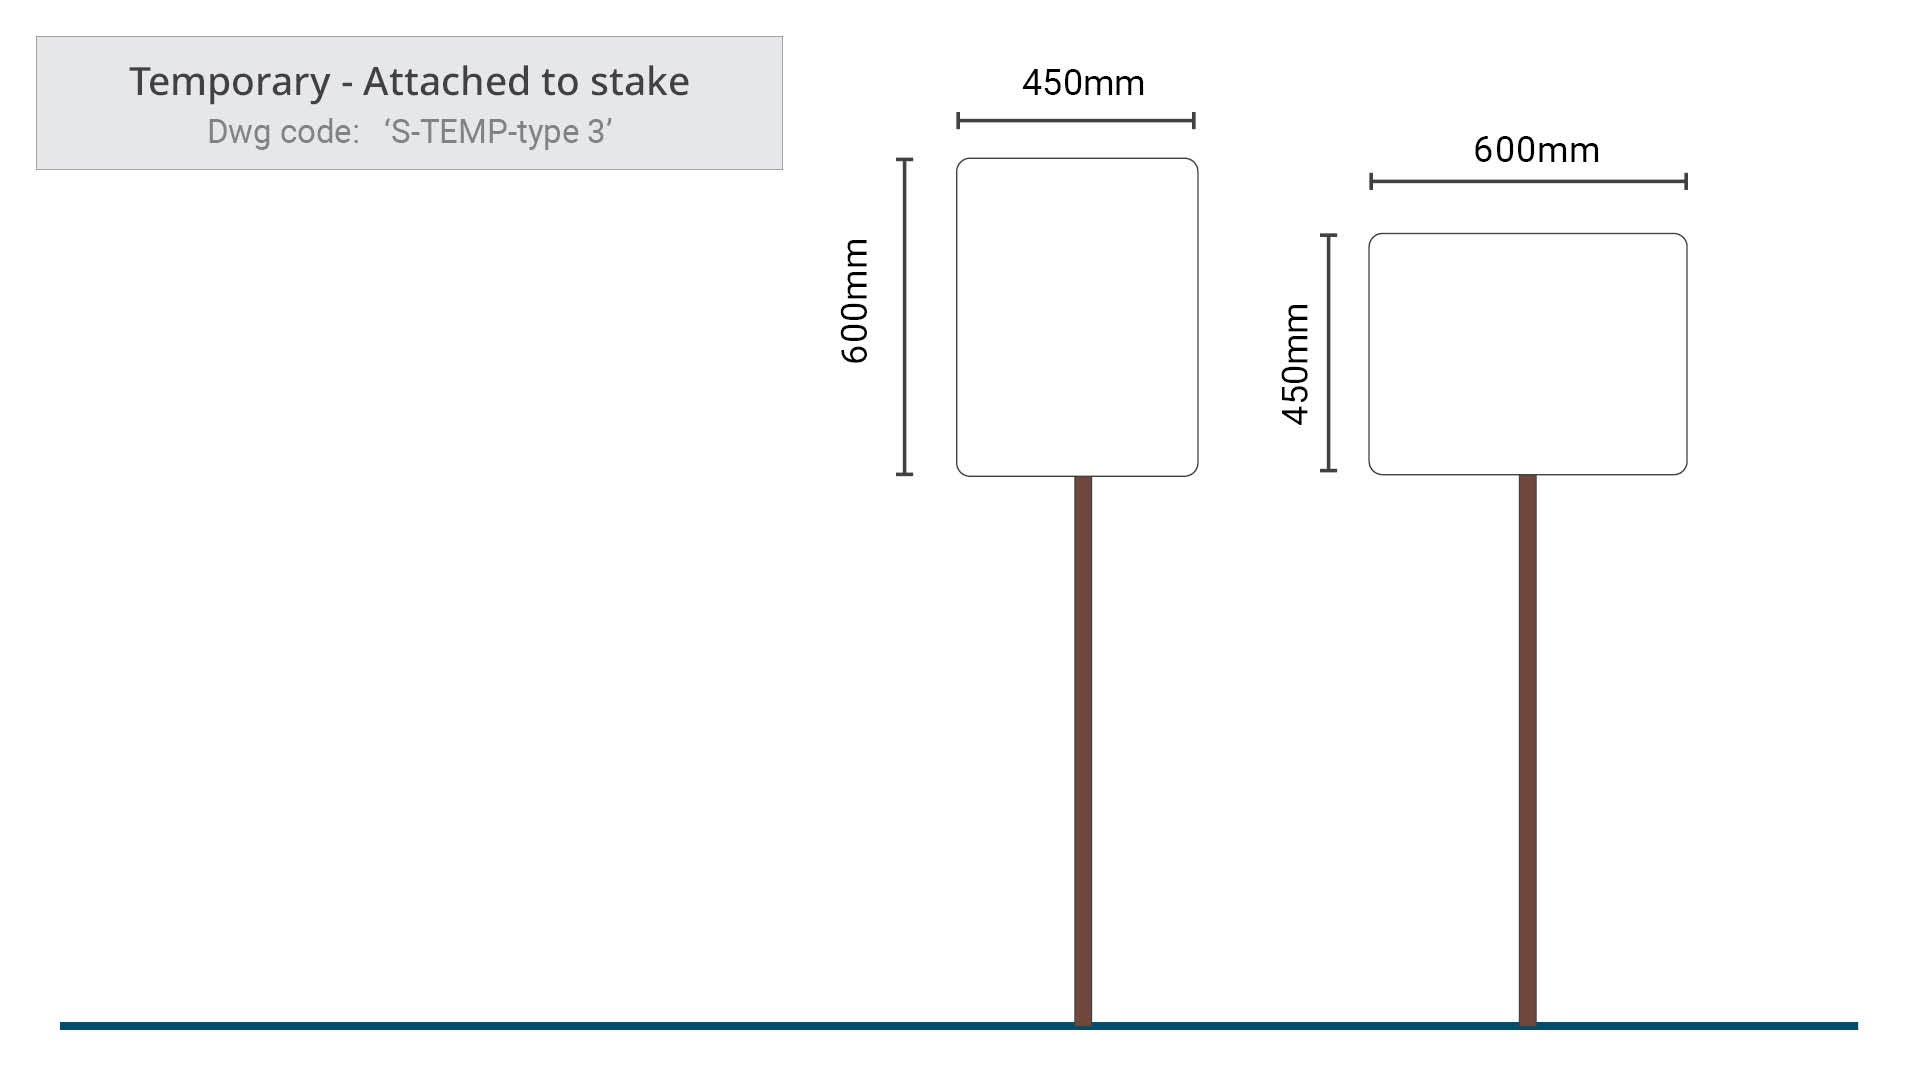 | Temporary signs - Attached to stake
| No supplier specified |
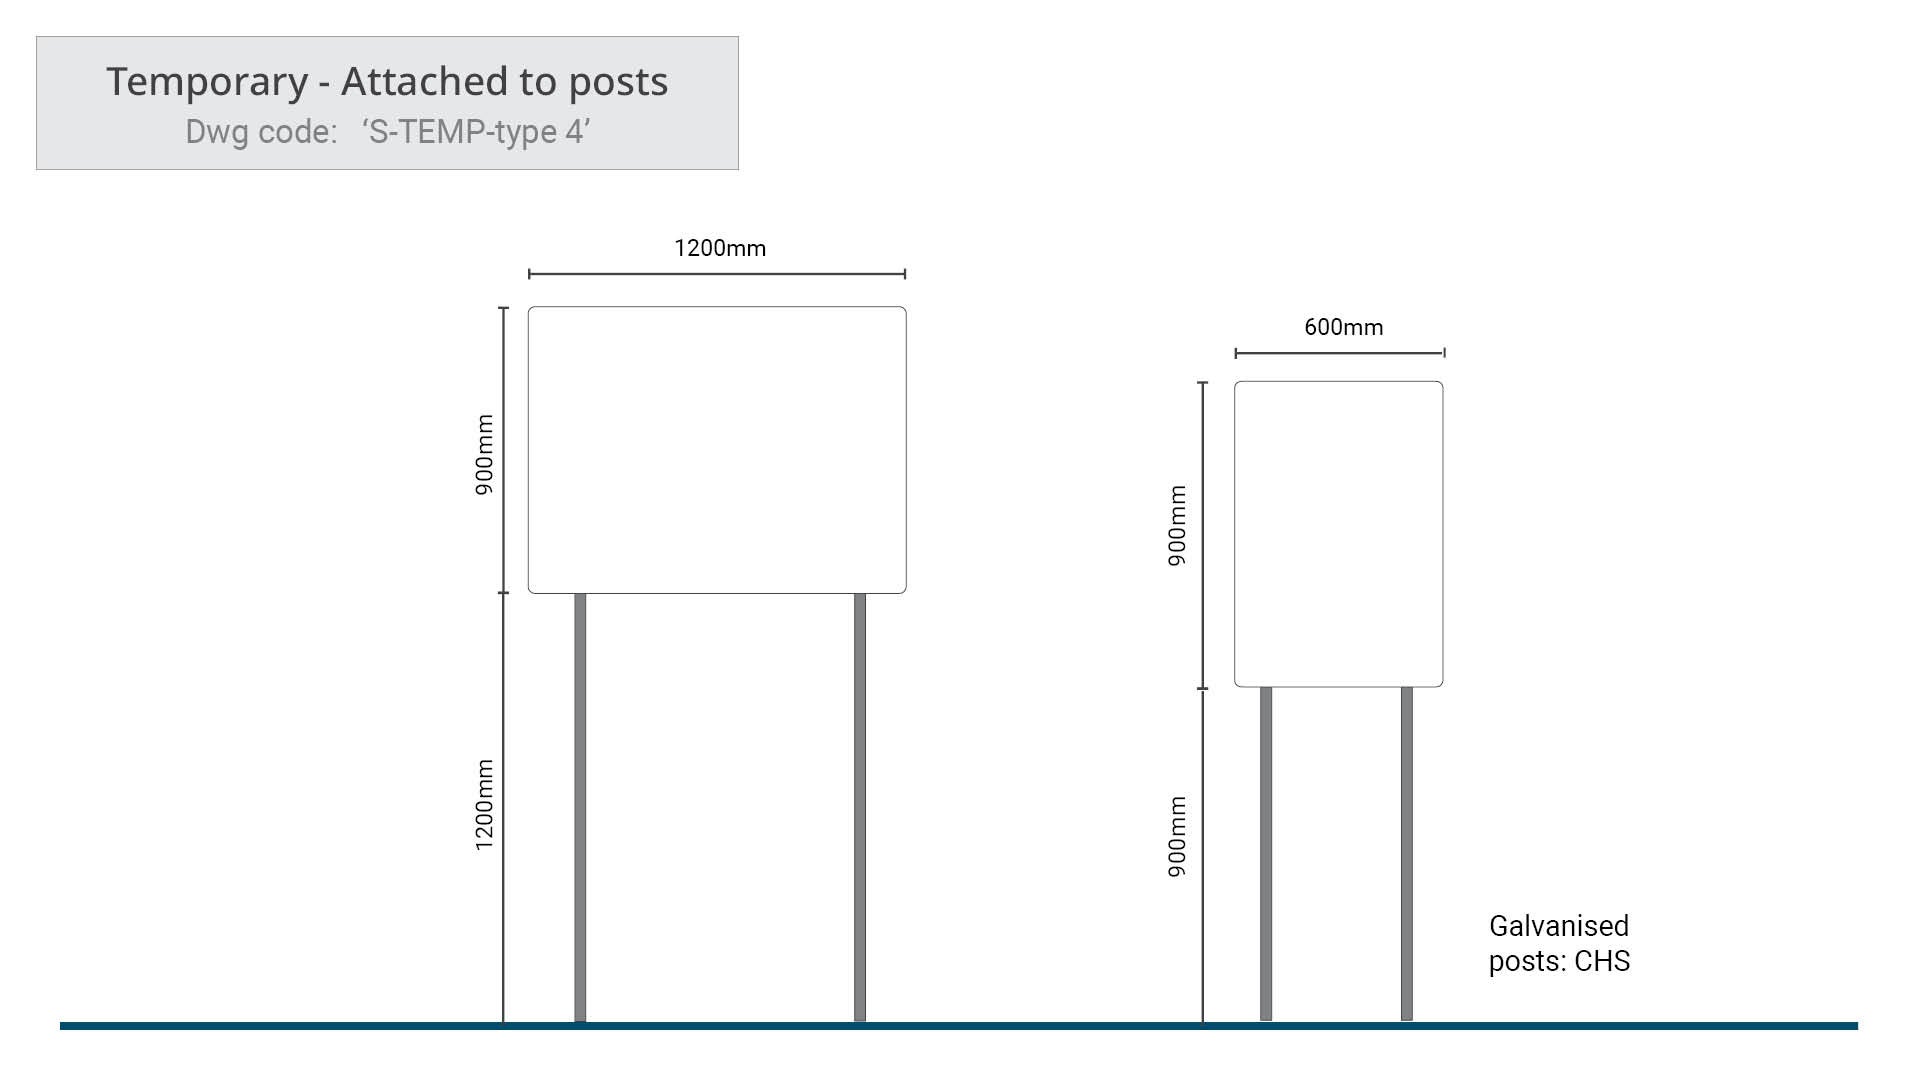 | Temporary signs - Attached to posts
| No supplier specified |
Purpose
Temporary signs are not permanently installed signs, they are positioned to where required to display a message for a short duration of time. They provide awareness information to protect and inform:
- a visitor to a site
- on-site workers
- passing pedestrians.
Temporary signs typical uses:
Warning sign - a temporary aluminium sign used to inform about hazards, safety issues or other relevant information. A warning sign is used to manage risk for on-site workers, passing pedestrians and in some cases, motorists. The sign is typically mounted or fixed to a stand which sits on the ground.
Instructional / interpretive sign – a temporary corflute or aluminium sign primarily used for temporary interpretive messages where a short-term display is required.
The sign may be mounted onto a construction fence or fixed to a timber stake (method chosen to suit application and message). For most effectiveness, the sign should be as close to the referring object as possible. However all signs must be located a minimum 500 mm from any tree trunk buttress or any structural root.
Project sign – (also referred to as a 'Capital Works sign'/ 'Major/minor project sign') a temporary aluminium or corflute (or equivalent) information sign used to convey details about a place, a site and or an event. Material selection is influenced by the length of time the sign is expected to be standing.
Corflute is used for short periods of time and aluminium is used for longer periods.
The sign is typically mounted on two galvanised posts, however mounting to a construction fence is a suitable option if space is limited.
The sign may also contain illustrations or plans detailing future works.
Materials, fixings and supports
Materials should be weather-resistant and securely fastened to prevent damage or detachment in windy conditions.
Short-term signs
Short-term temporary signs are typically printed on corflute (or equivalent material) is recommended. Corflute is a lightweight, cost-effective substrate suitable for both indoor and outdoor applications. It is easy to handle, install, and replace, making it ideal for projects with frequent changes or short durations.
While corflute provides adequate weather resistance, it is best suited for environments with minimal exposure to harsh conditions, as prolonged use may lead to fading or structural degradation.
Long-term signs
Long-term temporary signs are the use of aluminium panels is recommended. Aluminium offers superior durability, resistance to weathering, and protection against vandalism, making it suitable for projects that require signage to remain in place for extended periods or signs of frequent use (e.g construction works underway).
This material provides a higher-grade finish, ensuring a professional appearance and maintaining legibility over time. Aluminium panels can also be powder-coated or laminated for additional protection and aesthetic enhancement.
Planning
General
The following should be considered prior to erecting the sign:
- Determine the purpose for the sign. This will influence the type of temporary sign to use.
- Establish the estimated period of time the sign is to be in use.
- Consider the most accessible locations that are visible for the majority of passing pedestrians.
- Selecting site locations, will determine the total number of signs required.
- Ensure the sign is installed securely and at an appropriate height for visibility.
- Position sign to avoid hazards and comply with safety and accessibility standards.
- Remove signage promptly once the message is no longer relevant to prevent confusion or visual clutter.
Mounting methods

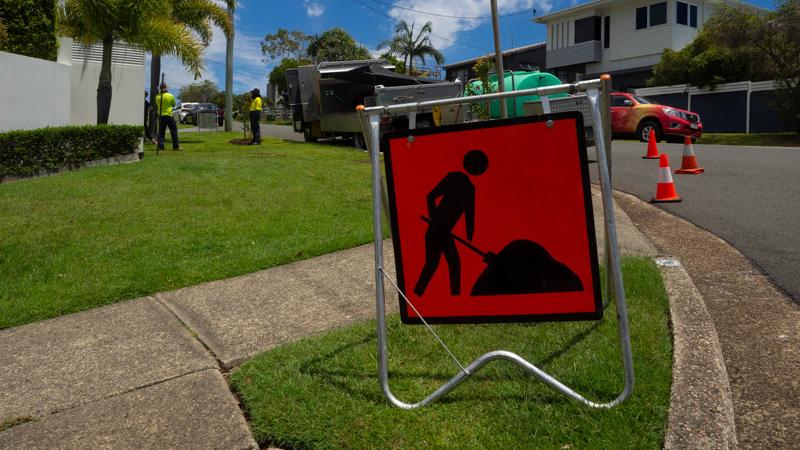
Attached to an A-frame (shown) or a freestanding stand
- This mounting method is commonly used for temporary worksites where flexibility and mobility are essential. It is particularly suited for short-term activities such as mowing, planting, or other maintenance tasks that occur intermittently.
- A-frame signage provides high visibility, can be easily relocated as work progresses, and minimises interference with surrounding infrastructure. Additionally, this option is ideal for areas without permanent structures to attach signage and where quick setup and removal are required.
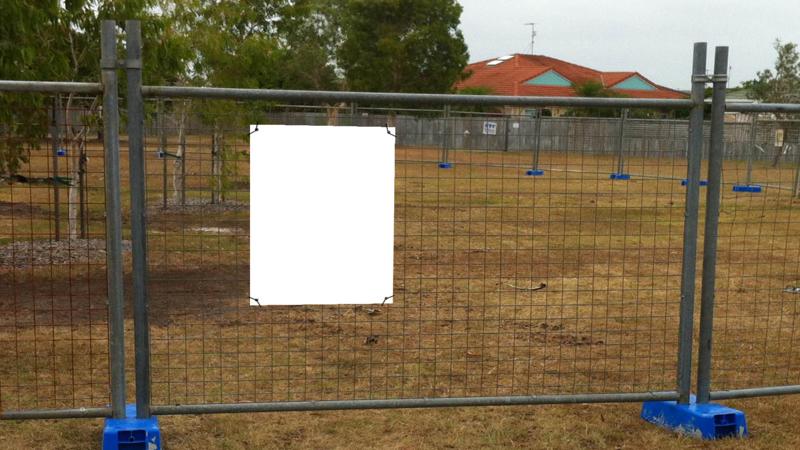
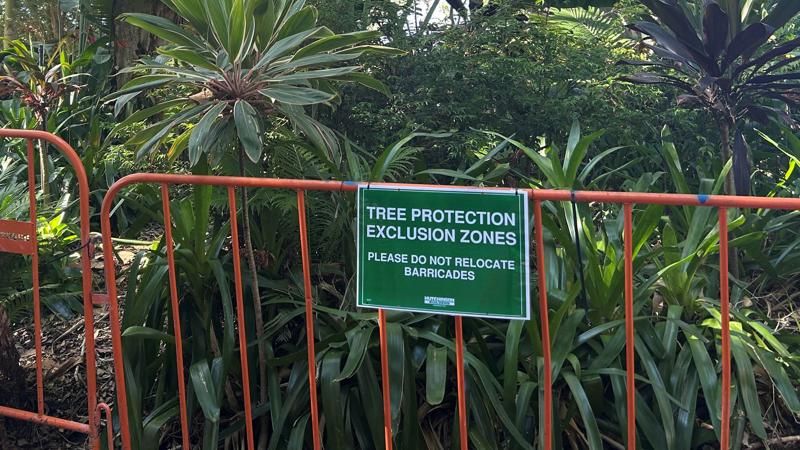
Attached to a fence (e.g. construction fence).
- This mounting method involves securing signage directly to temporary or permanent fencing using cable ties, clamps, or other fasteners. It is typically chosen for sites with high activity levels, restricted space, or where quick installation and ease of replacement are critical.
- Fence-mounted signage is ideal for dynamic environments such as construction zones, event sites, or areas undergoing frequent changes, as it allows for rapid repositioning without the need for additional structural supports. This approach minimises ground disturbance, leverages existing barriers for visibility, and is well-suited for projects where maintaining clear access and safety compliance is essential.
Attached to a timber stake
- This method involves securing signage to a timber stake driven into the ground. It is primarily used for temporary interpretive messages where a short-term display is required. Timber stakes provide a cost-effective and easily deployable solution for areas where permanent infrastructure is not practical.
- Typical applications might be:
- Environmental works: Communicating site-specific information such as 'Area closed for revegetation' or 'Habitat restoration in progress'.
- Wildlife and pest management: Alerting the public to seasonal animal behaviours, for example, 'Warning: Swooping birds during nesting season'.
- Construction or maintenance notices: Indicating temporary closures or restricted access zones.
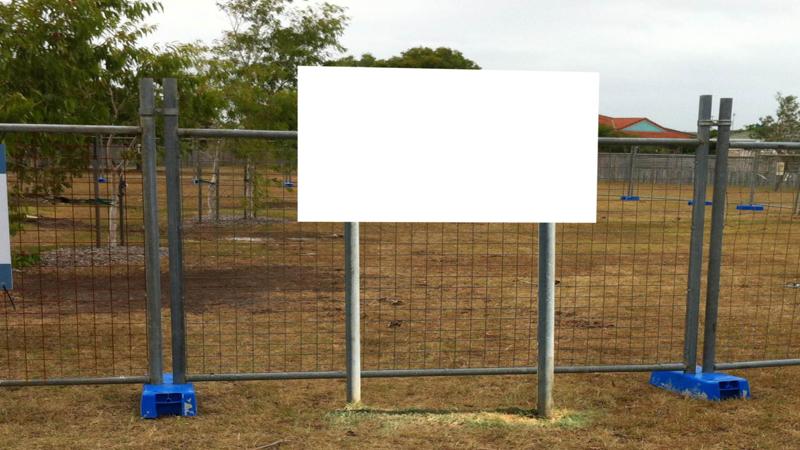
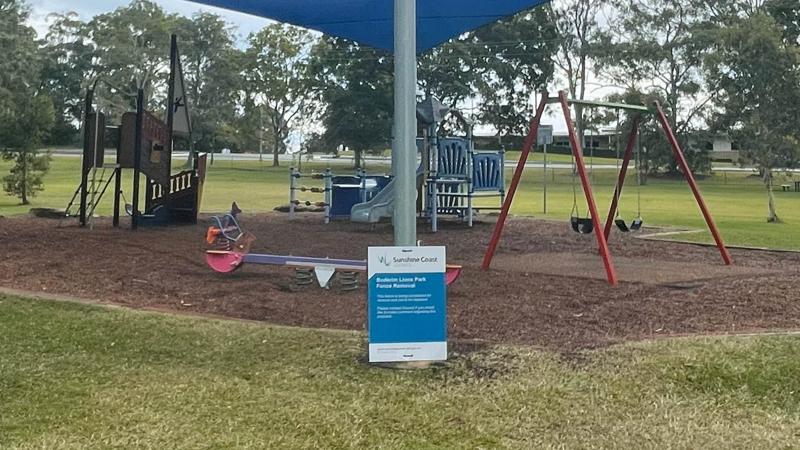
Mounted on posts
- This method involves securing signage to fixed posts, providing a stable and durable installation. It is typically selected for projects expected to remain in place for an extended period, such as long-term construction zones, infrastructure works, or semi-permanent safety notices.
- Post-mounted signage offers high visibility, withstands environmental conditions, and minimises the risk of accidental displacement.
- Posts can be installed in soil, concrete, or other stable surfaces, and may include options for adjustable height or reinforced bases for added stability.
- Typical applications might be:
- Event / construction or maintenance notices: Communicating key information about the changes in the marked area (temporary closures or restricted access zones), including dates, and illustrations or photographs where required.
- Environmental works: Communicating site-specific information such as 'Area closed for revegetation' or 'Habitat restoration in progress'.
- Wildlife and pest management: Alerting the public to seasonal animal behaviours, for example, 'Warning: Swooping birds during nesting season'.
See Technical drawings (above) for construction details for the above methods of mounting temporary signs.
Design
Legal, standards and guidelines, requirements
Sign construction
- Technical drawings (DWGs) - for typical construction details for each sign type. See Technical drawings and artwork templates table (above - top of page).
- Artwork templates and samples - for approved graphic design templates and samples for alternative options (where applicable) for each sign type. See Technical drawings and artwork templates table (above - top of page).
See LIM Signage – Overarching guidelines – for Standards such as, designing for access and inclusion, traffic and road standards (where applicable).
Content and corporate branding
- Sunshine Coast Council corporate branding logo must be displayed on all signs as per Artwork templates.
- All colours must be selected from the Council corporate colour palette or otherwise approved for specific purpose. e.g. some colours, such as red, yellow and black, (not part of the corporate palette) may be used for regulatory purposes.
See LIM Signage – Graphic design guidelines – for essential guidance on components that make up signs. e.g. colour application, pictogram integration, text sizing and spacing, map implementation etc.
Content general
- All sign artwork is to be professionally designed (by a qualified graphic designer or equivalent) as vector files.
- Short message - content must be clear and concise
- Sign content must use a positive tone. This will influence the reader to embrace the message.
- All regulatory pictograms must be approved by Council (Community Response) prior to printing.
Positioning
General
- When considering potential sign locations, avoid positions where the sign may interrupt or block a prominent view. Signs should be secondary to a natural view. However, safety is paramount.
- Position signs in a planted area where possible, for ease of maintenance mowing, and to potential for avoid pedestrian collision.
- To ensure a sign panel will not be obscured in future, consider mature size of surrounding vegetation.
- To protect trees from potential damage, all signs should be installed outside of their canopy areas (drip lines). Where this is not possible, the Project Arborist should be contacted to provide advice. See LIM Site set up (including Tree protection) for further guidance.
- Where there is an existing or new pathway, all signs must meet Austroads minimum 500 mm safety offset from any path edge, to avoid collision with the sign while using the pathway.
- Position signs a minimum of 200 mm in from any slab or compacted surface edge for mowing offsets (where applicable) and visual appearance.
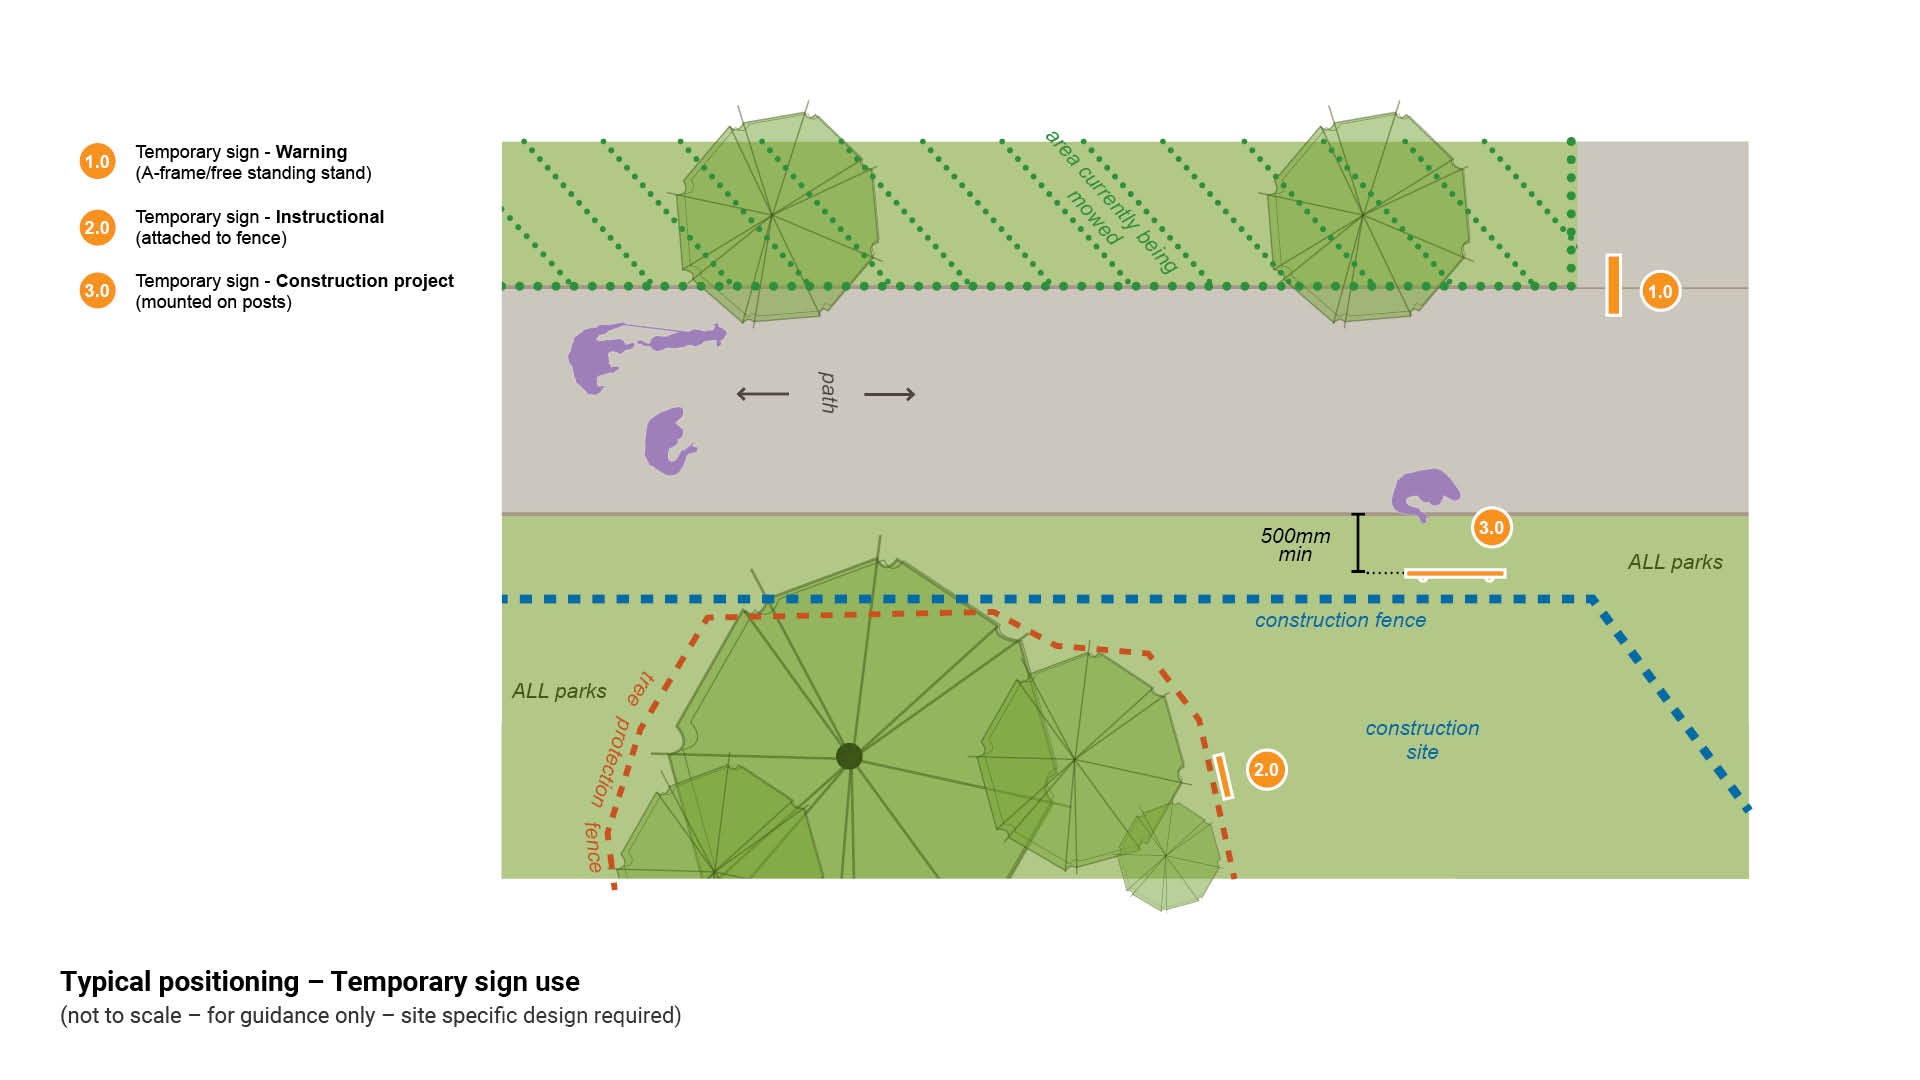
See Figure 32: Typical positioning – Temporary sign use
Figure 32: Typical positioning – Temporary sign use
Delivery
For all developer delivered assets, contact Council (Development Services) – this includes all works associated with any development application.
For all council delivered assets, the following process should be used:
Site investigations
- Confirm council land tenure and approval process.
- Identify sign location.
- Identify physical/technical constraints.
- Obtain arborist advice (where required).
Community engagement/stakeholders
- Where applicable.
Corporate liaison and approvals
See the Technical drawings and artwork templates table in each sign type page for guidance - How to place an artwork order (internal use only) and Artwork design instructions (internal use only).
- Council (Parks and Gardens) and or Council (Environmental Operations).
- initial approval for use/application of sign.
- approval and guidance of artwork content.
- approval to manufacture signs.
- approval of location of signs.
- Council (Community Response)
- approval of any regulatory signage/componentry.
- Council (Communication)
- editing of templates
- supply of proofs for approval
- approval of corporate branding.
Deliverables
- Site plan – for sign installation.
- Technical drawings (DWGs) – sign construction details.
- Schedule of signs.
Manufacture
See the Technical drawings and artwork templates table in each sign type page for guidance - How to place an artwork order (internal use only) and Artwork design instructions (internal use only).
- In-house manufacture – Council (Transport Network Operations) - Civil Operations (Signs Technical Officer).
OR
- External manufacture – select a suitable sign fabricator.
Installation
- All relevant key stakeholders are to be notified (including contractors), and where required, attend a pre-start meeting.
- Sign location as per approved site plan.
- Installation as per technical drawings and schedule.
Finalisation
- Assets captured.
- As designed as constructed drawings (ADAC) supplied.
- Hand over to asset custodian.
This component is currently in development