Suite of signs

Trail markers
A Trail marker is designed to provide a brief message either at the start, along a trail network or at decision points, where there may be multiple path options. It aids the user to identify where to go when exploring a trail network.
Download the full LIM Signage suite Catalogue.
Technical drawings and artwork templates
Embellishment | Technical dwg/artwork template | Supplier |
 | Trail markers - Mountain bike directional - Start marker
| Council custom or Replas (or equivalent) |
 | Trail markers - Mountain bike directional - Trail wayfinding
| Council custom or Replas (or equivalent) |
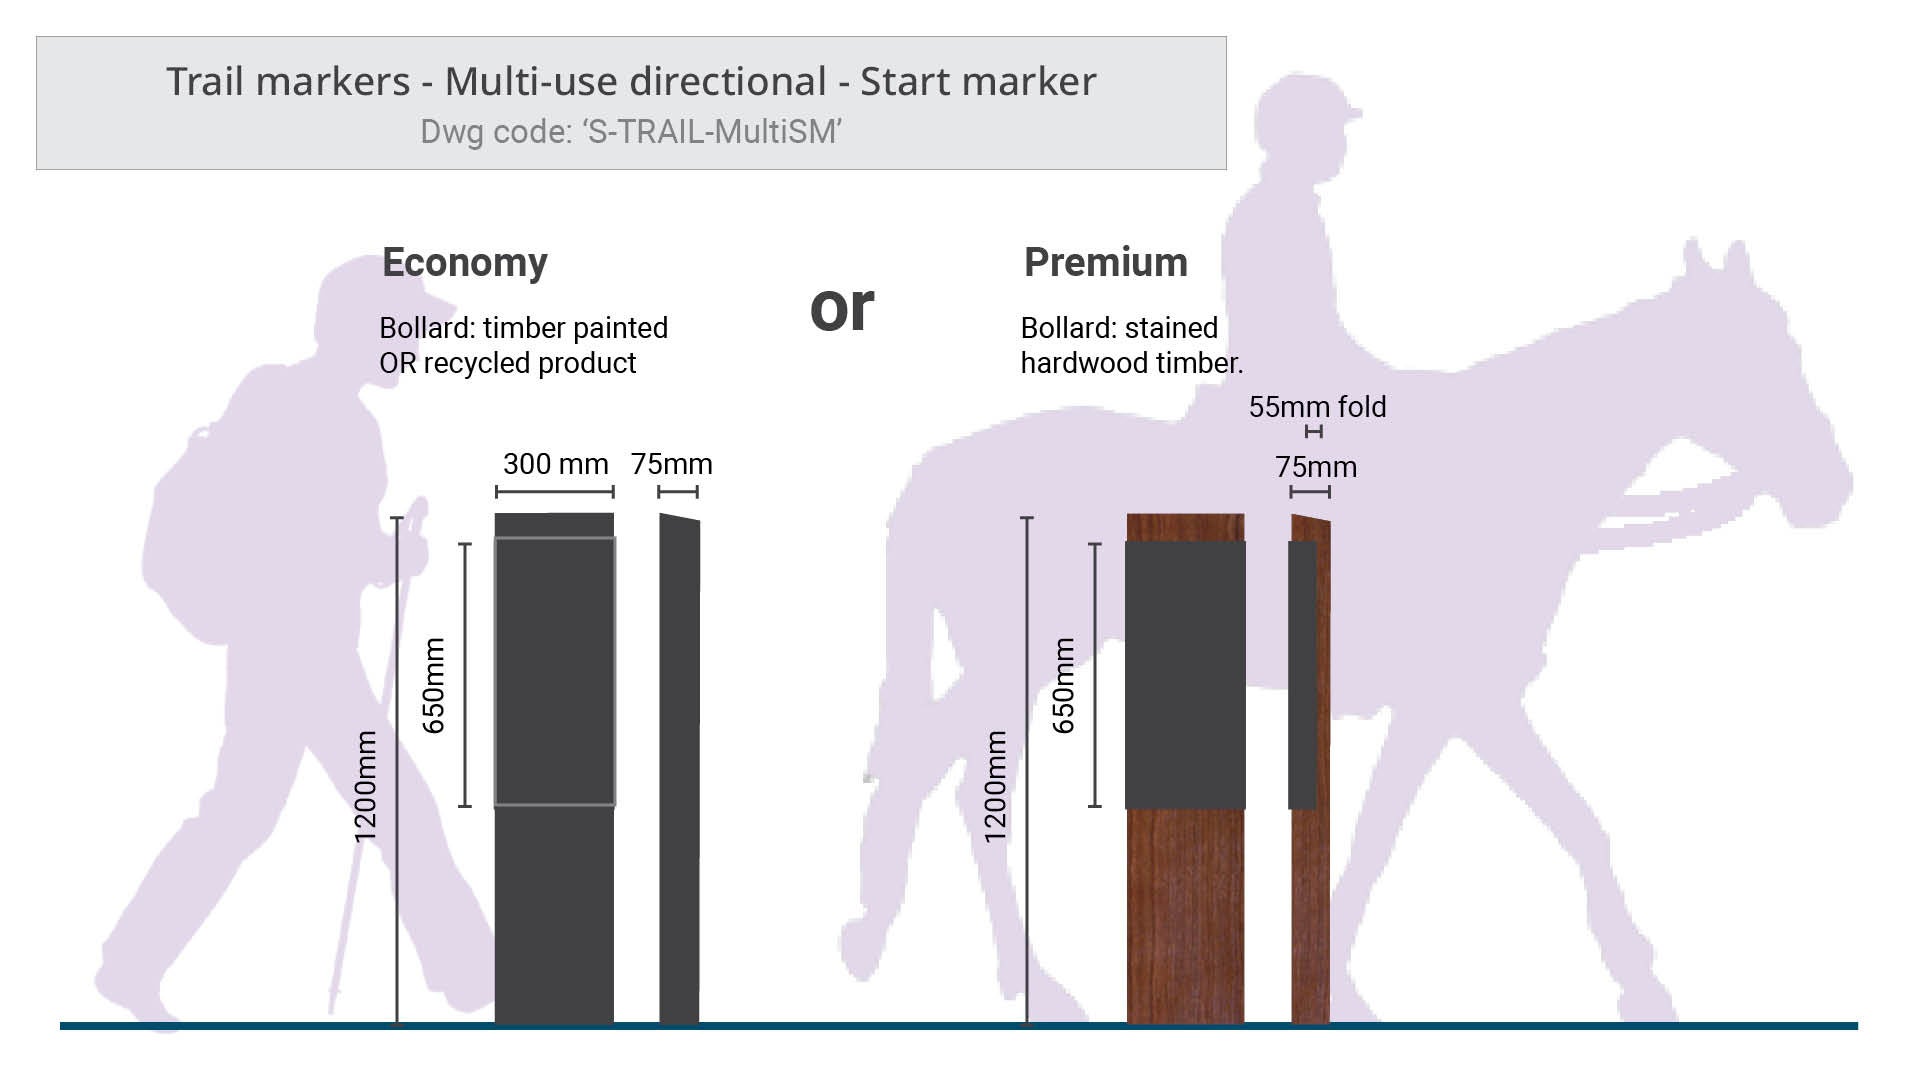 | Trail markers - Multi-use directional - Start marker
| Council custom or Replas (or equivalent) |
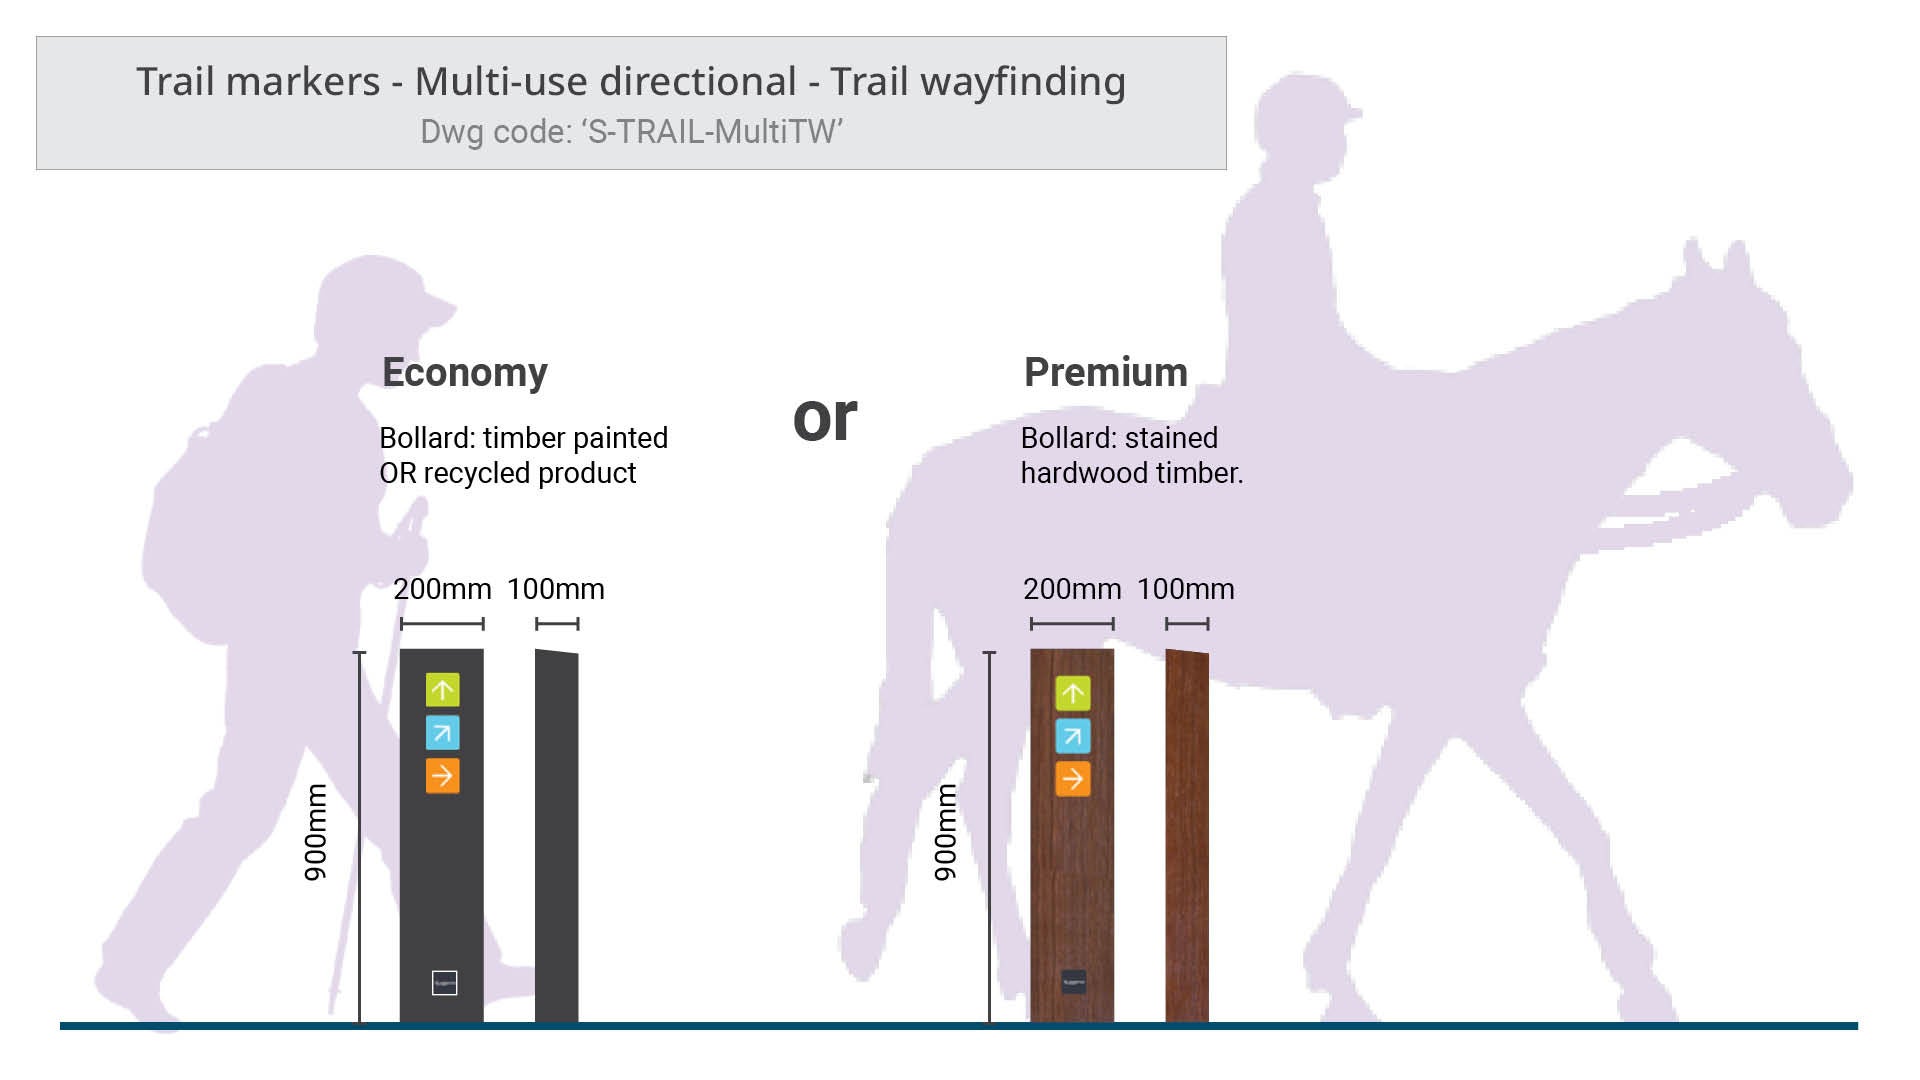 | Trail markers - Multi-use directional - Trail wayfinding
| Council custom or Replas (or equivalent) |
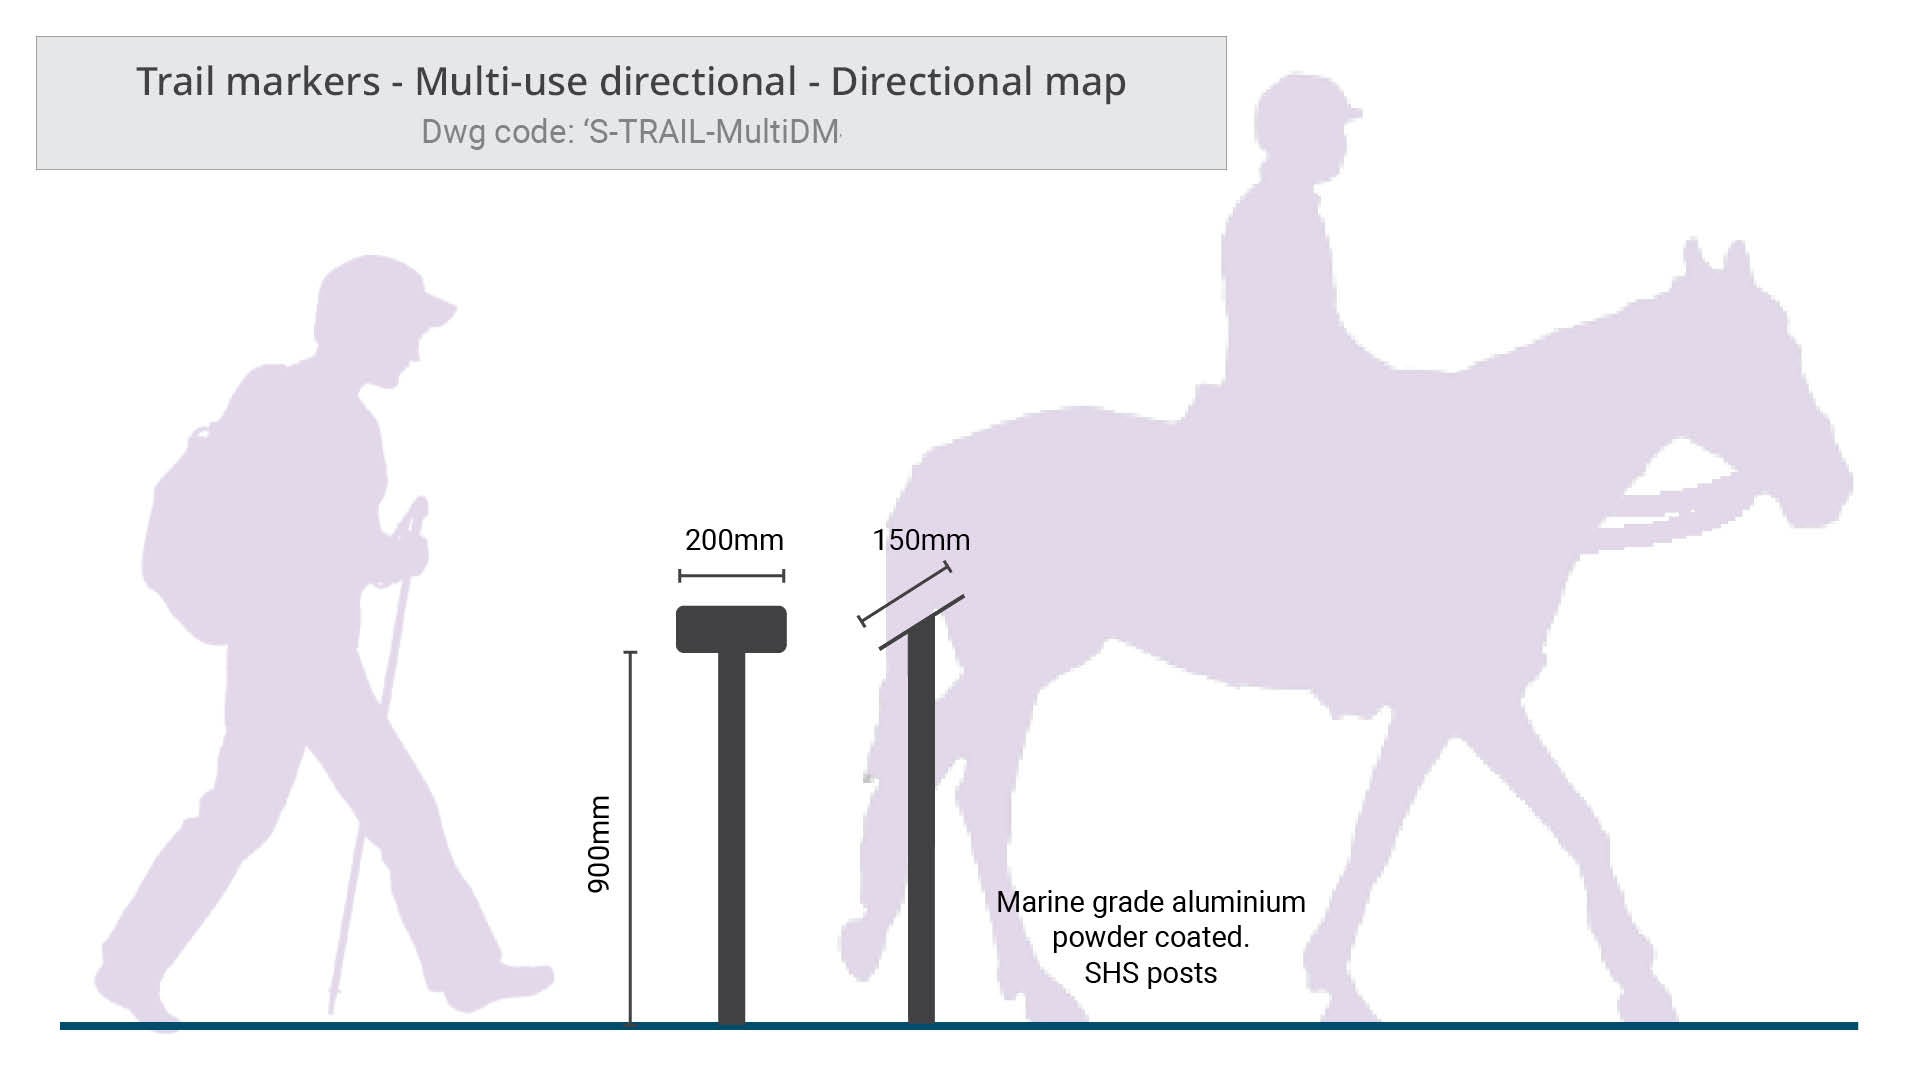 | Trail markers - Multi-use directional - Directional map
| No supplier specified |
Purpose
Trail directional markers are the next level of sign after the Map and information entry sign. The markers are used to aid in the navigation of the trail network. They may be utilised by the following types of user groups (but not limited to):
- Mountain bike riders
- Bush walkers
- Horse riders.
These markers are designed to provide a quick message at the start of the trail and at decision points along the trail.
- Decision points occur where there are multiple directions to choose between.
- The quick message marker may display directional arrows which use the designated colour displayed on the Map and information entry sign.
- Pictograms may also be displayed to depict specific aspects of a trail, such as the grade or difficulty.
The suite of directional markers includes mountain bike and multi-use trails:- Mountain bike directional
- Multi-use directional (such as walking/horse riding).
There are three types of Trail markers:
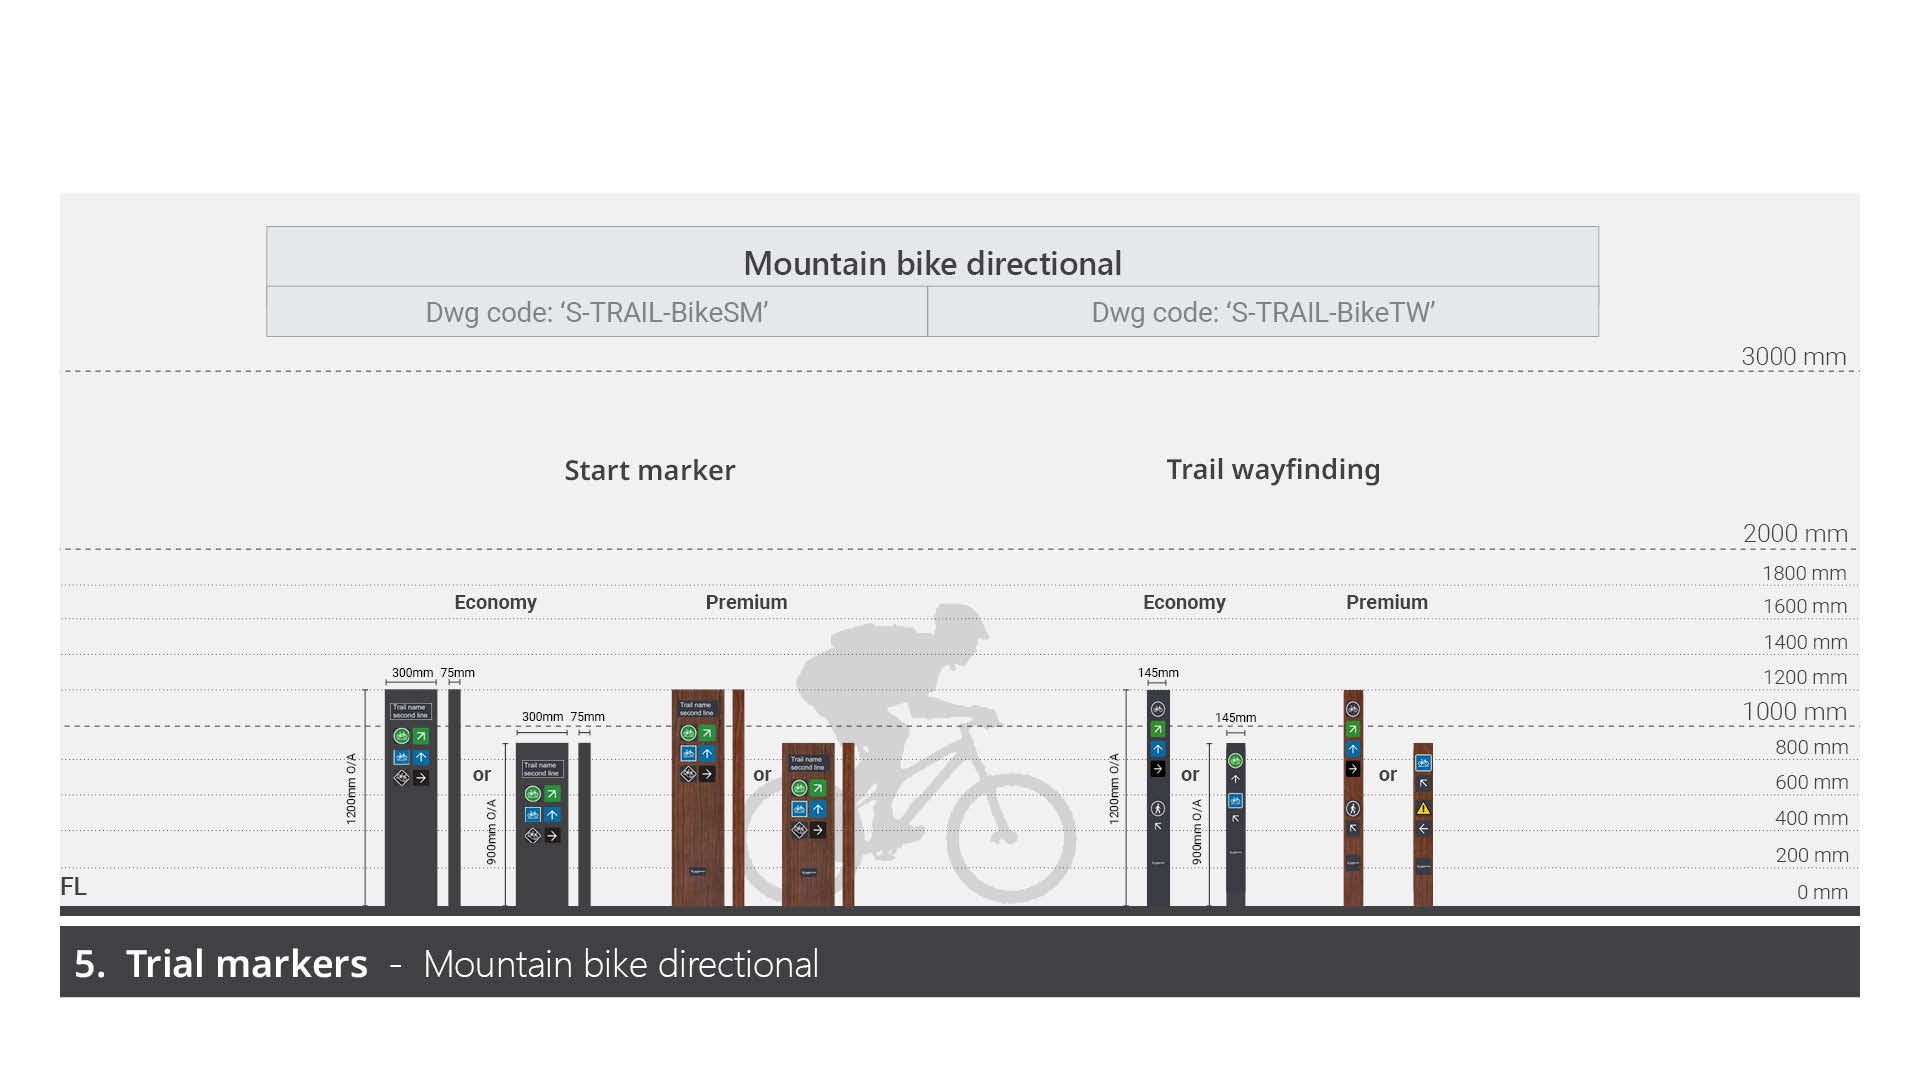
Mountain bike directional - installed to provide quick directional and trail level messaging using approved pictograms or arrows.
There are two levels of directional marker for use in the navigation of trail networks for mountain bike trails:
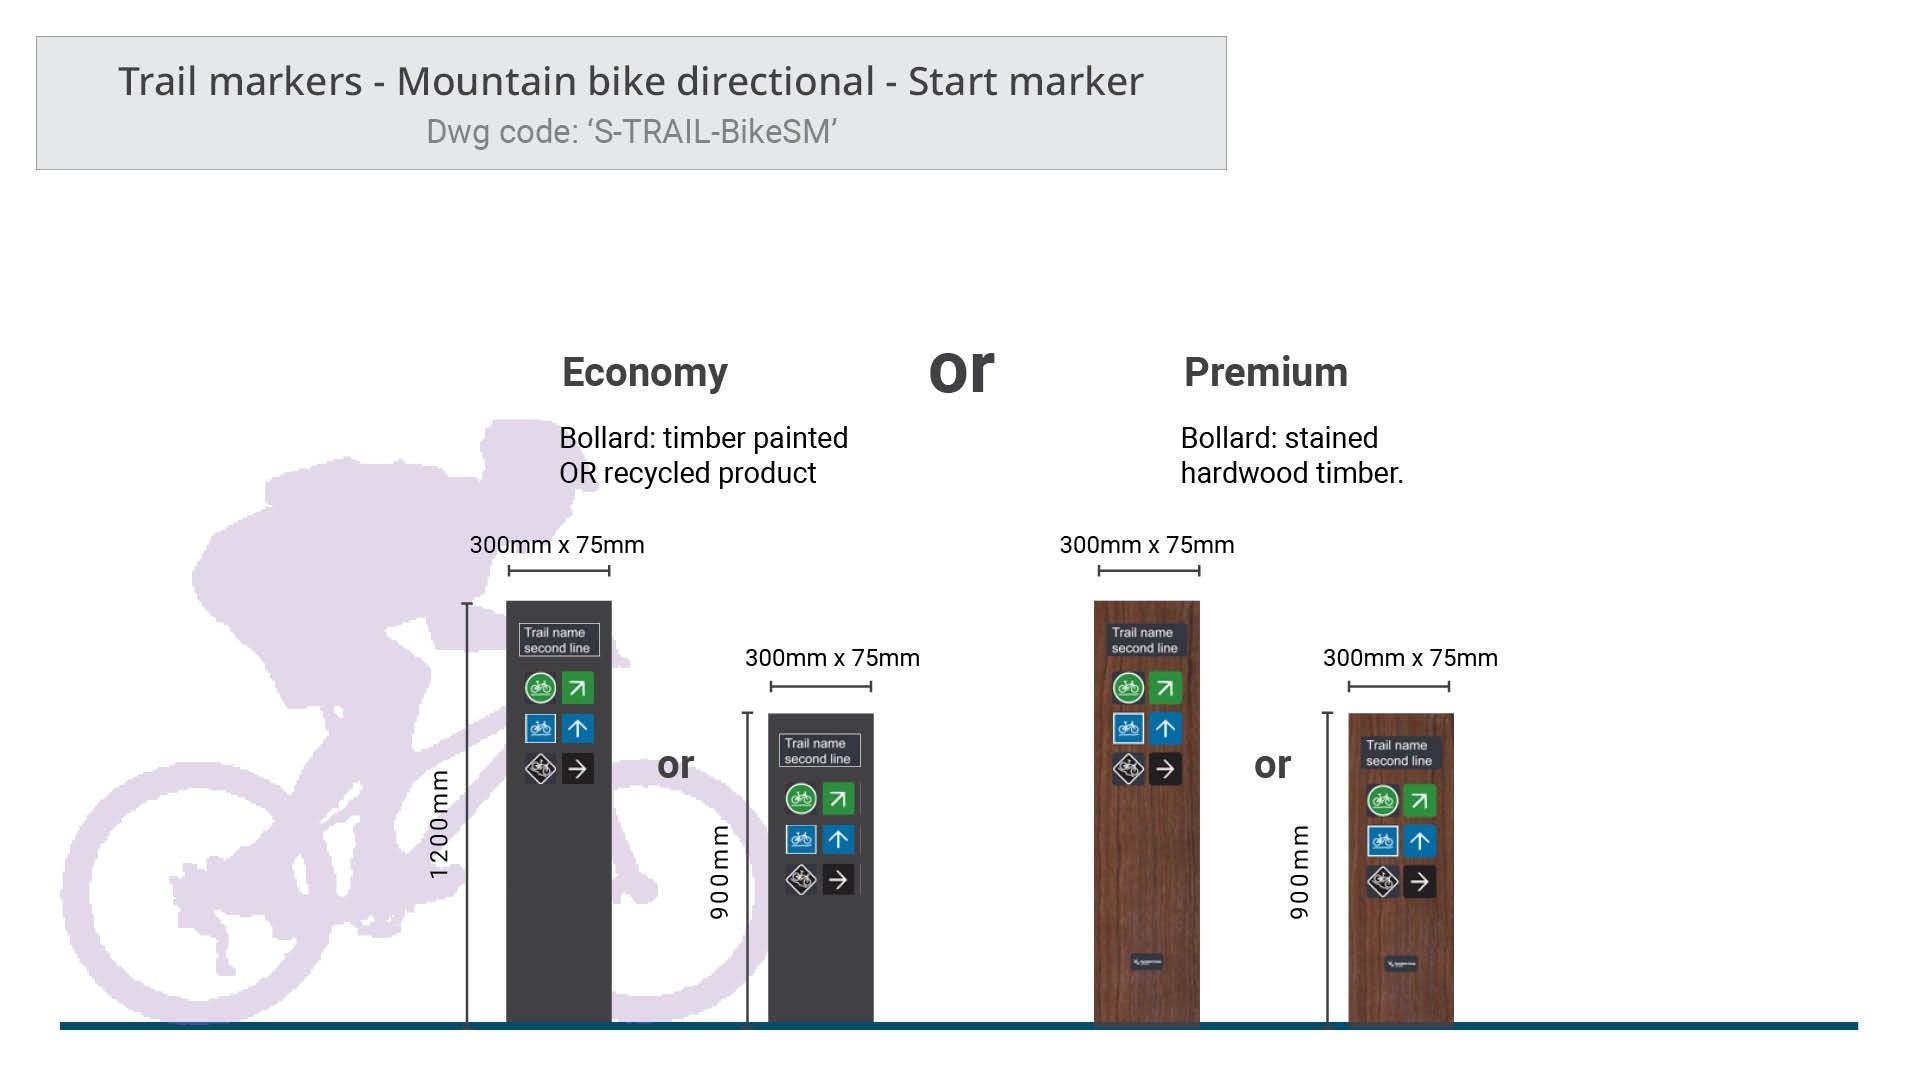
- Start markers - installed at entry/start points of a trail to mark the beginning, and on occasion, they can be installed at intersection points, where more information is required. They provide clear and concise directions to help the user to navigate and stay on the trail or to return to the trailhead.
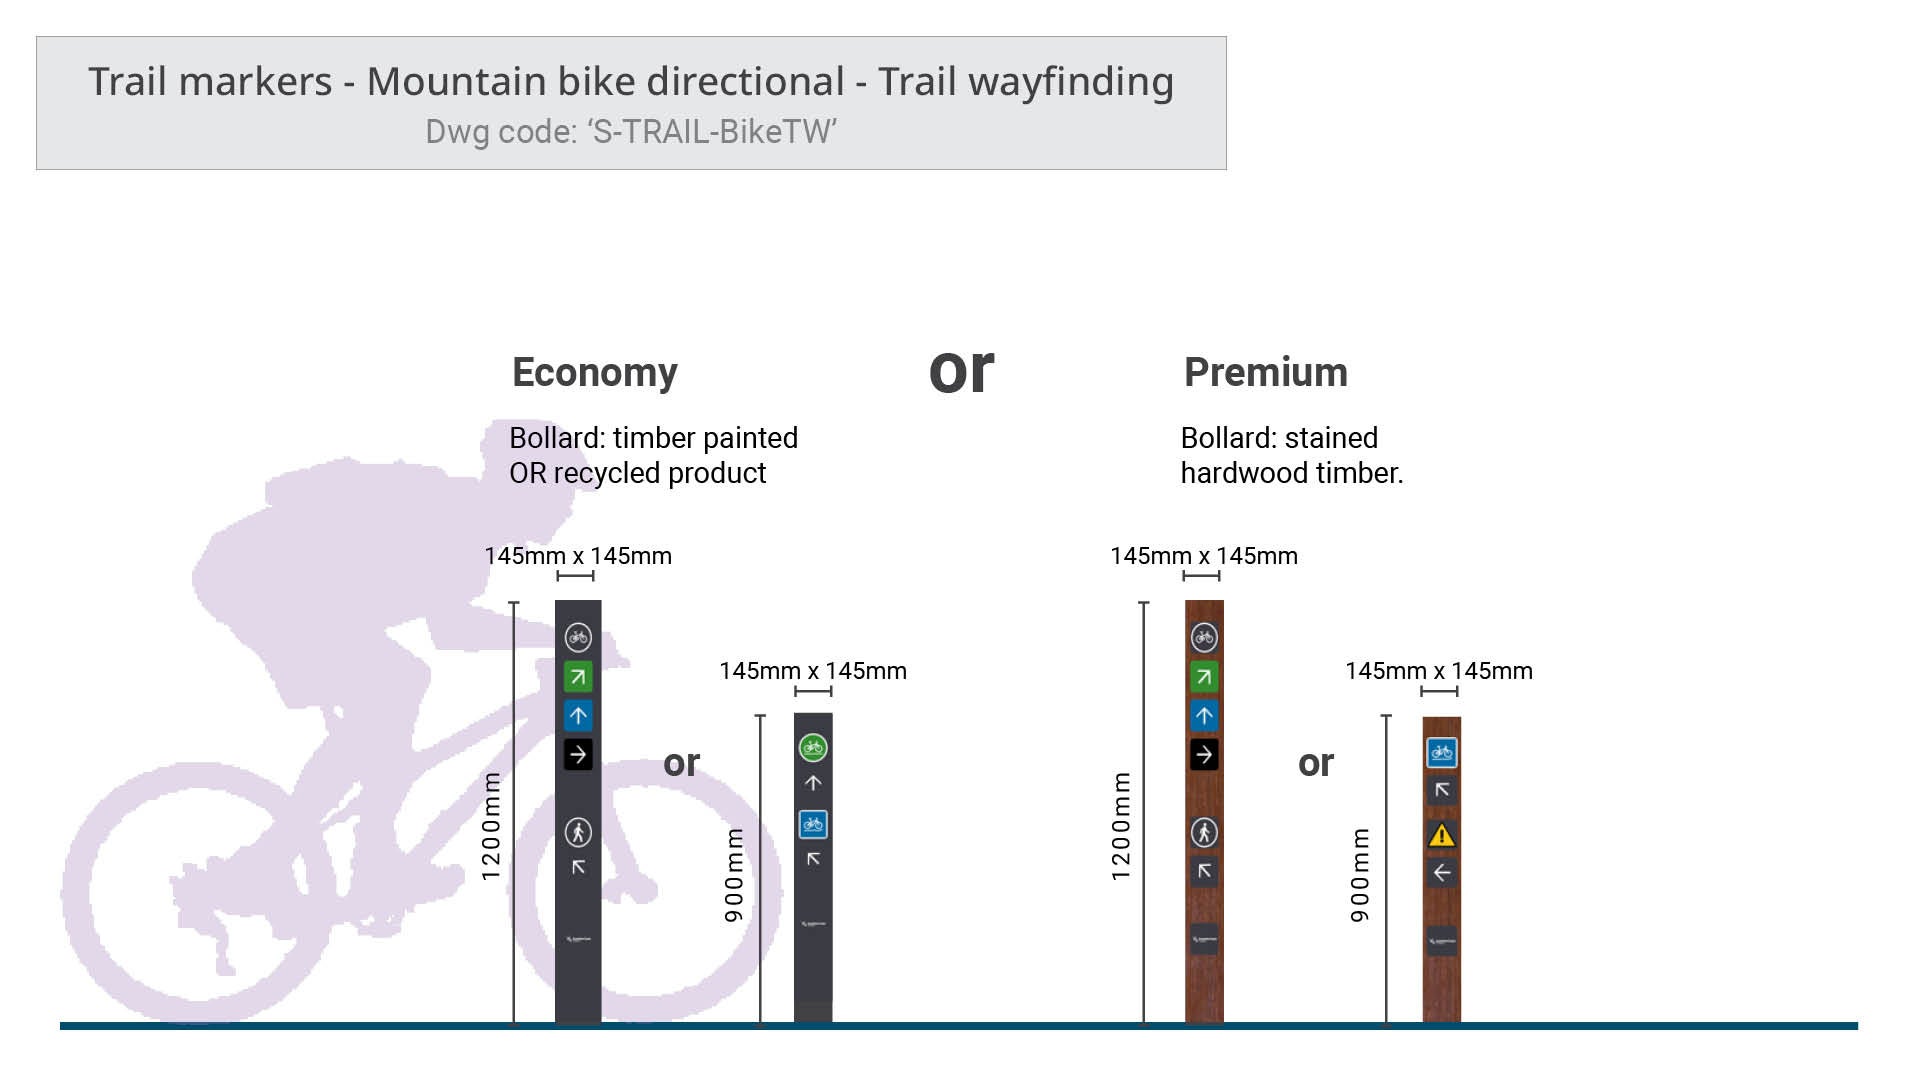
- Trail wayfinding markers – four-sided bollard signs, installed at decision points and intersection points throughout the trail. They provide clear and concise directions, where there may be multiple choices to make. They also help the user navigate and stay on the trail or to return to the trailhead.
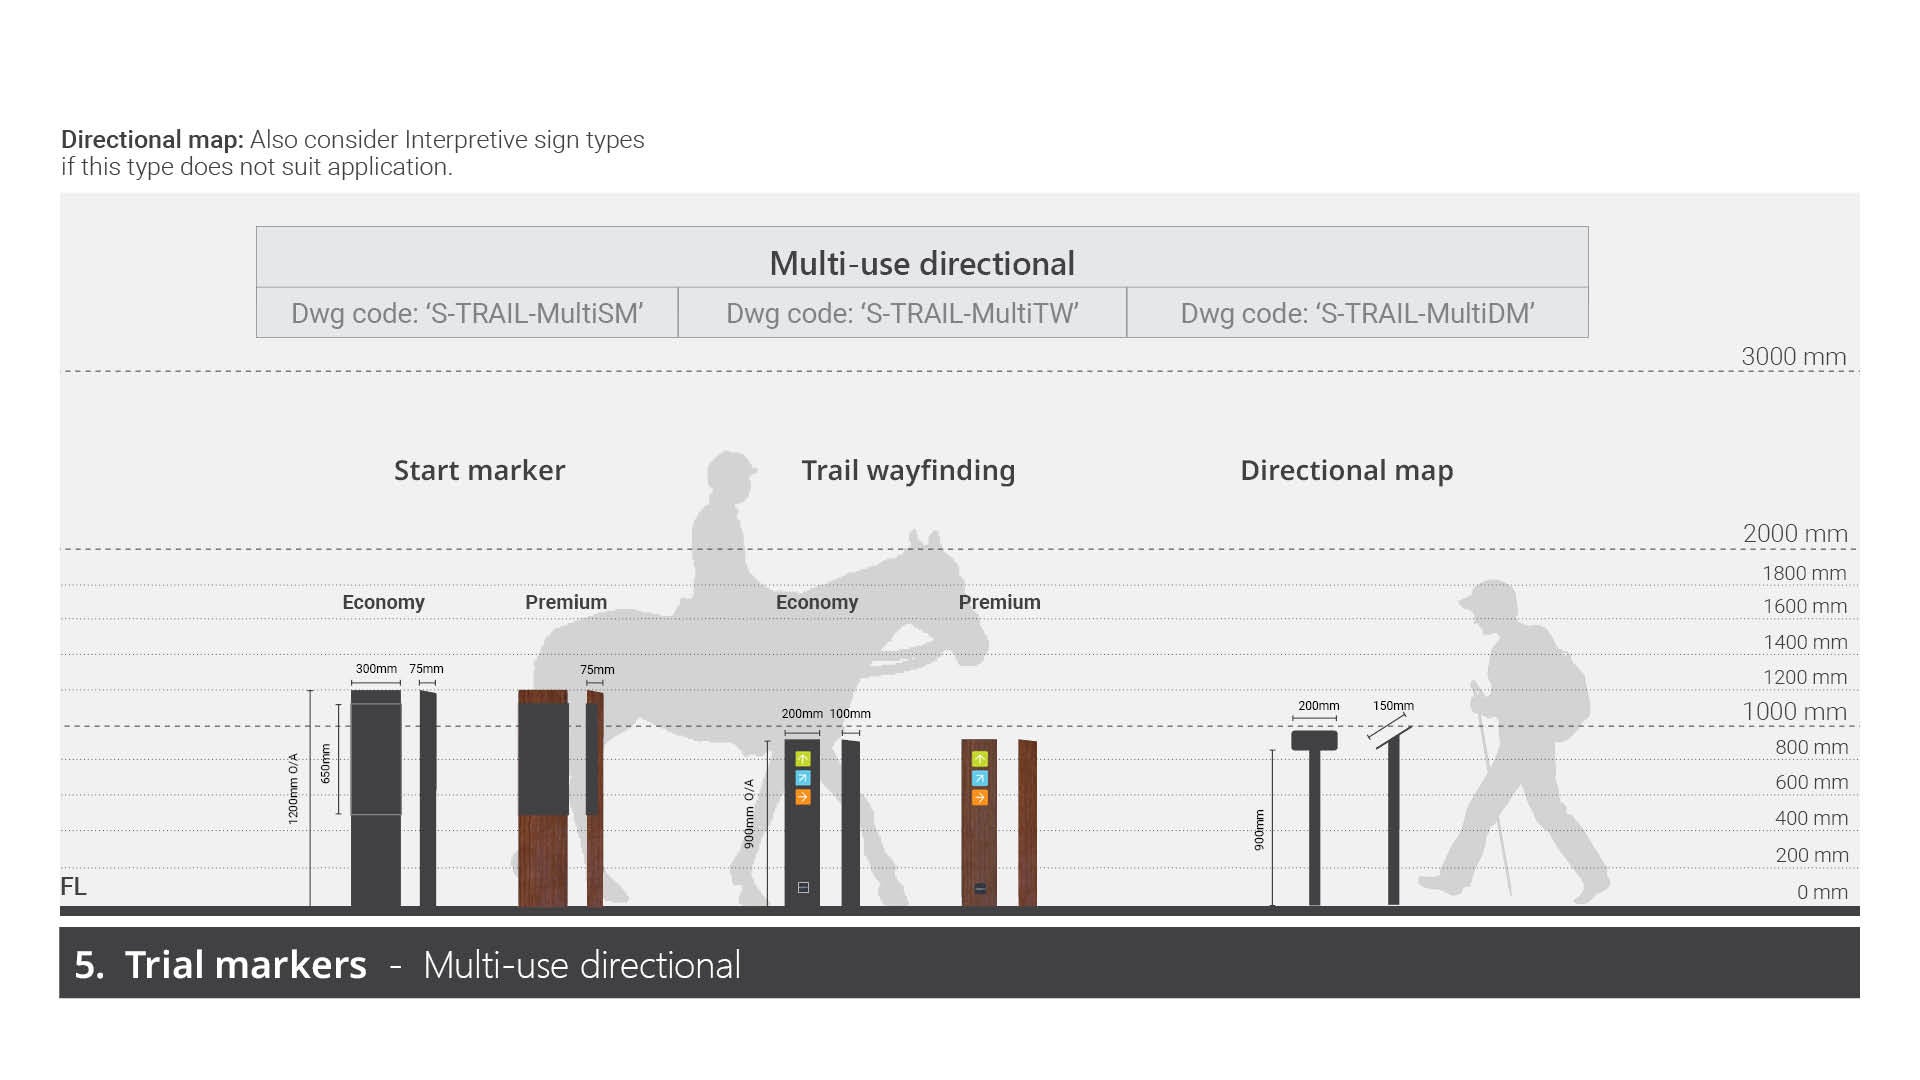
Multi-use directional - installed to provide quick directional and trail level messaging using approved pictograms or arrows.
There are three levels of directional marker for use in the navigation of trail networks for multi-use trails:
- Start markers - installed at entry/start points of a trail to mark the beginning, and on occasion, they can be installed at intersection points, where more information is required. They provide clear and concise directions to help the user to navigate and stay on the trail or to return to the trailhead.
- Trail wayfinding markers – installed at decision points and intersection points throughout the trail. They provide clear and concise directions, where there may be multiple choices to make. They also help the user navigate and stay on the trail or to return to the trailhead.
- Directional map – designed to aid in the navigation of the immediate area. Required where the a section of the trail network may be difficult to navigate without further assistance. The map provides that assistance and is designed to illustrate the trail in detail. These may be installed where ever required along the trail.
Note: Trail markers included in this suite do not contain equal access elements. Where a trail network or part there of, is deemed safe for blind persons to navigate, then Wayfinding equal access markers are to be installed at key decisions points.
In most cases the locations for the directional markers are positioned on trails that are not accessible for all users, or a vision impaired or blind person would be assisted by a sighted guide or an assistance animal (where applicable), therefore negating the requirement to provide equal access signs.
Planning
General
The following should be considered prior to the installation of a group of Trail markers:
- Where a trail contains a firm surfaced path with a defined edge (such as asphalt or compacted gravel) consider installing an equal access marker in place of a 'Start marker'. See Wayfinding equal access marker for further guidance.
- Determine the trail network use; multi-use, shared or mountain bike.
- Determine if the trail has potential for use after dark. If use after dark is a possibility, consider providing a reflective treatment or reflectors at the top of each marker. (Many mountain bike trails are used by night riders).
- Determine locations along the trail that will require additional signs – 'Trail wayfinding' (directional markers).
- Determine the total number of directional markers required.
- Determine if the trail/s will be directional or non-specific. If the trail/s are directional, it is vital that they are clearly marked to avoid high speed collisions with users e.g. mountain bike users.
- Determine the number of signs required.
- The markers must include the same style and colours that are displayed on the Map and information sign located at the beginning of the trail network.
- 'Start markers' and 'Trail wayfinding' markers may be double sided for multi directional viewing.
- 'Trail wayfinding' (directional) markers for mountain bike trails are designed as a four-sided sign. The four-sided marker is ideal, because it can provide clear messaging for multiple directions by installing only one marker.
Choosing between Economy or Premium
For consistency, the choice of Economy or Premium sign options must be implemented uniformly throughout an entire trail network.
- The Economy option has a simple overall appearance, using painted hardwood which requires little maintenance after installation or using a recycled material in place of natural timber. This option is preferred. This option may be selected for:
- Low maintenance over the life of the sign
- A simple, discrete appearance.
- The Premium option is designed to provide a superior finish, using stained hardwood. However this option requires a higher level of maintenance after installation. It is not preferred for this reason. This option may be selected for:
- High profile locations
- Increased visual impact
- A superior finish.
Design
Legal, standards and guidelines, requirements
Sign construction
- Technical drawings (DWGs) - for typical construction details for each sign type. See Technical drawings and artwork templates table (above - top of page).
- Artwork templates and samples - for approved graphic design templates and samples for alternative options (where applicable) for each sign type. See Technical drawings and artwork templates table (above - top of page).
See LIM Signage – Overarching guidelines – for Standards such as, designing for access and inclusion, traffic and road standards (where applicable).
Content and corporate branding
- Sunshine Coast Council corporate branding logo must be displayed on all signs as per Artwork templates.
- All colours must be selected from the Council corporate colour palette or otherwise approved for specific purpose. e.g. some colours, such as red, yellow and black, (not part of the corporate palette) may be used for regulatory purposes.
See LIM Signage – Graphic design guidelines – for essential guidance on components that make up signs. e.g. colour application, pictogram integration, text sizing and spacing, map implementation etc.
- Mountain bike use markers must include the approved International Mountain Bike Association (IMBA) degree of difficulty pictograms in conjunction with directional arrows or numbers.
- See Managing Mountain Biking – IMBA's Guide to Providing Great Riding for further guidance.
- All signs must be used sparingly throughout any site and permissions must be granted prior to installation. Overuse will result in a cluttered environment and a negative visual impact.
Content general
- All sign artwork is to be professionally designed (by a qualified graphic designer or equivalent) as vector files.
- Sign content must be accurately researched and approved by council asset custodian prior to print.
- The name of the site (e.g. environmental reserve) and street address must be clearly displayed at the top of each sign. This information could be vital in emergencies, (this only applies to 'Start markers' for multi-use).
- Site name and spelling must be checked against Council records to ensure accuracy.
- All regulatory pictograms must be approved by Council (Community Response) prior to printing.
- Positive pictograms are preferred, to encourage the user to accept the message.
- Positive signage is encouraged. Regulatory pictograms must only be used where there may be a reoccurring problem/s.
- Corporate branding banner.
Note: Consider positioning reflectors on each Trail wayfinding marker for Mountain Bike trails (both sides) to alert users. Due to the high speed environment, objects may appear suddenly. The reflectors will aid to alter the rider.
Detailed content design
Directional marker locations positioning throughout the site will depend upon:
- Trail classification.
- Definition and continuity of trail network.
- Local site conditions such as; vegetation cover, topography and weather.
Consider the following prior to installation:
- To avoid potential injury from sharp edges or protruding nails or screws, directional markers should not be fixed (where possible), in positions likely to be used as handholds.
- The recommended height for placement of a marker is 0-2.0 m above the finished ground level, depending upon the local conditions (such as terrain and seasonal variations.
- Consistency of height is recommended (where possible). Heights for markers used for mountain bike trails are:
- 1200 mm (preferred)
- 900 mm.
- 'Trail wayfinding' markers may have a reflective finish to assist users in identifying the trail at night or in low visibility conditions (site specific).
- Comply with AS/NZS 1906.1:2017 Retroreflective materials and devices for road control purposes - Retroreflective sheeting.
- Also see LIM Signage – Overarching guidelines – Materials, fixings and finishes, for further guidance to consider the application of a high intensity prismatic grade reflective sheeting.
- Directional markers within this suite are short message signs and are designed for use on trails that are not recommended for people with vision impairment (VIP). Therefore the optimum viewing height of between 1.2 m – 1.7 m from the finished surface level does not have to apply, but is preferred.
- See Wayfinding equal access marker for further guidance for trails that are deemed safe and accessible for VIP use.
- The 'Trail wayfinding' (directional) marker for mountain bike trail use, is a four sided bollard. This enables the use of one marker to clearly display multiple directions at a decision point/intersection.
- Where trail use changes between trails within a network, a 'Trail wayfinding' marker must clearly indicate the change of activity using approved pictograms.
Specific use content
Mountain bike use
All Start markers must include the following:
- Trail network name.
- Double stacked approved pictograms and directional arrow plates. (May display up to four trails).
- Each trail is to include an International Mountain Bike Association (IMBA) approved difficulty rating pictogram.
- A directional arrow (background colour equivalent to IMBA pictogram colour) must sit beside each IMBA pictogram.
- Corporate branding banner
- Council logo plate.
All Trail wayfinding (directional) markers must include the following:
- Single stacked pictograms and directional arrow plates.
- Each trail is to include an International Mountain Bike Association (IMBA) approved difficulty rating pictogram.
- Other trail uses, if applicable such as walking, (use Council approved pictograms) may also be included.
- Corresponding trail direction plate must be positioned directly below trail pictogram plate. Display directional arrows with background colour equivalent to IMBA pictograms, or those colours shown on the Map and information sign (trailhead entry sign).
Multi-use (such as, walking/horse riding)
All Start markers must include the following:
- Reserve network name.
- Up to five trails -
- each trail displaying the trail name accompanied with a directional arrow OR
- each trail displaying a grade rating pictogram accompanied with a directional arrow.
- Council approved regulatory pictograms – may be positioned on far right of trail name (optional).
- Activity pictogram/s are to be located to the top far right of the reserve name, for quick identification of the reserve approved uses, such as a a person on a horse pictogram to identity a horse trail.
- Corporate branding banner
- Council logo.
All Trail wayfinding (directional) markers must include the following information:
- Single stacked directional arrow plates.
- Maximum 5, preferred 3.
- Background colour must match corresponding trail colour identified on Map/information sign (trailhead entry sign) located at the beginning of the trail network.
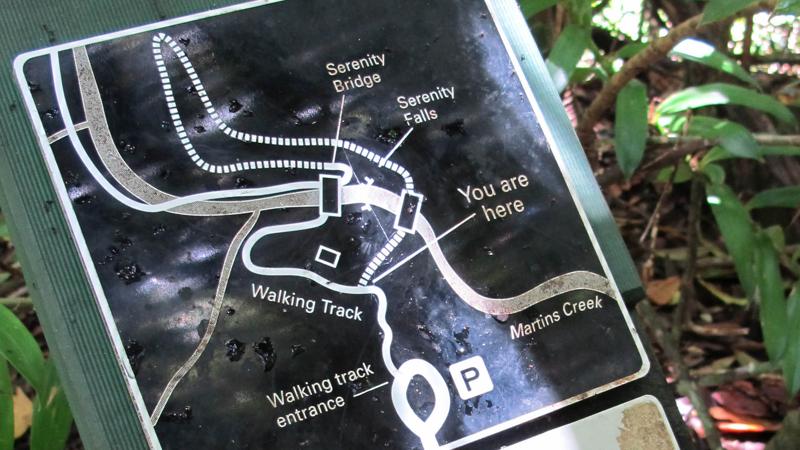
All Directional maps must include the following information:
- Trail name
- Body content text:
- Map
- Reserve attractions/destinations.
- ‘you are here’ icon. The icon (which must be a stand out element, usually achieved by the use of a strong colour).
- North point/scale bar.
- Street names/landmark attractions to aid in navigation) in the area such as, waterfall, beach, car park.
- Map
- Council approved regulatory pictograms.
- A single directional arrow to be located to the top far right of the trail name, for quick identification of the direction of travel.
- Corporate branding banner
- Council logo.
- The map must incorporate the same style and colours displayed on the Map and information sign (trailhead entry sign) located at the beginning of the trail network.
Positioning
General
- When considering potential sign locations, avoid positions where the sign may interrupt or block a prominent view. Signs should be secondary to a natural view. However, safety is paramount.
- To ensure a sign panel will not be obscured in future, consider mature size of surrounding vegetation.
- To protect trees from potential damage, all signs should be installed outside of their canopy areas (drip lines). Where this is not possible, the Project Arborist should be contacted to provide advice. See LIM Site set up (including Tree protection) for further guidance.
- If a pathway is less than 2.0 m wide, an additional slab or compacted surface treatment is required when a sign is installed. This provides an area for reading the content of the sign while not obstructing the path of travel. (Required for longer message signs).
- For new paths, a coloured textured treatment is recommended to form the sign slab and must extend the full width of the continuous accessible path. This treatment creates a visual and physical cue to an accessible sign location. (Required for longer message signs).
- Where there is an existing or new pathway, all signs must meet Austroads minimum 500 mm safety offset from any path edge, to avoid collision with the sign while using the pathway.
- Position signs a minimum of 200 mm in from any slab or compacted surface edge for mowing offsets (where applicable) and visual appearance.
- Allowance for deck mowers (where applicable) – 2.5 m clear area around embellishments (where possible) and avoid creating small, difficult to mow areas.
- Most directional markers will not require a slab or compacted treatment surface base. These markers are quick message signs, requiring little time to stop and read.
- Mountain bike trails may require markers at regular intervals determined by the speed and type of the terrain.
- All 'Start markers' should be located within view of a Map and information sign (trailhead entry sign). This will encourage the user to begin the trail network.
- Trail directional markers should be attached to structural elements (bollard) or suitable physical features along the trail (not preferred, such as large tree trunk).
- To ensure a Trail wayfinding marker does not get lost in the landscape, consider the following:
- Locate the marker in front of a mature tree trunk will provide a solid background increasing the visibility of the marker.
- Retain clear lines of site to a marker, whilst having regard for environmental considerations.
- Where possible, all markers should face the trail users path of travel and be installed at a consistent height.
- Markers are usually located on the left side of the route for trails that are looped.
- Where a trail is two-way, the marker is required to be bi-directional, meaning that two to four sides may be utilised.
- The speed at which a trail is travelled is an important element in determining an appropriate distance between each marker. A mountain bike track will result in higher speeds than a walking track.
Additional requirements
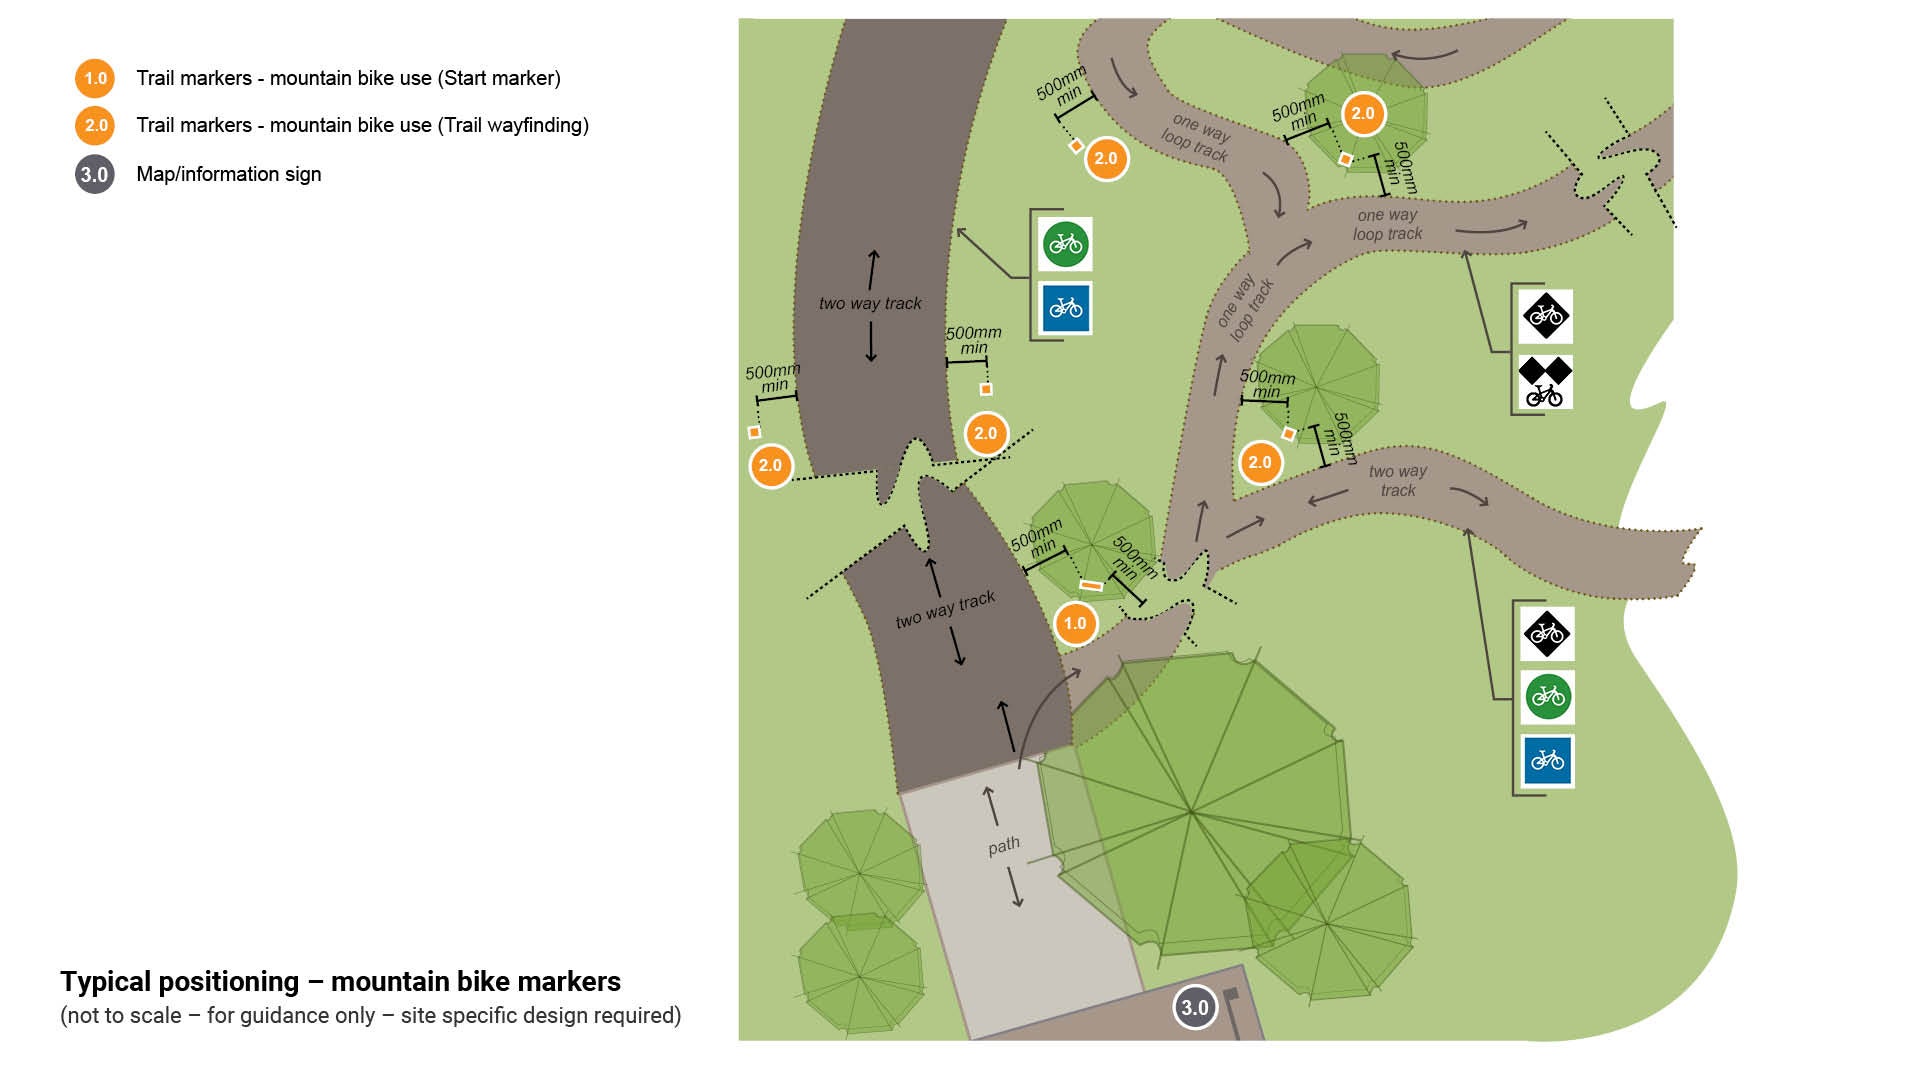
Mountain bike markers
- Determine if the trail is one way or two way. Position markers to suit.
- Marker position should consider the flow of the trail and likely speed. They should not be placed where a rider could potentially collide with a marker.
- Place markers, so they do not encroach onto the trail at the bottom of a downhill descent or where the trail changes direction (corners).
- Ensure cyclist vision is not distracted by poorly positioned markers. Such as, if a marker is positioned where there are objects for the rider to hurdle, two things may occur:
- The marker is not seen and the rider successfully navigates around or over the hurdles OR
- The marker is seen and the objects the rider must navigate are not be seen due to rider reading the poorly placed directional marker, resulting in an avoidable collision for the rider.
See Figure 13: Typical positioning – mountain bike markers.
Figure 13: Typical positioning – mountain bike markers
Self-guided trail markers
- It is recommended that between five and 15 points of interest or stops are marked along a self guided trail. This will ensure the trail user is kept engaged during the experience.
- The trail markers will ensure that the majority of users remain on the trail provided.
- For a trail 2.0 km in length, it is recommended that markers be provided at average spacings of 100 m to 300 m.
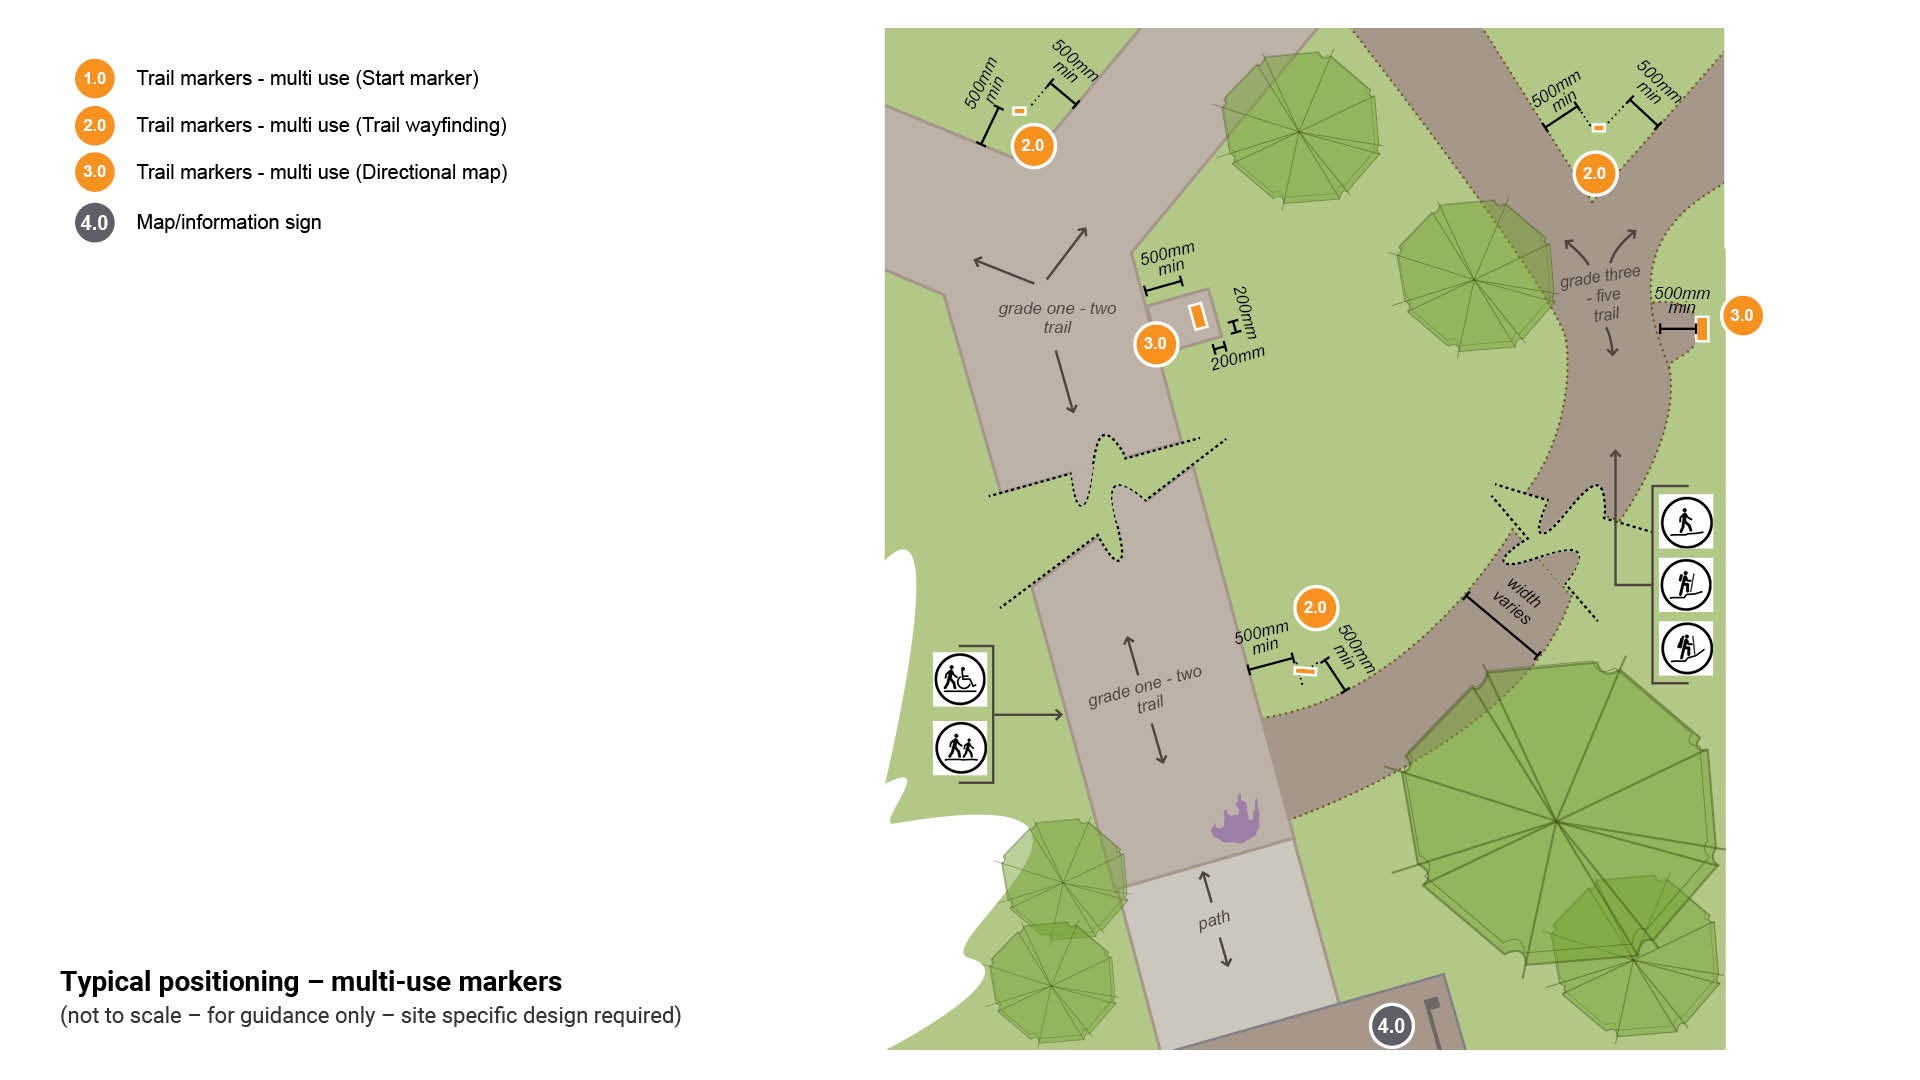
See Figure 14: Typical positioning – multi-use markers.
Nature-based and horse trail markers
- Less signs are required due to the focus of the trail. The focus is predominantly on the activity and or viewing the natural scenery.
- Install markers to guide nature trail users and horse trail users of the following:
- to stay on a trail
- where there is a change of trail direction
- at a decision point
- where the trail is unclear, such as a bridle trail along an unsealed road
- where a trail crosses a sealed road.
See Figure 14: Typical positioning – multi-use markers.
Figure 14: Typical positioning – multi-use markers
Delivery
For all developer delivered assets, contact Council (Development Services) – this includes all works associated with any development application.
For all council delivered assets, the following process should be used:
Site investigations
- Confirm council land tenure and approval process.
- Identify sign location.
- Identify physical/technical constraints.
- Obtain arborist advice (where required).
Community engagement/stakeholders
- Where applicable.
Corporate liaison and approvals
See the Technical drawings and artwork templates table in each sign type page for guidance - How to place an artwork order (internal use only) and Artwork design instructions (internal use only).
- Council (Parks and Gardens) and or Council (Environmental Operations).
- initial approval for use/application of sign.
- approval and guidance of artwork content.
- approval to manufacture signs.
- approval of location of signs.
- Council (Community Response)
- approval of any regulatory signage/componentry.
- Council (Communication)
- editing of templates
- supply of proofs for approval
- approval of corporate branding.
Deliverables
- Site plan – for sign installation.
- Technical drawings (DWGs) – sign construction details.
- Schedule of signs.
Manufacture
See the Technical drawings and artwork templates table in each sign type page for guidance - How to place an artwork order (internal use only) and Artwork design instructions (internal use only).
- In-house manufacture – Council (Transport Network Operations) - Civil Operations (Signs Technical Officer).
OR
- External manufacture – select a suitable sign fabricator.
Installation
- All relevant key stakeholders are to be notified (including contractors), and where required, attend a pre-start meeting.
- Sign location as per approved site plan.
- Installation as per technical drawings and schedule.
Finalisation
- Assets captured.
- As designed as constructed drawings (ADAC) supplied.
- Hand over to asset custodian.
This component is currently in development